Sunday, November 25, 2012

Searching for Santa!

As it gets closer and closer to Christmas, you may be hearing more and more about SANTA! That means that it's time to make plans to search for Santa in the night sky!

Take a cardboard tube and help your child wrap it in a festive color of construction paper. Glue or tape in place. Then, your child can get creative with how to decorate this hand-made telescope - with some festive touches! Set out paper pieces, foam decorations, glitter or stickers of their choice to personalize it - it's now a Santascope!

Attach a little printed note like this:

"On Christmas Eve when Santa
Goes flying through the night,
Look for his sleigh and reindeer -
What a wonderful sight!"

Your child can search the sky for the Jolly Old Elf right before bedtime .... maybe they'll catch a glimpse!

*******************************************************************************

Make a Rudolph ornament while waiting for Christmas to get here!

You'll need some craft sticks and sheets of foam (tan and white), two googly eyes and a red nose made from a pompom or another piece of foam, red this time. First, glue two craft sticks in a V pattern and then use another to go stright across, about a half-inch below the tops of the other sticks. To complete the antlers, add two more craft sticks in a wider V.  Finally, add the foam pieces: a large piece of tan for the face, small piece of white for the forehead, two tiny ears - then add the nose and eyes.
Add a little string or ribbon and Rudolph is ready to hang around and help you decorate!

Have fun!


Wednesday, November 7, 2012

Books to Love: "The Great Gracie Chase" by Cynthia Rylant

"The Great Gracie Chase: Stop That Dog!" written by Cynthia Rylant and illustrated by Mark Teague is a wonderful book for kids of all ages. Your little ones will fall in love with Gracie, an adorable, good dog who loves living in her quiet house. Then, her life gets disrupted by some painters and Gracie decides to leave, beginning a chain reaction of people who follow her to get her back home.

Well-written books can be so much fun to read - sometimes, again and again! Action-packed books like "The Great Gracie Chase," filled with great images and descriptive language, make it so easy for children to visualize the characters and action taking place.


Kids will love the bright pictures and funny portraits of the various characters who join in the chase. Try some of these activities:

  • After reading, try to recall the order of the appearance of the various characters and record them in a list - see how many you can get before checking back in the book.

  • Talk about the parts of the story - the beginning, the middle, the end - and about how the chase keeps building, adding people and then narrowing down to the end, like a cycle.

  • Children can draw their favorite parts for retelling. Introduce transition words like first, next, then and finally, to help them put their stories in order.

  • Trace a black and white picture of Gracie for little ones to color and make into a Gracie puppet, attaching a craft stick for a handle. 

Have fun with it!

Monday, November 5, 2012

Make a Thankful Book


Make a "Thankful" book, just in time for Thanksgiving!

Choose whether you want it to be a book of "Things" or a book of "People," then get started with an easy template of "I am thankful for ..." pages. 


If you decide on an "I am Thankful for People" book, help your child come up with a list of important people, like friends, cousins, grandparents, etc. Then, your child can take, find or draw pictures to assemble into a little book. Don't forget to complete it with labels or captions about each picture.

To make a "Thankful" book of Things, use the same idea, generate a list and add pictures ... I'll bet some favorite toys, pastimes and special things would make a nice book that your child would love to "read" again and again!

A book of their own will be a great resource for your child who is just starting to ask about names of important people in his/her life or how to write something like "legos," "animals" or "books." Use it as a resource for learning the spelling of loved ones' names and as a writing tool for early writers.

Super simple and super fun!

Have fun - and, be thankful!

Monday, October 22, 2012

Pumpkin Fun!

Pumpkin season is a fun time for art projects! You can make sponge print pumpkins, paper scrap pumpkins, even paint some paper bag 3-D pumpkins. Your little ones love to make projects using crayons, markers, etc.

Here's something else to try - a felt play kit!!


You will need a shoebox, some felt pieces, scissors and glue ... and your imagination! Line the inside of the shoe box lid with a rectangle of colored felt. This will be the background for any scenes your child puts together. For a "Five Little Pumpkins" scene, cut some long, skinny pieces and some shorter pieces out of a dark colored felt to form a fence. Then perch your little orange pumpkins all along the fence and take them off one-at-a-time to the tune of:

Five little pumpkins sitting on a gate
The first one said, "Oh my, it's getting late!"
The second one said, "There are witches in the air!"
The third one said "But I don't care!"
The fourth one said, "Let's run, run, run!"
The fifth one said, "Let's have some fun!"
Then .... whoosh went the wind and OUT went the light,
And five little pumpkins rolled out of sight!

Your child will love the flexibility of the fabric and how the felt  pieces cling to the background ... and you can play with it over and over! Keep your kit around long after pumpkin season and fill it with different shapes - you and your child can come up with many uses for this play set! Use it for story telling, language development, patterns, etc.

Have fun!

Thursday, October 18, 2012

Books to Love: "The Dot"

The first time I read "The Dot," by Peter Reynolds, it felt magical ... and I was reading it by myself in the bookstore.

The first time I read it aloud in a classroom, the magic was apparent - every child was listening raptly with such intent expressions! I LOVE this book!


Children will identify with the character and become empowered themselves as the story unfolds ... every child has a little bit of the main character, Vashti, inside. Anyone who has ever hesitated to put themselves out there, or who thinks "I can't do that!," should get a copy.

When Vashti thinks she can't paint, she is encouraged by a teacher to start with just a dot ... and to sign it. That starts the ball rolling and Vashti's confidence and self-worth grows and grows. The ending is particularly touching.

Every time I read it, a few children chime in at the ending - they just know what it will say. This is a great book to use for a child who has a hard time getting started, someone who's not sure of themselves or their skills.

Extend the book with an art project ... have your child choose a simple shape or object to explore and provide them with open-ended art supplies - see what happens! Maybe you will have a beautiful gallery of squares or triangles ... make sure your artist signs their work!

For more art extension  ideas, check out the author/artist's website: http://www.peterhreynolds.com/dot/dot_activities.html

Have fun!

Monday, July 23, 2012

Summer Olympics Fun!


There are so many fun ideas to play with that are Olympics-related and that will inspire excitement in your children!!

Start with checking out all the internet action already going on to get them aquainted with what sports and athletes they might be interested in. Check out the live feed from www.nbcolympics.com or get lots of info at www.olympic.org ! Google "Olympics" for more sites ...

Then ... do some training and competition! It is so important for children to have lots of exercise and physical movement - get out there and make it happen! It's easy to put together a simple program of activities using items you may already have around the house or classroom.

See what you can come up with ... when we did the Winter Olympics, we set up a card for each  "competitor," with different stations for "events" like sock skating and olympic ring toss (hula hoops and bean bags!). If you do a few games or exercises each day, you can stretch it out over a few days or a week - culminating in a Closing Ceremony of your choice!

Crafts can be simple:

For olympic rings, you'll need paper, paint (representing each of the five colors) and small paper cups! Hold the cups upside down, dip in paint and print circles galore!


For a related art project, make Olympic torches! Trace children's hands on flame-colored tissue paper - red, orange, yellow - one set of each if you can! Wrap a paper roll with black paper or have them paint them black and then attach the hands to the top - now you have Olympic torches!


Make some hand-made medals together, going over the five colors of the rings - every country participating, at the time the logo was developed, had at least one of these colors in its flag! The five rings represent the five continents (North and South America were considered together at the time, Europe, Africa, Asia and "Oceania") of the world - and the fact that they are all joined together for "unity" - kids understand that concept!


I like to finish off with individual photos of my Olympic athletes, standing in front of a flag, wearing their hard-earned medals - and huge smiles! They make a great keepsake - and, who knows, maybe it will be part of their own Olympic profile someday! :)

(Parts of this post are adapted from previous posts on the Olympics - I wanted to get it all together :)

Have fun!!

Monday, June 25, 2012

Water Play!

Water is so much fun to play with - and a great learning tool, too!! It can be a fun mess, though, so summertime is a great time to do it, if you're worried about getting your floors, tables, clothes wet! Just take it all outside!


You do not need a fancy water table (although there are some great ones out there!) or a great amount of water. I've done these activities with a small basin of water, in sinks, or in little blow-up baby pools in the yard. You can do it with one child or a few, just watch, as always, for safety around water!

Here are my Top 5 Water Play activities:

1. Sink or Float: Gather up, with your child, a variety of objects that can get wet. They can be kitchen utensils, blocks, toys, fabric, sponges, .... anyything you have on hand! Your child can experiment with how these things interact with water ... Do they sink? Do they float? Do they expand and take on water? There are so many things your child can learn from this type of play, as well as having fun while doing it! Children will be observing, interacting, making connections - scientists at work!

2. Measure Up: Make available some containers - save yogurt, milk, margarine containers - and some measuring cups or small pitchers. Anything that will hold and pour water will do. Let your children discover how to fill containers using other containers and encourage them to see differences in size - "Look, it took you two scoops with the yogurt container to fill the margarine tub!" Watch as they count and size containers, determining smallest and largest, less and more, and be sure to name those concepts for them as you go! Join in to model new activities, as needed, but let them be the ones making the discoveries :)

3. Water Cycling: Children are never too little to learn about the importance of conservation. Talk to them about how the water we have on our planet is so important to our lives. Show them how the water cycle works by setting up a tiny model, using clear plastic containers. Next time it rains, catch some rain in a pitcher or shallow plastic container. Pour some into a clear cup and mark the water level on the outside with a piece of tape or marker. Next, invert another clear cup over the top to make a seal. Place it in a window where you can observe it over time. Check back later to see, as the water heats from the sun, tiny water droplets forming on the top and eventually dropping like rain back to the bottom. Keep checking to see if  the water level changes. After having some success with this, uncover the top and keep track of the water level, as it dries up. Lots of opportunity for discussion ... your child may want to record their findings via artwork, journal-style ... their first "lab reports"!!

4. Freeze and Melt: Fill up some ice trays or small containers with water and place in the freezer. When frozen, they can be turned out into a basin alone to observe the melting process, or put into water - where they will melt faster! Your child may want to use some big spoons to capture and release ice pieces, or just fingers to feel the temperature and texture. (Have a bit of room temperature water available to dip chilly fingers in.) Introduce some small toys and see what your child will do with them. Try freezing small figures in ice and seeing how long it takes to get them free! Your child may find ways to speed up the melting process! Fun!


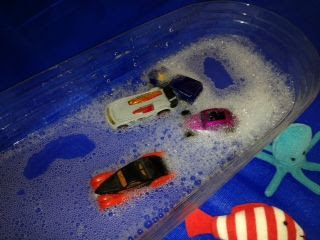
5. Wash Day!: Kids love water and kids love bubbles - and you love clean toys! Make everyone happy with wash day activities. Set up a basin with some warm, slightly soapy water - a little squirt of dish detergent goes a long way! Have a rinsing station - either a clear water basin to dunk in or some pitchers and a larger shallow container (like a baby pool) and a drying center. If you have access to a fence and clips, that would work, or spread out some beach towels or an old shower curtain to catch the sun. Then, let your kids have fun washing, soaping, rinsing and drying - cars, dolls, play equipment, etc. They will have a great time - of course, bubbles may be blown around, too, and they will most definitely get wet - and happy! 

Have fun!