Showing posts with label spring. Show all posts

Saturday, March 11, 2023

Printmaking with Nature

 As the weather warms up here, everyone wants to be outdoors, especially the kiddos. Looking for lessons that can be done outdoors is one way to satisfy that longing for fresh air! 

Printing with the colors of spring is a delicate process but has so many benefits for your littles. Teach them to retrieve the flower parts that have fallen already, or those that are in abundance or wilting, so as not to take away what animals and insects need :) Talk about food chains in the simplest terms and about how important all of the pieces of the chain are. 

It is also a great time to talk about having respect for growing things, and to give the plants a chance to survive and thrive. Children are capable of being very gentle and should understand their impact on gardens and wildflowers - respect for all nature! :) 


Bring paper and rolling or pounding tools (maybe from playdoh or kitchen sets) outside.  Demonstrate how to place the plant material gently between the folds of the paper and press, or pound, the color onto the paper - and then check out what you have made! The color and shape may transfer or become another shade when pressed on the paper. Very wet flowers and leaves won’t work for you, and dried leaves or plants are too brittle to transfer well. 
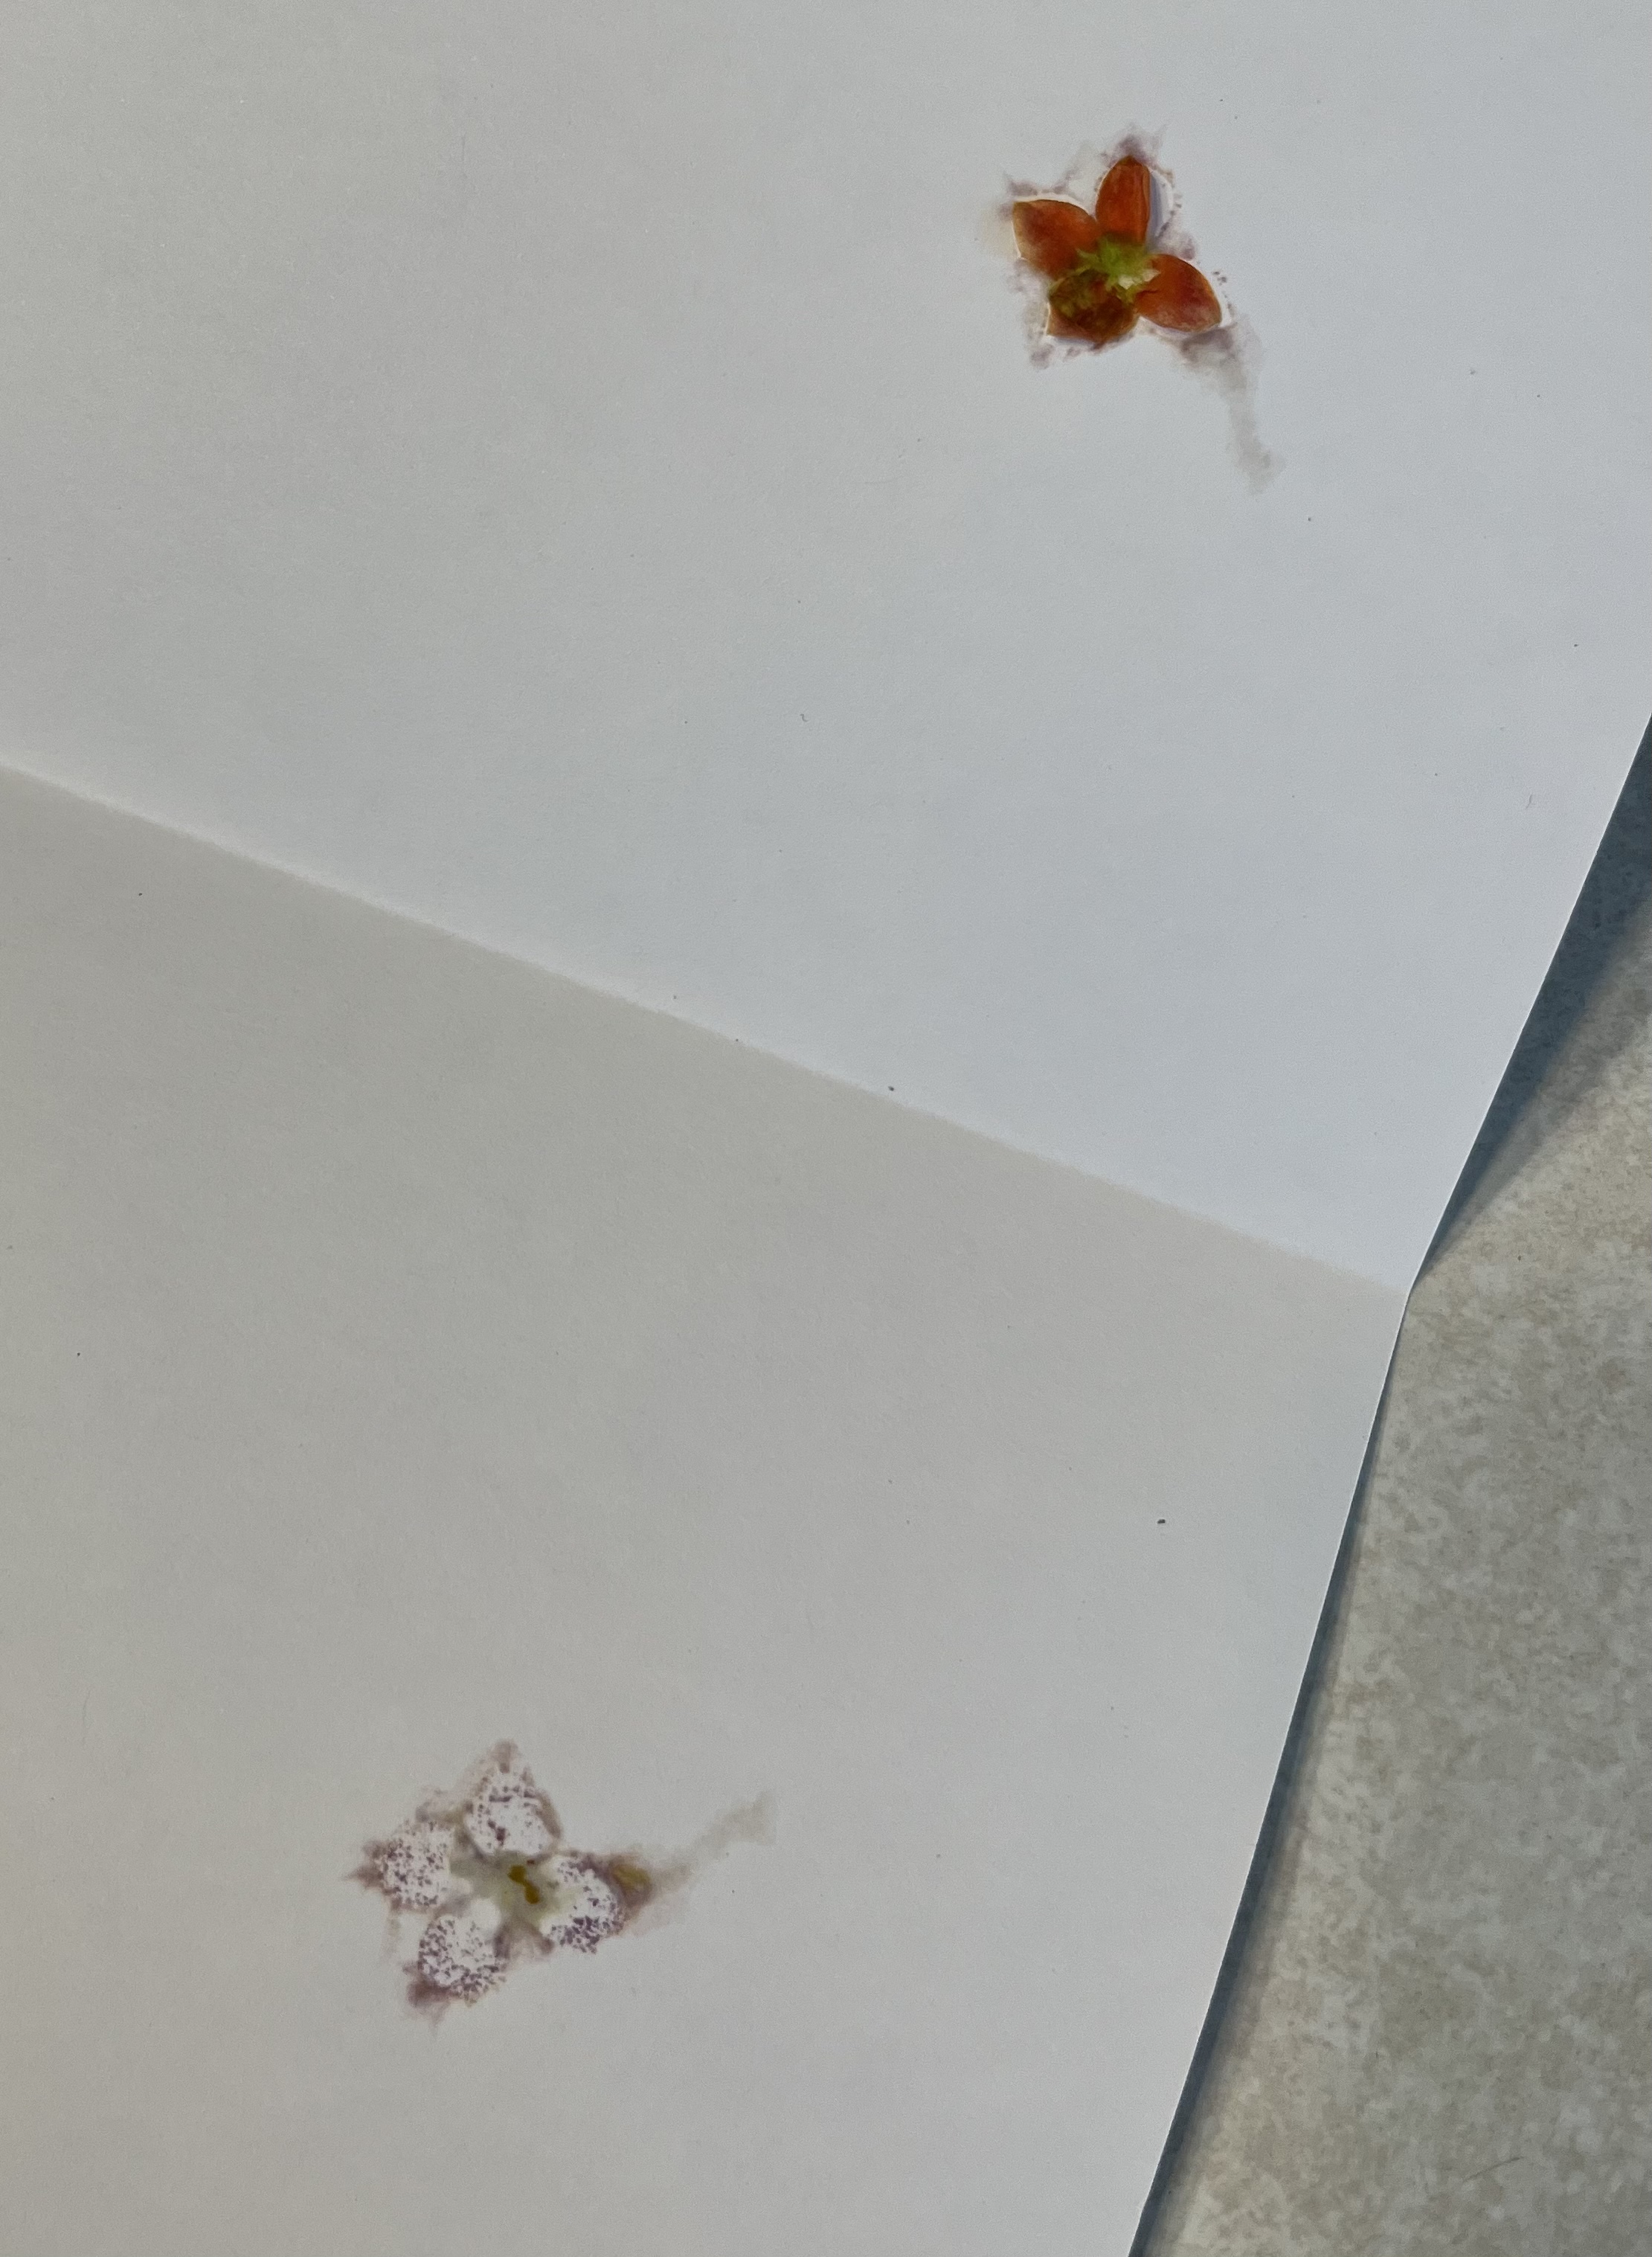

Trial and error (or success!) is a great practice for children, as they need to learn stamina in experimenting. Watch for students who are willing to share information and partner them with those who may need some encouragement. 

This can be a great team building experience, as you hopefully see empathy and excitement build for all the group to be successful. As children learn to work together, they can experience great self-image and feel good about cooperating. Encouraging these traits through play and creating is THE BEST! 

And, as always, have fun!


Sunday, April 23, 2017

Mindful "Noticing" in Springtime!

 As Spring emerges, "noticing" has become our favorite word. We notice buds on bushes, water streams after the rain, pods lying on the sidewalk. Many "gifts" have been brought in - dandelions, shiny rocks, flower petals ... all the signs of spring!

As good as the children are at noticing, sometimes we adults are so busy organizing and planning, and just doing, that we miss the opportunities that are presenting themselves ... to stop and look through the eyes of the child next to us, and see where we can go with the subjects they are showing interest in.

Welcome and celebrate the interests of each child - see where their interests lie by the things they consider treasures and want to share with you or their friends. Find a way to incorporate telling about treasure in your day - a show and share type of activity, expanding vocabulary, and promoting conversation and questioning. Try taking turns filling a special bag or box and sharing what's inside! Each day could be a different surprise!

Explorations in parts of a flower or plant, how trees come back to bud, life cycles of plants and animals ... all of these "growth" topics are great for springtime, with examples all around us. Asking open-ended questions, such as "What would you like to do with it?" or "How can we find out?" will get your child more involved in the exploration.

Set up a "sticky wall" to give your children a place to display their treasures. A square of contact paper, hung sticky side out and tacked onto a window or other surface, can become a favorite display and organizing tool for your kiddos. With the light coming in, treasures are highlighted and can become a focus for future explorations. A dedicated exploration center, with small bins and boxes, is another way to organize special things that should be handled and examined. See what tools you have lying around - kiddos are always excited about magnifying glasses and plastic pincers - the tools of a "real" scientist!

Add art materials to the mix! Leave paper for sketching and clay for sculpting near the objects and see what they decide to do - maybe make a sculpture with sticks and flowers incorporated, or mold a tower with clay and rocks.

Combining natural materials with traditional art materials gives your kids a whole new experience! Sketching a rock with all its veins and colors helps children really see all the variety in its appearance, instead of just seeing a brown oval shape. It takes them deeper in "noticing."

 During the day, as you go about activities, make sure that you are present in the moment to witness these experiences, as often as you can. This attention to the little things is the mindfulness we hear so much about lately - young children are so good at this naturally, if we give them the opportunity :)

Have fun!

Sunday, February 26, 2017

Learning with Lois Ehlert

When you start to plan some garden activities, make sure that you gather up Lois Ehlert books to help your little ones understand what the garden is for! The illustrations and vivid colors are so attractive, and the messages are clear.

Start with "Planting a Rainbow" to illustrate the planning and planting process. Colors are the highlight here, as the flowers in the flower garden all represent the colors of the rainbow. The process of growing from seeds and bulbs is also shown.

"Growing Vegetable Soup" is a great book to show the growth of vegetables from start to finish. Little ones are not always sure where their food is coming from, and may need the visuals to make connections between what they eat and how it come to be. Combine this with a trip to a local farm or farmer's market to get your child's brain thinking outside the supermarket.


"Eating the Alphabet" is another great book for seeing what different foods people eat, including some your child may not be familiar with. It relates each food to alphabet letters, both upper and lower-case, for authentic learning. When children can see and experience things that they read, it becomes more real and stays with them longer. Learning the alphabet this way will give them reference points - visuals - to connect to.


Lois Ehlert is the author of so many great learning books - "Color Zoo" teaches shapes and animal names, as well as giving children a view into how pictures can be broken down into shapes, for easier drawing :) Die-cut pages and surprise flipsides give every reader something to look forward to, as the pages turn.

In the fall, "Leaf Man" and "Red Leaf, Yellow Leaf" are wonderful tools for learning all about the changing of the leaves and the process that deciduous trees go through each cycle. The author' s creative use of natural materials to make pictures in "Leaf Man" will have you and your child seeing leaves in a whole new way! Try to make your own leaf creations when you're done :)

"Snowballs" is a crowd favorite for wintertime - something for every season! The use of natural, found items in her pictures is one of her style choices that delight young readers, as they find things on the page that are familiar.

Lois collaborated with other authors as well, illustrating the "Chicka Chicka" books, among others, so it's easy to see why her style is so familiar and attractive to little ones - and everyone!

Have fun reading!

Sunday, April 10, 2016

Math Games with Ladybug Wings!

Make a cute ladybug game to practice math with your little ones -  you can play it over and over! You'll be getting in lots of small motor work during the creation of the game, and then, math skill practice with such concepts as one-to-one correspondence counting, matching numerals and the objects they represent, odd and even, etc.


First get some black construction paper to make the body. Use something round, like a cereal bowl, as a stencil to trace around. Model holding the bowl and tracing around, then hand off for kiddo practice :) When that's done, add a small semi-circle at the top for the ladybug's head! Make sure your little guys add some eyes and antennae - whatever materials you all choose! (We did googly eyes and some mini pipe cleaner pieces!)

When you're all finished with the body, help your kiddos use the "stencil" again to cut a big round red circle for the ladybug wings. After tracing and cutting it out, help your little one fold or draw a line down the middle to cut it apart into two wings. Glue them on, overlapping a little bit, so they stick out a little - like real wings do!

Now, comes the game part! Cut out some round black dots to place on the wings. Roll one or two dice and count out how many dots are rolled.

Then, try to put them all on the wings, one on the left wing, one on the right, etc. ... but remember, ladybugs have the same number of dots on each wing! Does the number you rolled work out, or do you have a "leftover"?

Take the dots off and roll again. Each time, practice matching numbers to objects, for counting practice. For a change, use dice with numerals, or cards with numerals instead, to reinforce matching the number with objects that represent it.

Try to remember which numbers work and which don't ... when your kiddos are ready, introduce even and odd ("the odd one out"), as concepts to explain how sometimes it works and sometimes it doesn't, in math!

Laminate your ladybug, or put it in a plastic sleeve, to use a Dry-Erase Marker for dotting - for replaying ease! Remove the eyes and antennae while you're laminating, or look for alternative decorations that will lie flat :)

Have fun!

Wednesday, March 9, 2016

We Are Scientists: Out for a Walk!

Sometimes you just have to pack your stuff and get outdoors! As Spring approaches, look for new ways to explore the backyard, playground, or sidewalk. Grab a basket or tote and throw in whatever "science" tools you have around ... Magnets, magnifiers, measuring tools, a sieve or colander, transparent colored or clear lids or containers. Grab a block and a car for even more fun! Somehow, making a Kit makes it more official - and fun!

Let your little ones take the lead - see what they're drawn to and slow down the pace to "notice" everything about it. It might be bugs or spiders, it might be plants or trees - lessons are all around you! If they need a little nudge, model your own observing style ... they'll want to know ... "What are you looking at?"

Prompt them to explore with "I wonder..." statements, and then let them go with it!


  • Take some little cars out to the playground or backyard and see which ones go faster down the slide. Build your own slide with a long piece of wood and change the angle to make the car go faster or slower.
  • Use your magnifier to get a close up look at all the different colors and parts of a bug (the non-stinging variety!) Your kiddos will be amazed at the details they see. Help them take a picture with your phone and enlarge it for viewing. Bring a sketch book with crayons or colored pencils, so your child can record like a scientist :)
  • Measure everything you see - with a ruler or against something familiar - sneakers or fingers make a great non-standard unit of measure. How many fingers tall is that flower? How many sneakers long is that bench?
  • Do a magnetic or non-magnetic study! Have your child see you try a magnet with something magnetic - it's magical! Then, something non-magnetic ... they will want to join in and find out for themselves!
  • Take samples of dirt from different areas and check them for differences ... are they the same color? Texture? Wet or dry? Sift some sand and see what different sizes those grains of sand really are - are there stones left behind?

Let your little ones play in the dirt and the mud - it will open their mind to scientific thinking and making conclusions.

Have fun!

Sunday, May 19, 2013

We Are Scientists: "Discover" Symmetry

Have some fun with symmetry in nature ... It's perfect for Spring!

First, find some beautiful non-fiction books that show full-winged pictures of a variety of butterflies and bugs. Have your children inspect some close-up pictures to "discover" all on their own ... lessons stick better that way! Direct their attention to specifics in the photos and have them do the "noticing."

There are also many children's book authors who use beautiful artwork displaying symmetry in fiction stories depicting animals or insects. The books might tell about the seasons, life cycles, or natural occurances such as camouflage - you might have some on hand that are already favorites of your children. Eric Carle's book, "The Grouchy Ladybug," shows symmetry in the collage work he does, even though it has other themes. Use resources you have on hand to draw attention to something new!

Then, get out there and explore! Make sure you have a "kit" to inspire your little ones to get into the activity. Our kit consisted of some plastic tweezers, magnifying glasses of different sizes, some index cards (for lifting delicate specimens), and a small container with holes to temporarily house what we found. It all fit in an old lunch box ... a small sand bucket would do nicely, too! Your child will be delighted to find all sorts of examples in the critters you uncover! Make sure they are using their words to describe what they see - and you could even bring along a sketch book and some crayons to do critter portraits :)

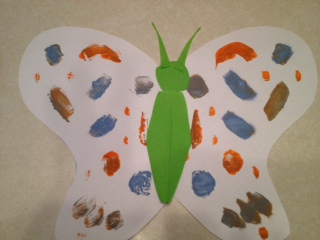
For some fun artwork, when you're back from your travels, fold a large sheet of construction or other heavy paper in half. Draw the shape of a butterfly's wing (or another bug's) on one half with the center of the body at the fold. Cut through both pieces of paper so when you unfold, you have a butterfly shape. Have your child make a design on only one of the wings with some acrylic paint and then fold and press gently to transfer the design to the other wing. You should end up with a mirror image - symmetry!


You can finish up by adding a body, head and antennae with some paper scraps, pompoms, or whatever you have on hand!

Have fun!

Thursday, April 4, 2013

Spring into Action!

As the weather starts to get a little warmer, it's a great time to reevaluate your daily routine with your children! Use this time of year to jumpstart a daily movement plan that will get you ready for summer play. Slipping in some exercise, some walking, balancing, throwing, catching - it will all help your child's overall development! After a long winter of sitting inside, it's just what we all need!

Start by inserting some basics, such as running in place or jumping jacks, in between everyday tasks. It will rev up your energy level and boost your mood! Have a catch with a squishy ball or stuffed toy! Visit a playground or plan a playdate that is a no video/no game time for action :) Pull out some chalk and make some hopscotch or maze patterns to use for more fun!

Find some pockets of time where you can get in a daily walk - even if it's only for a few minutes. While you're walking, you can cover a whole day's worth of early childhood curriculum.
Children are fascinated by the tiniest things in nature ... a bud opening on a tree, an ant crawling on the sidewalk, a ladybug on a leaf ... use this time to help your child connect with nature! (science)  Work on counting as you cover the distance down the sidewalk! (math) Practice songs and clapping to different patterns while you walk - find objects that begin with each letter of the alphabet! (literacy)

And, best of all .... have fun!

Tuesday, May 22, 2012

Fun with Birds!

This time of year, all the kiddies are longing to be outdoors. Structure your learning around an activity they can all enjoy: bird watching!!

Put their powers of observation to the test - have them peep through some homemade "binoculars" to get started. Tape two small cardboard rolls together and decorate as you wish: we used packing tape to secure ours and then added some construction paper and stickers. There are some really cool designs out in duct tape now, too! Add some yarn or string to hang them and you're all set!

Here's a cute little art project: cut two circles out of white paper and then a larger figure-eight shape out of black. Attach the two circles as lenses of the binoculars and tell your kids to draw what they see in the "eyes" of their binocular pictures. Have them dictate "I see ..." to finish it off!

Check out some bird websites for some identifying pictures and let your little ones try to paint some birds of their own. Sponges in small and medium ovals or circles for the body and little triangles for beaks will help them make a bird shape - then dip some feathers in semi-dry paint to add details. So cute!

Find a children's guide to bird watching at your library or bookstore and don't forget to read some great fiction books, too! "Are You My Mother?" is always fun to read and "Round Robin" by Jack Kent is another favorite of mine!

While you're checking out the birds, fix up a simple bird feeder for your yard. Take a large pretzel, tie a ribbon on it long enough to hang it from a branch. Then, roll it in a small bit of peanut butter (unless there are allergies to watch for!) and dip it in a pan of bird seed from your local market. All you have to do is tie it to a tree branch and wait for the birds to find it. It will make a great spot for sighting some favorite local birds!

Have fun!

Monday, May 7, 2012

Books to Love: "Over in the Meadow"

Rhyming poems help children learn and remember things, just like songs! The poem "Over in the Meadow," written long ago by Olive A. Wadsworth, does this perfectly. It introduces mother and baby pairs, new vocabulary, spring themes ... all in an easy to read, fun package! There are many books that illustrate the poem - this book version, illustrated by renowned author/illustrator Ezra Jack Keats, is lovely to look and great to read. You'll find your little ones chiming in to read along with you, especially if you put a little rhythm in it! It's a perfect read for Mother's Day and you can extend it with a project to highlight the holiday!

Try this: Bake a big, round cookie with your child and ice it to look like a fishbowl - then add some Mom and baby candy fish to decorate. Or ... a whole family of cookie fish! You'll be spending some time with your little ones and they'll be joining in a special gift-making that will begin to set up some traditions, a good lesson for the future.

Trace and cut out some mom and baby animal shapes to make a spring scene or card, or surf the Internet, search for the poem by title and find some cool ideas there - I found a little coloring book on my search that would be fun to do :)

Have fun!!


Monday, May 9, 2011

Bug Party: Early Childhood Exploration!

Plan a "party" to celebrate and explore BUGS! Gather a few things together to make your children feel like explorers - we chose safari hats and bandannas from the party store, a simple bug collecting case (ours was from a craft store, but you could make one from a recyclable container) and a magnifying glass. Then, round up your bug-hunting crew (we did it for a small birthday party!) and get ready for an adventure. Plan on visiting a nearby park or garden, and plan your route with a rough map - map-makers welcome! (On our walk with a few three and four-year-olds, we decided to make a work-crew guidance device (!) using a length of rope and making a big knot for each child to hold onto - the leader held one end of the rope and a spotter took up the rear! We told them we all had to help carry the rope in case we needed it!)

Once you arrive at your destination, have an adult or child model for the other children how to move  rocks without hurting bugs, how to slow down and look carefully, and how to stay very still while "hunting" - then, set off on your own or in pairs, once a perimeter has been established! Cries of "check this out!" and "quick, look at this!" will ensue as everyone has fun finding a variety of insects.

Make sure to have a digital camera on hand to record some of your finds for review later! Have some books about bugs along to read or another activity for when you start to slow down ... we sat down and did some body art, coloring ants and ladybugs on forearms or cheeks with face-painting crayons.

Later, prepare some special treats with your "buggy" crowd:

Ants on a Log
Use sections of celery sticks, spread on cream cheese and add a row of raisins for ants. I've also seen this done with variations using pretzel logs, peanut butter and craisins :) Watch your food allergies!

Dirt Dessert
Mix together one large vanilla pudding mix and two cups of milk. Add 1/2 cup of powdered sugar and 8 oz. of softened cream cheese - mix until blended. Stir in 8 oz. of Cool-Whip type topping. If you do this with the kids, make sure to count and measure along the way - math!

In another bowl, combine 1 1/2 lb. package of crushed Oreo cookie crumbs and 1/2 stick of melted butter to look like dirt. Alternate layers in a cups or a bowl, ending with crumbs on top! Add some gummy worms for fun and refrigerate!

Yum!

Friday, May 6, 2011

We Are Scientists: Float Your Boat!

Where I live, there are sidewalks and curbs lining the streets, making a great channel for water to float or race a boat on a particularly rainy day! If you have somewhere to float a boat, gather some materials together and make one! To make a "boat", all you need is a small piece of wood, like a piece left over from a house project or lightweight shims that you can find at a hardware store. If you don’t have access to wood, a container that is shallow with a flat bottom, such as a small tray from a frozen meal or a plastic bowl or lid would work fine! Look through your recyclables and get inspired :)
Whatever materials you decide to use, put together an “activity box,” including paint, stickers, foil, tape, cardboard and anything else you think might work! If you want to, include natural materials like small sticks or large leaves or pods for interest. Let the children create, going over some basic sink and float information while you “play!” (I needed some sandpaper to sand my wood a little, to avoid splinters! Then, markers or paint and a few stickers - and my boat was ready to try out!)

Have a larger shallow container ready with an inch or two of water to test the boats’ seaworthiness periodically! Sticky tape, such as the clear packing type, can seal areas that might not be otherwise waterproof – and, remember - sometimes, the simplest designs are the best at floating! (We found that a plastic lid from a food container made a great raft, like those in a water park - we imagined riding down the "river" in that!)

When you are ready, make sure there are no traffic hazards for your children, and get out in the rain! You might want to try to race boats made of different materials or try boats on different streets that have more or less incline (see if they go faster or slower!)  Brainstorm to come up with ideas that will prove/disprove different theories – scientists in the making!
Try adding some ballast to your boats and see what happens! We added plastic bags of coins and washers – maybe you have a favorite toy figure who would like to go for a ride?
Have fun!

Wednesday, May 4, 2011

Seeds!

When it's time to celebrate Spring with flowers, some seed science experiments are exactly what you need. Hands-on plant growing is so much fun for the kids - they will learn by doing and will be so proud of what they accomplish!

Grow something! Pick out some seeds with your child and get ready to get dirty! Make sure that you plant more than you need, to avoid any disappointment if things don't all grow. Sunflower seeds are always popular and easy to handle, but any seeds will do. I used zinnias this time, but have done all different flowers - and vegetables! Noting the differences in the seeds when working with a variety is fun, too!

Try a few different "experiments" with seeds:

1. Grass "Hair" - take a plain paper cup (somewhat sturdy) and draw a face on it - make it silly! Fill about two-thirds full with dirt and then add some grass seed. Water and leave in the sun and in a few days you will have grass "hair" sprouting! (I've also seen these done with character paper cups and with egg shells!) When it grows tall, you can give it a haircut! :)

2. Dirt/No-dirt planting: You will need a few of the same variety of seeds, along with dirt, a paper or plastic cup, a sandwich-sized plastic bag and a good paper towel. Plant two or three seeds in dirt in the cup, give it water and set in the sun. Then, soak the paper towel in some water, squeeze and fold into a square to fit in the plastic bag. Add a few seeds on the towel and seal up. Hang in sunlight in a window. In a few days, you will start to observe the seeds in the bag beginning to grow roots - it's fascinating for the children to observe.

We can't see what's going on in the dirt (unless you have planted a seed close to the edge of a translucent cup!), but soon a sprout or two will come up out of the dirt! Compare the size and growth of the two plantings and, when you have little seedlings in both, replant together into a larger container!

3. Keep a plant diary! Children can make an initial entry, drawing the process of planting and writing or dictating any words. Every day, as new growth or change is noted (or not!), new entries can be made, documenting the process (like a REAL scientist!!) At the end, a picture of the final product will cap it off!

4. To integrate technology into your lesson, take pictures with a digital camera and practice downloading and inserting into a document, where you can make your plant diary digital!

5. Take a few different seed varieties and mount samples on index cards. Cover with clear packing tape and label on the back with your child. Plant each type of seed in a different cup and label (one friend does this in cardboard egg carton cups). As you get plants starting to come up, try to match up the plants with the seeds you have on cards :)  See if the seeds look like the plants in any way! If you're in a classroom, set this up as a science center, updating with pictures of tiny seedlings on cards (again, label on back) as the plants grow bigger. Take new pictures at different stages and soon you will have a sequencing activity, too!

Have fun!!

Monday, May 2, 2011

Go On A Bear Hunt!

It is always fun to read and get involved in a story with children - sometimes a favorite story is read over and over again! Remember stories where the children got so involved, they were chiming in on parts? While you are reading and re-reading, you can be sneaking in valuable literacy lessons, too, that just seem like good fun!

A favorite book to read and act out is "We're Going On A Bear Hunt!" by Michael Rosen, illustrated by Helen Oxenbury. In this book, there are lots of repeating lines, fun words and descriptive language - draw your child's attention to the sounds that each section of the "hunt" brings and encourage them to recall and order the events - great exercise for attention to detail!

Take a good look at the illustrations, alternating between black and white drawings and vivid color! For an animated version of the book, check YouTube - there are also other interesting videos, including the author acting out the story.

To act out the story yourselves, brainstorm with the children about the sounds that come up in the story ... and how you might recreate those sounds! Try to find things around the house that would make all the various sounds... "Hmmm, this part says "swishy, swashy".....what do we have that could make that sound?" Gather together some home-made sound effects or instruments that you could use to act out the story.

Make up simple symbols for the different scenes in the story and make posters to set on the floor and take a  walk - a grassy field, some mud, etc. - while acting out the story. Play "what-comes-next" and make sure you backtrack at the end!

For an art extension (and social studies!), make a map! Use simple symbols again or cut-outs to represent the areas that the family goes through and have the children lay it out in a map form! Use lines and arrows to show how the group should progress according to the story - maps are fun to make! Have a child describe the map to you and sequence the events of the story!

Have a good time reading!

Friday, April 22, 2011

Start Spring with Eric Carle books!

To get started, gather some books written and/or illustrated by Eric Carle - there is a great list on his website: www.eric-carle.com . Check out similarities, artwork, colors ... go on a few picture walks. Choose a few books to read and show your children that some of the books have specially-cut pages and need to be treated, as all books do, with special care!
I like to tell the little ones that someone named Eric wrote these books for them – and other children! I tell them his whole name and describe how he is sitting somewhere in a workshop/office planning even more stories – right now! I describe the process in simple terms for them and then we get started looking at some of the books – it helps them connect in a special way. (I also tell them that they, too, can be story-tellers or authors!)
“The Very Hungry Caterpillar” is a well-known book that is fun for all ages! (counting and days of the week are part of the book!) 

When you're done reading, make one of these:  (1) Egg carton caterpillars from half of an egg carton – paint and attach eyes and chenille stick antennae.

(2) Thumbprint caterpillars - use as many colors and make it as long as you want! 

(3) Super-simple paper-cup print caterpillars! Use the top edge of a small cup to dip in paint and make your caterpillar -  go over circle shapes, too! 

(4) If you’re really ambitious – here's a multi-part project: Have children paint clothespins to look like a caterpillar. Separately, make coffee filters into butterfly wings by coloring with markers (try for symmetry) and dripping drops of water to make them bleed. Let dry and set aside. Paint paper rolls brown to make cocoons. Make a big deal about putting the caterpillars into the cocoons and waiting – maybe a week or so - but it's hard to wait(!) When the kiddies aren’t around, clip your wings onto the clothespins to make butterflies and roll back up into the cocoons – when you are ready, the butterflies can emerge for the cocoons.
Another favorite,“The Very Lonely Firefly,” is a book with a great message and one kids love – and get! Fireflies are fun to make – paint craft sticks with glow-in-the-dark paint, attach eyes and pretty tissue paper wings – when they are all dry, you can turn the lights off and have your fireflies find their friends!
“The Grouchy Ladybug” is also fun to do with kids – they pick right up on the repeating lines and LOVE to join in -with attitude - on the ladybug’s lines. It combines time of day (the o’clocks) and size (increasing animal sizes) with lots of animal names – fun! List the animals to practice recall - a great literacy extension. Make a ladybug and go over symmetry in nature as a science extension – use a paper plate or card stock and attach wings with a fastener – make sure your dots are equal on each wing!
Check my previous post "I Love Eric Carle!" for more ideas!  Have fun!

Monday, April 18, 2011

Fiction or Non-Fiction?

While you’re choosing books and reading to your children, you can add discussions of literacy elements as extensions of your stories. 
Talk about the title, the author and the illustrator. Use those words so the child becomes familiar with them. Little eyes light up when you tell them, “A man named Eric wrote this book – for you! His whole name is Eric Carle – can you say that? He has an office where he makes pictures and writes words for children just like you to read! Writing books is called being an author.”
Don’t be afraid to introduce big words – four and five-year-olds are able to distinguish between "fiction" and "non-fiction" books and like to play the fiction/non-fiction game. At the end of a story, ask them about the characters and the setting – “Do bunnies wear clothes?” or “Do teddy bears really talk?” - to prompt discussion of real and non-real, fiction and non-fiction.  Let them figure out which category the book falls into!
Sometimes the illustration style, drawings versus photographs, etc. will give clues about the story, as well.  Discuss the choices made in illustrating the book with your child – they might want to try their own illustration! Extending the story in this way also makes it more memorableJ
Have children play with fiction to make it non-fiction and vice versa. Generating conversation with your child is great for vocabulary building, speech sounds, and verbal expression. Ask them questions like,  “What would the story be like if Corduroy couldn’t get around in the store? Would a book about real snakes be better if they lived in a house and watched TV?”
Pair up fiction and non-fiction books with similar topics and share with your child. Spring is a great time for this – there are lots of baby animal stories and books that lend themselves to spring reading! You could pair up “Hopper’s Easter Surprise” by Kathrin Siegenthaler and Marcus Pfister (dreamy illustrations by Marcus Pfister!) with a non-fiction book about bunnies, complete with real photographs. You and your child could compare all sorts of things between the two and learn lots of science information while you’re reading. Any of Eric Carle’s books about animals – “The Mixed-Up Chameleon” or “The Very Hungry Caterpillar” – would be easy to find companions for in the non-fiction section of your library.
  So, get out there and get reading!  J

Wednesday, April 13, 2011

Make a Texture Bunny!

Make your Easter Bunny a texture project Here’s what you need:
BUMPY-edged paper plates for the body, face and ears (The base of the bunny is two small paper plates, one for his body and the other cut to make his face and ears J)
 SOFT cotton balls for the body
 HARD plastic googly eyes
 ROUGH sandpaper for his paws 
 SMOOTH plastic for his nose (I cut mine from a plastic container top – make it an upside-down heart)
 WRINKLY paper strings for his whiskers (paper Easter grass!)


Put it all together with some glue and maybe a staple under the nose to hold the whiskers on.


As your child assembles this project with you, use any texture words that apply to introduce or reinforce vocabulary! Have your child say the words as he/she touches the different textures to encourage learning!
Have fun with it! Happy Easter!

Wednesday, April 6, 2011

Play and Learn with Plastic Easter Eggs!

Here you go - Ten Things To Do With Plastic Eggs!!
Before, during and after Easter, try these fun activities with plastic eggs you may have around the house! 
1.   Use for “anytime” egg hunts! Fill with seasonal stickers or pieces of a craft to be done - extend your hunt by having each child find one of each color, or plant personalized eggs  for each child to reinforce name recognition! If able, try one egg per letter and have them find and make their names :)

2.   Use eggs as a coin counting game! Put different amounts of coins in a few eggs and place in a basket on the counter. “Change” it up each time you play, pick an egg and get in some coin counting practice with your child while you’re waiting for dinner to finish cooking!

3.   Use eggs  to make patterns!  Open the eggs into halves so they will stand on open ends – use two or three colors to lay out in two- and three-part extended patterns – great practice :)


4.   Letter matching! Try matching upper to lower case – use a permanent marker to write uppercase letters on one half and lowercase on the other – mix up and then match up! Use multiples of colors to make it more challenging!

5.   Self-checking addition eggs!  Program each half on the outside with a number of dots, stars, etc. and write the sum on the inside (use one of each color to avoid mix-ups) – have your child count them up and then open up to check the answer!


6.   Use for games to make a rainy day fun! (Or a sunny one!) Place eggs on spoons and have some races ... if you drop one – no problem!


7.   Try another race – each child gets an egg and two or more children can race by pushing eggs with their noses on the floor – carefully!


8.   Like the old pass-the-orange game, tuck an egg under your chin and pass to a partner without dropping – this takes skill :)


9.   Use eggs in a container of sand for a dinosaur dig! Put small plastic dinosaurs in modeling clay and place in eggs. Bury in the sand and dig up “fossils”!


10. Use to plant seeds and grow small seedlings before planting outside! Open the eggs up, place in an egg tray or other container to stand them up, fill part way with dirt and add seeds … a little water and a sunny spot and you’ll be all set!

Have fun!