Showing posts with label science. Show all posts

Sunday, April 25, 2021

Learning Outdoors

"Why not have class outside?" Easy for them to say .... ;) But ... with some prep, it can be fun and productive!

In these continuing pandemic days (or really anytime!), as the weather gets nicer in the northern hemisphere, we can look to the outdoors to supplement our classroom space, but only if our needs can be met there for safety and security :) 

First, think about safety. Is the surrounding area conducive to having class outside? Are there too many distractions from heavy traffic or loud noises? Is it too sunny/shady? The physical position of the teacher (and other adults) and students is also important, as you want to make sure no one is out of sight or close to hazards (like streets or steep slopes).

Next, this plan takes some prep work for the teacher, instead of a spur-of-the-moment decision. Try a rolling cart or carry basket pre-loaded with all the supplies you might need. (A small white board, markers, some chalk, sticky notes, etc.) Students could have pre-made "seats,"such as folded beach towels or small pillows tied inside plastic shopping bags for avoiding dampness. Clipboards are always a great addition, making things "official" :)

Then, choose what part of your daily lesson would work best outdoors. Some topics really work in outdoor settings, such as: 

  • measurement or making patterns in math - Take your measurement tools outdoors and use objects found there to extend your lesson. Or, find natural objects outdoors to arrange and extend patterns on the sidewalk or in a grassy area.
  • growing things or force and motion in science - Take these topics outdoors and plant in the dirt or in raised containers or offer wood planks and blocks to encourage experimentation with force and motion ideas. Add a few balls or toy cars and see what theories your friends can prove.
  • poetry or descriptive writing or really any type of creative writing - Any age students would enjoy laying outdoors on a beach towel and writing/drawing about what they see/feel/hear.
  • reading aloud with discussion - This would be great, even as a last-minute idea, and can break your day up, allowing for stretching and movement, as well.
  • independent reading/paired reading (more room to spread out)/small groups - Experiment with different set-ups for reading time and spread your class out a little. Have something in mind to hold them accountable for what they are reading during this time. You may choose to pull a small group, as long as you can still monitor safety for the others.
  • art with watercolor paints, chalk, recycled sculptures, nature sculptures - There are so many art projects that can be enhanced by being outdoors, and help your children connect art and nature.
Have Fun!


Thursday, March 18, 2021

Learning with Collections: Seashells

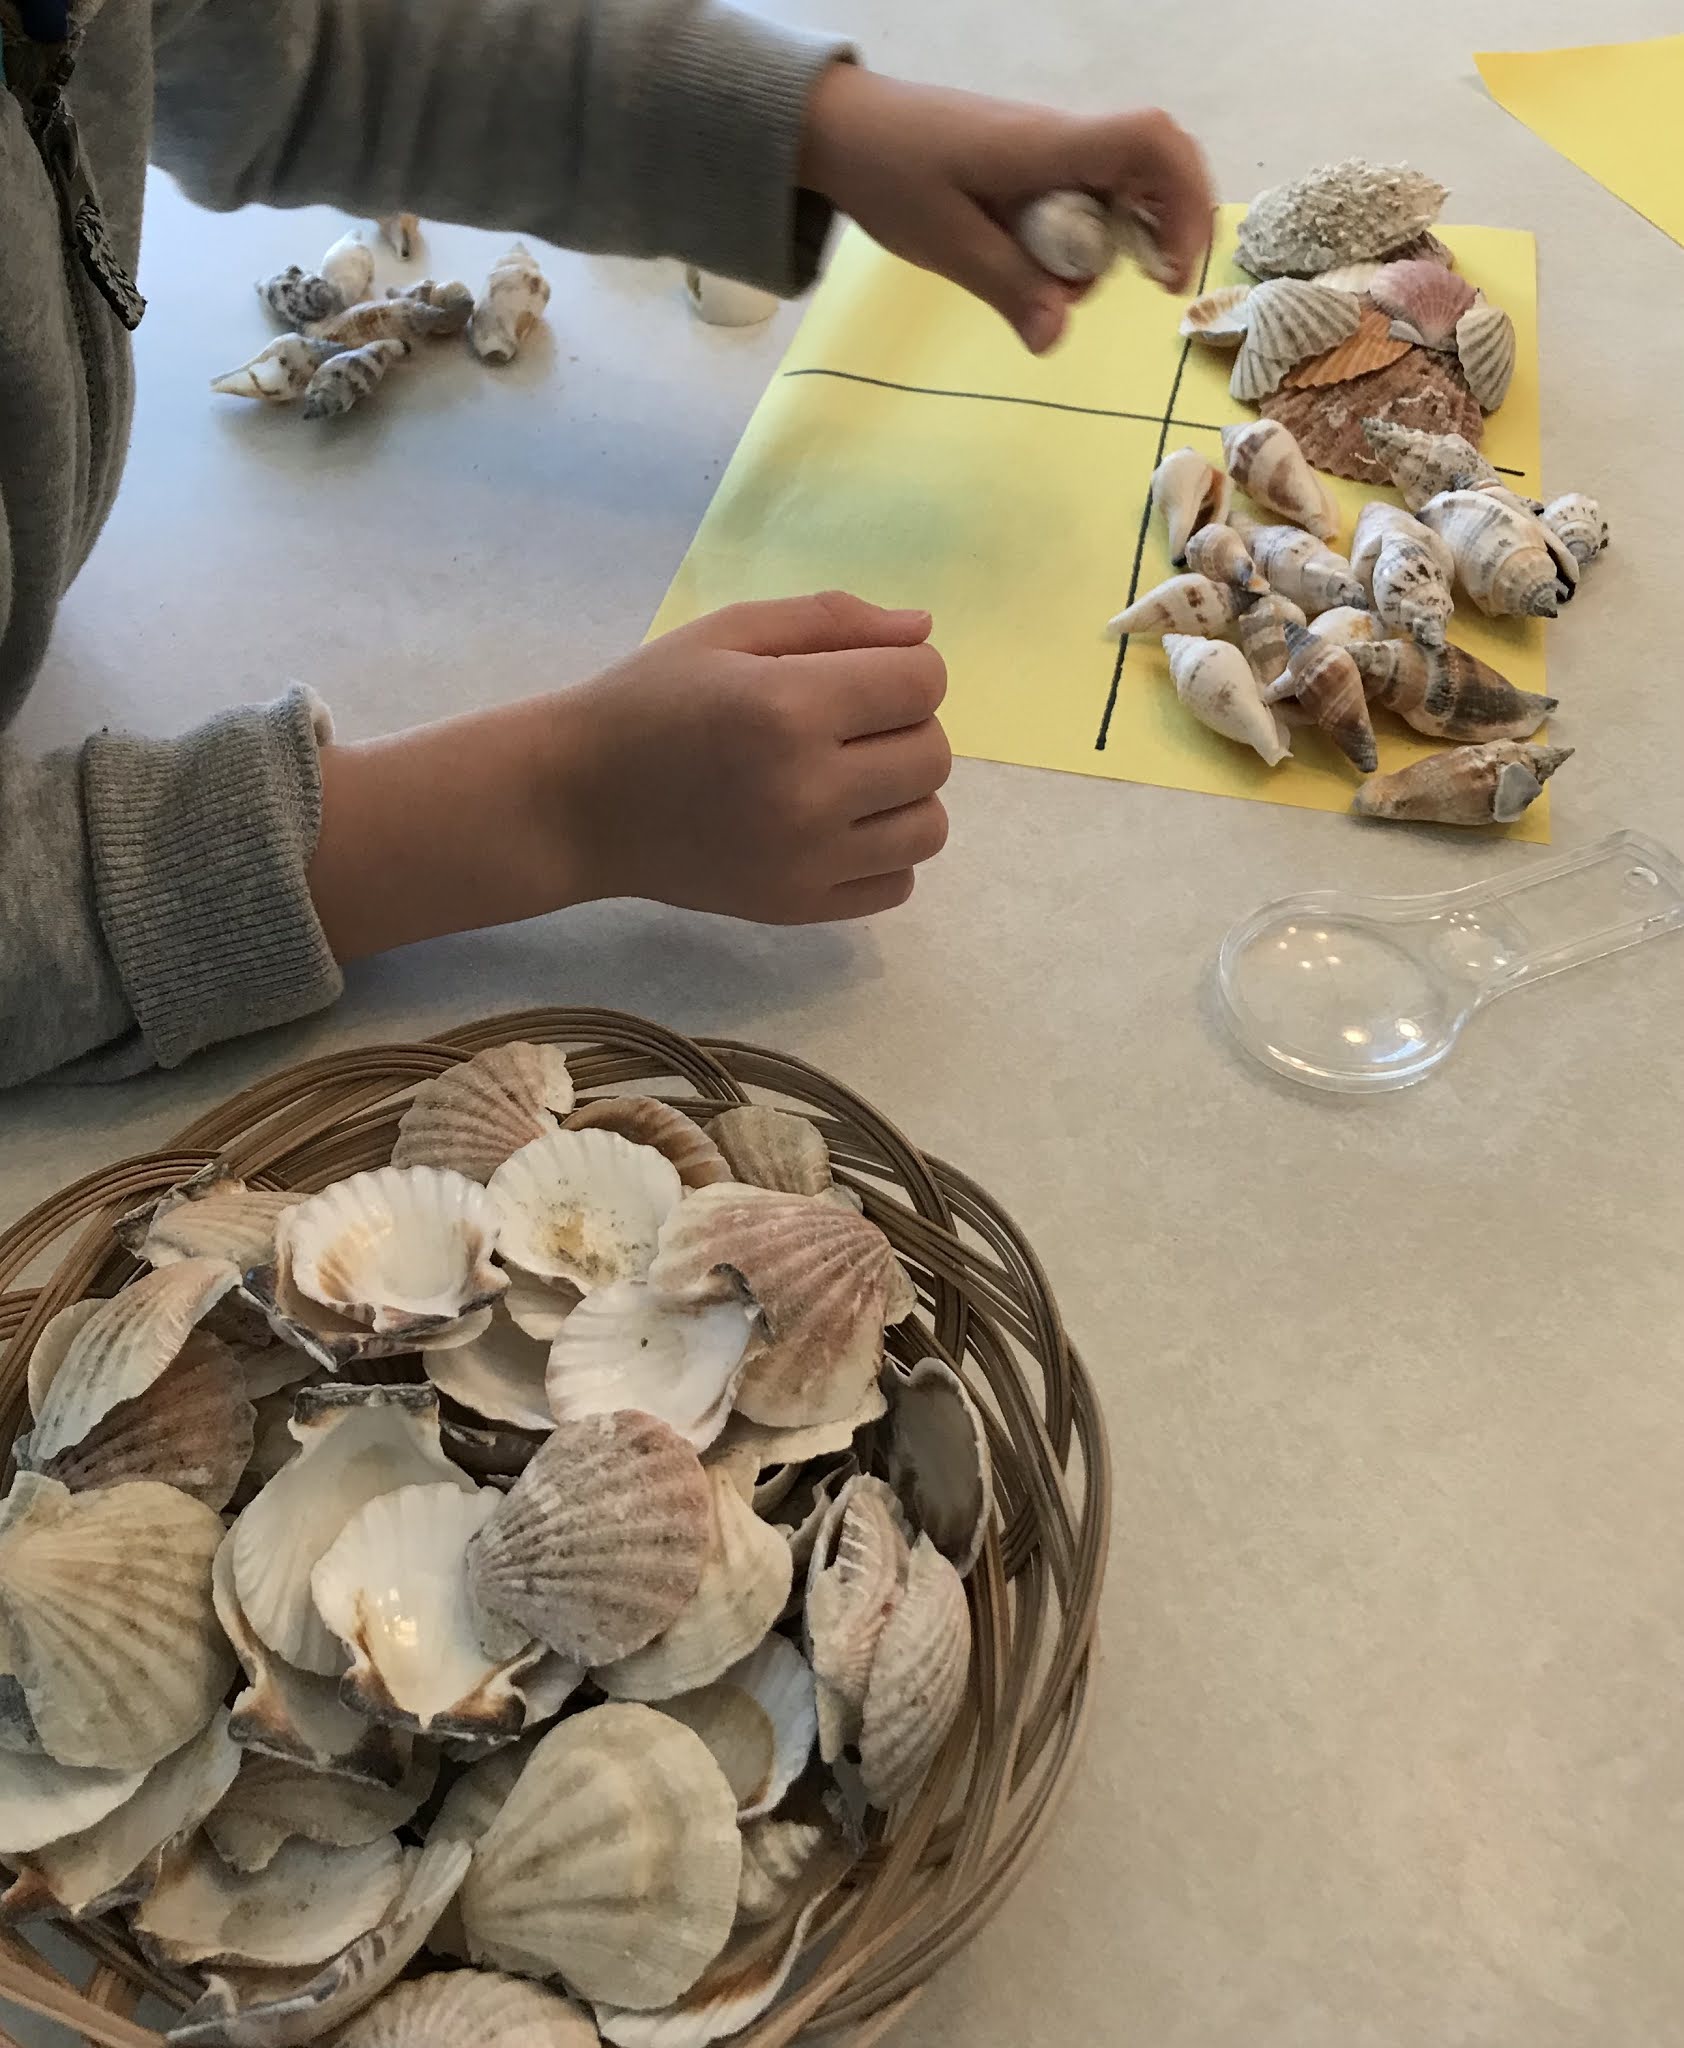
Playthings don’t have to be expensive and manufactured to grab a child’s attention, and to learn from. Nature provides many objects to observe and tinker with, and kiddos are drawn to them. Sticks, leaves, rocks ... and don’t forget seashells! (If you already have a few around, from trips to the beach, then you’re all set! If you don’t, craft stores and discount stores often have baskets or bags of them for decor projects.)

Whether your child has never been to the seashore or has visited there lots of times, seashells seem to spark curiosity and can lead to all sorts of learning. There are many shapes, sizes, and colors of shells to be explored :)

Their first inclination may be just to look closely to see the nooks and crannies of each shell. You can help by providing tools, such as magnifying glasses and simple sorting mats. Sketching tools are great for encouraging in-depth observations, also.

“What do you notice?” is a great prompt to lead them into discussion and wondering, allowing natural scientific inquiry to take place. One kiddo here started to play with the distance from object to magnifier. “When I hold it farther away ...” and he was off checking things out :) 

They may observe fossils, shells inside other shells, or even find that two half shells that fit together. This may lead to questioning what might have lived in the shell previously. Many children might not realize that an animal had lived in the shell, and would likely be interested to find out about it.

Discussions of animal habitats and different types/shapes of shells can be supplemented by finding pictures in books or on the internet. Having books or pictures on hand is always a good idea and teaches children how to explore a topic.

Kiddos may make connections to other things they know about the sea. We had a shell with some green dried strands of what they imagined could be seaweed, knowing that seaweed sometimes was found by the ocean’s edge. Let your child question and explore ... maybe even get a pan of water to build a habitat for pretend play!

Have fun!


Friday, February 12, 2021

Photos as a Teaching Tool

With some students remote and some present in school, educators are scurrying to find engaging ways to interact with both groups and “up” the interest factor in their lessons. 

Using photographs as tools in the classroom is not a new technique, but maybe one to revisit in this day of COVID teaching. The strategy of popping a photo up without direction and leaving feedback open-ended makes the photo a “mystery” to be solved and encourages students to “lean in” by piquing their curiosity.  

There are so many ways to do this in very different areas ...


Use photos as Story Starters, giving students an opportunity to write a sentence or story about what they see. Embed lessons about sentence structure, word choice, etc. in a back door kind of way.  


Photos can be great language builders - descriptive words are a natural ... size, color, shape, etc. Try a word web on a topic using a photo as a launch point. 


 Science topics are a terrific fit for photo use! There is nothing like a visual prompt to get everyone involved in something like space, earth science, growing things ... any topic you want. 

KWL charts can be enhanced by using a few photos to boost the interest and grab your visual learners, prompting them to participate. 


An area where real life photos is underutilized is Math! Photos of block arrangements, groups of scattered manipulatives, or partially-filled containers with a “What do you notice?” will get your students thinking, looking for groups, similarities and differences, shapes or whatever else they come up with. They will begin to view math as a part of the everyday world. Great discussions and lessons can ensue! 


The BEST part is that, using technology, ALL of your students can see these photos at the same time and can feel that engagement of learning and exploring something new. A puzzle or mystery to be solved is sure to grab their attention.


Use photos as transition tools or do it just for fun, but toss a little learning in along the way ... What words can you make with these letters?

What do you see on these picture cards? Matches? Sizes? Lots of math concepts here ...


Have fun!

Sunday, January 24, 2021

Discovery Walks in Winter

Sometimes you just need to get outside, even if it’s chilly and wintery out there! A quick walk or a bundled-up garden or playground visit will clear the head and get some movement into your day :) While you’re walking, shivering, or playing, make some observations!

Just like a “noticing” walk in Springtime*, take the experience to a new level by generating new vocabulary and slowing down to really see what’s outside. You might find some deserted (or not!) habitats for small animals. The undersides of fallen tree branches or beneath small piles of leaves are likely places for hidden wildlife such as insects. You might see some frozen icy spots, with cool cracking to snap a quick photo of. There are wonderful sights to see, when you slow down a little and really notice :)

Closely examine the pieces of nature that your little ones find ... It’s treasure to them! Look for pine cones, big and small, collect different types of needles from evergreen trees, or snatches of bark that you might find on your travels. Even a twig or a fallen feather will be a source of wonder for a child.

Take the “treasures” indoors and use in drawing and writing projects for little ones or older students. Children may want to use a magnifying glass to really look closely at their chosen objects, like the scientists that they are. Sketching and labeling are good first activities to get started for the younger ones. 

Older children may generate a list of words for writing. Begin with a shared writing chart to build vocabulary first. Students may help with beginning sounds and more, depending on their abilities. Try doodling a little picture next to each word, or hanging an actual sample in a clear bag right on the chart.    

Use this as an anchor chart for writing and labeling, and moving on to full sentences, where appropriate. No matter where your students are developmentally, you can bring some of that winter nature right into the classroom! It’s a great way to level the playing field with shared experiences :) 

Have fun!


*link to Mindful Noticing in Springtime post below

https://makeearlylearningfun.blogspot.com/2017/04/mindful-noticing-in-springtime.html


Tuesday, December 1, 2020

Motion: Moving Things Without Touching

Moving objects are often pushed or pulled by hands, feet or other extensions of our bodies. We’ve used ramps and slides to speed things up and bumpy surfaces to slow things down. 

Now, try making things move without touching them! 

Show your kiddos a small, lightweight ball (the dollar store usually has ping pong balls in packs!) and talk about how they could get it to move ... without touching it! See if they can come up with pushing the ball with their own breath :) 

You will need a straw - maybe from a sippy cup or water bottle, or maybe you have disposable straws tucked away in a drawer. Then, get out some play dough or blocks (or both) to have some fun moving the ball without touching it. :) 

Roll out some skinny play dough “snakes” and encourage your friends to use them to design a maze for the ball the roll through. See what designs they can come up with! Sometimes a side-by-side play example will help to get their creative juices going. 

See what directions they can make the ball go in, and what they learn from this ... Do you have to blow softly? Is it better if you blow harder? Where does your straw need to be? Encourage them to think outside the box ... what else could you use? Would a paper towel tube work? Which works better? How else can you make air move?

We are scientists! Have fun!

Thursday, October 22, 2020

We Are Scientists: Learning with Leaves 🍁

Nature is a great equalizer - all students can be a part of a shared activity when the subject is something that they can all access, like leaves. 

Go on a nature hunt or ask students to bring in interesting leaves, pine cones, twigs, etc. Build a collection in a series of small tubs to allow for social distancing, but shared experiences. 

Sort and Match

For matching and sorting, look for a set of leaf ID cards on the internet, or have students help make a set :) Look for simple pictures that display size, shape and color. 

Sorting Mats with boxes (large construction paper, draw on boxes and maybe laminate) offer a focal point for slowing down observation to really look at samples, and a way to divide up leaves by similarities and differences. Seeing up close that all leaves are not the same may lead to closer inspection of the trees they come from :)

Scientific Observation

Encourage students to look carefully at the parts of leaf, and to try to draw what they see. Magnifying glasses are a great tool to introduce here. When they get close up “like a real scientist” and take a look, they may notice the veins and stems - don’t forget to look for nibble spots where insects and small animals may have feasted. 

Make Patterns

Use clear contact paper or packing tape to cover leaves, in order to make a group of leaves for forming patterns. Model a few simple patterns and see where they take it! 

Tracing and cutting leaf shapes from card stock or construction paper would work, too :) 


Remote Learners

If you have remote learners, encourage them to fill their own basket at home with natural finds. As an alternative, have a basket of samples bagged to take home outside your classroom. If available, send small magnifiers and sorting sheets to complete the experience.


Leaf Art

There are so many ways to explore leaves through art. For a list of Art applications see this post : We Like Leaves!


Have fun! 🍁🍂

Friday, October 16, 2020

We are Scientists: Pumpkin Exploration

There is nothing like hands-on experience for really learning and remembering about a topic. Pumpkins are a great subject for diving into and learning about in a multi-disciplinary way! 

Measuring is a fun way to start out .... try it with non-standard units of measure that you can compare to other objects. You can use something flexible like a rope or length of yarn to see how much it takes to go all the way around the pumpkin. You can also see how tall the pumpkin is this way, or use blocks or connecting cubes to get your answer. Hands on measuring and comparing are great math activities :) 

Talk about how your pumpkin grew and where it came from. Show photos of the stages of growth - from a seed to a sprout and changing colors - there are great non- fiction (and fiction) books that highlight this. You can find videos of pumpkins growing and even virtual pumpkin patch visits! 

Cut into your pumpkin for some slimy, hands-on fun next! I like to make a cut in the top and also cut out a “window” in the side, to make it easier to see in and reach in - the hole on the top offers more light.   


Lots of kiddos love to reach in and pull out all the pulp and seeds. Use as many of your five senses as possible - to see, smell, touch and maybe even taste seeds or pumpkin products. Run a hand around the outside and count up the ribs - or try guessing and counting as a fun predictive activity. For those with sensory differences, try for a little exposure at a time to the pulp in order to get them more comfortable with the squishy feeling. 


In-class learners can go back again and again to see and explore ...  remote learners may benefit from leaving a basket of baggies with pulp and seeds outside for them to pick up after school hours. Planning ahead can have all students on the same page with this activity. (If you’re up for it, watching it rot over a few days is also interesting.) 

Playing with sealed bags of “pumpkin guts” can be a fun counting activity - make sure there is pulp and seeds and have students mush around and count the numbers of seeds inside. 

Using a variety of gourds and small and large pumpkins can also be a fun sink or float activity. Introduce some other classroom items - maybe a pumpkin eraser, or some plastic scoops - and guess whether things will sink or float. Then, take turns testing out your theories. Your little scientists will love it! 

Have fun! 


Thursday, September 24, 2020

We Are Scientists: Simple Machines


Every little one likes to move things - it’s part of being a “little scientist”! One of the first science topics that we always work (play) with in early childhood (and up through the grades) is force and motion. 

Simple machines make great playthings for experimenting with movement and force. You can find them everywhere in your home, classroom, or schoolyard. The six simple machines are the wheel and axle, the lever, the inclined plane, the pulley, the screw, and the wedge, although the latter three are actually just extensions or combinations of the first three.

For this post, we'll focus on the first three :)

The Wheel and Axle 

Experiment with moving carts or wheelbarrows to get some idea of moving objects with and without the benefit of wheels. 

An easy thing to find might be some old or new luggage pieces. Luggage with wheels is very common these days, but also find a suitcase with no wheels for some experimentation. With your child, load each with some blocks or something with some weight (same in each) and try to pull/push them. Look for play cars or trucks that have removable wheels in your collection. Try to move them on a flat surface or even on an inclined one, without wheels and then with - your little scientist will be able to make all their own predictions and conclusions on this one! There are many LEGO wheel and rod pieces - again, try to move with and without wheels, for fun. 


The Lever

We see examples of levers every day - a seesaw in the playground is a lever. Kitchen tongs are levers. 

Your scientist(s) can make their own simple lever with objects in your home or classroom. Look for a glue stick or other cylindrical object and a popsicle stick, and make a simple seesaw. Take it a step further and design a catapult lever - the easiest way is to tape on a plastic spoon and use it to hold a lightweight object. Push down on the opposing end and your object will be airborne!


The Inclined Plane 

Children will see inclined planes in ramps, slides, and rollercoasters - all things that start high and go down on an incline. They are also part of working scissors, knives, and doorstops - they are designed to have a wedge shape to start with a slim side and get wider, like an inclined plane. 

To experiment, start with moving a toy car on a flat surface and see how far it can go. Have other elements laying around nearby and ask - How can we make it go faster?  Your child may decide to make a toy car move faster or farther by elevating one end of the road/block by propping it higher and making their very own inclined plane. By making a hypothesis and proposing a test, they are using the Scientific Method!!

Have fun!!


Saturday, May 9, 2020

Remote Learning: Growing Things (With What You Have at Home!)


Want to grow something and show your children at home the process?

No seeds? No problem!!

Don't despair if the sunflower project you always do in the Spring isn't able to work with Remote Learning! Look around at what you (and your students!) already have at home - you'll be surprised what you (and they) can do when you start thinking outside the box :)


Soon after we realized we weren't going back to the classroom anytime soon, I looked around at what I had - in my fridge, my pantry, on my block ...

The first thing I tried was rerooting romaine lettuce. I had a package of lettuce with the stalk part still attached and I had seen a YouTube video showing how to regrow the lettuce. I can't believe how simple this was! Just cut the lettuce about 1 1/2 inches from the end and take the stem piece and set in water in a small container. Overnight, I could see the regrowth. Change the water daily and within a week or two, you'll see roots start to appear. Plant in dirt and watch it grow!


Seeds from an apple were next, after eating it, of course. I put the seeds into a sealed plastic bag in the sunlight, with a small, damp paper towel and waited to see what would happen. This took longer, but after about 7-8 days, roots and a stem started to appear. A few days later, it was transplanted into dirt and continues to grow :)


Look around your environment, too, not just in the house! These "helicopters" fall from a tree near me every year, so into a bag they went, and .... after two weeks (patience!), a small root system was kicking in!


Carrot greens can be grown from the tips of carrots - good for seasoning and garnishing :)


To grow potatoes, I cut a section of a potato that had some growth at the eye, and put that in a plastic bag, too. I left it in a sunny window, and forgot about it ... until this root system caught my eye :)


No seeds, no problem! You can teach and they can learn - using things that are already around in the home!

Have fun!


Saturday, February 15, 2020

Small Steps Towards Equity and Inclusion

Teachers (and parents) can broaden children’s experiences through thoughtful, inclusive choices in both literature and in choosing topics for project-based learning. Seeing a range of people reflected in books, and opening up topics that are inclusive, where everyone can contribute and feel connected, are just two ways to honor and celebrate the differences among us.

All children need and deserve to see themselves in books - to feel a part of the world represented in literature, through illustrations and photos. If they do not, they won’t necessarily feel the connection to literature as a whole and to specific stories that may reflect or expand their experience of the world. Children should also be looking at illustrations and reading stories that broaden their view of different cultures ... there is a wealth of great books out there to choose from.


It’s easy to find book lists that are inclusive and expansive, depicting children of all races, cultures, ethnicities, etc. Books that also show characters with disabilities, varied family structures, and in different living situations are so important, as they normalize things for children who may feel marginalized in some way.

In order to feel truly a part of play and learning situations, children must also be able to make connections to the materials featured in the classroom. Choosing topics for group activities that level the playing field opens the door for children with differing backgrounds and experiences to meet on common ground. Topics that are drawn from nature, for example, allow all children ... those who are learning a new language, those with special needs, those with fewer background experiences, even those with trauma in their past ... to join in and contribute.

Common subjects like leaves, snow, planting, motion ... the typical “science” explorations have shown to be great equalizers in our class. Using these types of topics to launch new vocabulary, build knowledge, and explore common questions, helps our students all get involved in the topics we explore. Using these projects to bring together all of our children has helped make our classroom a community, and give each child a voice. And, it has been a very happy voice!

Have fun - and promote equity!


Sunday, January 20, 2019

We Are Scientists: Ice Cube Treasures

We are scientists! My friends and I are excited about science - most kiddos are! Here's some science for a cold winter day ... all you need are some ice trays (or there small containers), water, and small colorful items for a little science fun!

First, fill the ice cube trays about 1/3 full and freeze. Then, lay in some tiny treasures ... little toys, natural items, or colorful pompous! Fill the rest of the tray with water and freeze (if the items float, just freeze part full and then do a third layer of plain water to freeze).

When they are frozen, pop an ice cube out per child and encourage them to think up ideas about how to get the “treasure” out. They may want to try breaking the ice cubes or chipping at them with some kind of tool. Have them predict some outcomes and plan a method ... that’s what scientists do!


Show them how to use a dropper or a small spoon to drip little drips of water over and over on the ice ... it will start to indent a little.

Dripping cold water might work s-l-o-w-l-y, but they will see a divot develop where they are dripping water. Eventually, you can guide them to drip warm water with an eye dropper, and see the magic work even better!

Start a chat about the connections between ice and water - and how heat and cold affect each. See what your kiddos observe - tell them they are, indeed, scientists!

My friends got great satisfaction out of this task and stuck with it longer than I thought they would :) Some even asked for more cubes to try again :)

Have fun!

Sunday, January 14, 2018

Loose Parts: Junk Drawer Bounty!

There are so many cool things that you can do with Loose Parts - all the little things that end up in your junk drawer or around the house. With only a discerning eye and some old odds and ends, you can put together a basket or box of small things to tempt your child's imagination! Playing with collections can enhance math and science skills, stimulate language development, encourage creativity, and give small motor skills a workout. And, it's fun!

First, check your junk drawers for old keys, buttons, and other little pieces that might make interesting additions to your collections box. Coins can also be cool for sorting, patterning, and making designs with. Nuts, bolts, screws, etc. might make the list - anything small hands can tinker with, while staying safe. We also found some old monopoly houses, dice, bottle caps, and ping pong balls, which were all of immediate interest to our small friends.

Next, set them out and watch the magic happen! All of these small objects can be examined,  sorted by many different attributes - size, color, shapes, etc. Piles, patterns, lines and arrays may happen. Counting and comparing will be a natural next step. Encourage one to one correspondence counting by touch-counting objects yourself. Some of our friends even made creative pictures with different small pieces, shaping flowers, people, houses ... watch out, imaginations may be sparked! Side by side play on the part of the adult is a great way to spur exploration, without direct instruction or direction.

When our friends discovered our classroom collections, buttons and keys were examined and sorted - conversations about where they came from and what they would do with them came next. Sorting mats were pulled out and magnifying glasses employed. Every child discovered their inner scientist :) Patterns were made, and attributes discussed, using comparative language! The balls were bounced and rolled and then raced on flat surfaces - and then  other small pieces were used to make an obstacle course - lots of basic physics tests followed. Different objects were even put together to make non-permanent art - very cool pictures and collages!

See what's in your junk drawer - and get started!

Have fun!

Sunday, April 23, 2017

Mindful "Noticing" in Springtime!

 As Spring emerges, "noticing" has become our favorite word. We notice buds on bushes, water streams after the rain, pods lying on the sidewalk. Many "gifts" have been brought in - dandelions, shiny rocks, flower petals ... all the signs of spring!

As good as the children are at noticing, sometimes we adults are so busy organizing and planning, and just doing, that we miss the opportunities that are presenting themselves ... to stop and look through the eyes of the child next to us, and see where we can go with the subjects they are showing interest in.

Welcome and celebrate the interests of each child - see where their interests lie by the things they consider treasures and want to share with you or their friends. Find a way to incorporate telling about treasure in your day - a show and share type of activity, expanding vocabulary, and promoting conversation and questioning. Try taking turns filling a special bag or box and sharing what's inside! Each day could be a different surprise!

Explorations in parts of a flower or plant, how trees come back to bud, life cycles of plants and animals ... all of these "growth" topics are great for springtime, with examples all around us. Asking open-ended questions, such as "What would you like to do with it?" or "How can we find out?" will get your child more involved in the exploration.

Set up a "sticky wall" to give your children a place to display their treasures. A square of contact paper, hung sticky side out and tacked onto a window or other surface, can become a favorite display and organizing tool for your kiddos. With the light coming in, treasures are highlighted and can become a focus for future explorations. A dedicated exploration center, with small bins and boxes, is another way to organize special things that should be handled and examined. See what tools you have lying around - kiddos are always excited about magnifying glasses and plastic pincers - the tools of a "real" scientist!

Add art materials to the mix! Leave paper for sketching and clay for sculpting near the objects and see what they decide to do - maybe make a sculpture with sticks and flowers incorporated, or mold a tower with clay and rocks.

Combining natural materials with traditional art materials gives your kids a whole new experience! Sketching a rock with all its veins and colors helps children really see all the variety in its appearance, instead of just seeing a brown oval shape. It takes them deeper in "noticing."

 During the day, as you go about activities, make sure that you are present in the moment to witness these experiences, as often as you can. This attention to the little things is the mindfulness we hear so much about lately - young children are so good at this naturally, if we give them the opportunity :)

Have fun!

Sunday, March 12, 2017

We Are Scientists: Think It - Make It - Try It!

Scientists have questions, try to figure out ways to answer the questions, come to conclusions, and record their information. Sounds like every young learner I've ever met!  So, let your kiddos know that they ARE real scientists ... and watch them get to work!

To get started, you can put together an assortment of materials that might be useful - and definitely will be appealing. At first, the children might just want to tinker with each of the materials but, before long, they will start to see possibilities for using them in different ways. The idea is to provide this "makerspace" where they can have a thought and then test it out :) For example ... What would make this ball roll faster? Farther? Hmmm....

PVC pipe, in varied widths and lengths is a great place to start. Your local hardware store may even have it pre-cut into shorter lengths - two feet is a very workable length for little learners. I made sure to include two different width sizes (1 1/2" and 2"), as well as different joints that fit one or the other - or both! My scientists had to figure out which would work together and which wouldn't! It has been the workings of many experiments in velocity, friction, air pressure, etc., all by 3, 4, and 5 year olds.


A standard set of unit blocks, as well as any Duplo or Lego sets are great to have around, too. They can be used in conjunction with each other, as your child sees fit. Simple things like shoelaces, twist ties, and velcro strips make great connectors when building. Ping pong balls, available in colors and 6 to a package, were a big hit from my local dollar store!

Small cars, marbles (depending on the age of your children), and any small, light balls are all terrific tools for testing theories on speed and direction. Make sure that they are within reach and at eye view, so that inspiration hits :)

The idea is to introduce these elements but then STEP AWAY. Let the children formulate questions and try out hypotheses through interaction with this variety of resources.

Ask how, what, and why questions to help steer them, if they are stalled.

Maybe they want to see how to make the cars go faster or farther. How could you make that happen? What could you use?

Maybe they want to roll a ball so it goes farther than before. What would help with that? How can you use it?

Prompting to problem solve is the way to go!

My crew wanted to roll ping pong balls farther and faster - so they built this .... on their own!


See what your little scientists can come up with!

Have fun!


Sunday, February 12, 2017

Learning with Collections!

There are so many things your children can do with a collection of objects! It could be coins, shells, rocks, buttons! I can remember, as a child, being fascinated with a jar of multi-colored buttons that sat on a shelf at my grandmother's house. We would pick some, or pour some out, and  play with them, making up all sorts of games.


There are many simple things your children may choose to do ... many of them math and science related! Let them play with collections, and make decisions about what to do with them. Their ideas might surprise you! They may first choose to just examine up close and begin to notice differences between groups - colors, sizes, shapes ...  noticing is the first step to classifying and sorting!

Counting collections is another great next step, while they are doing some examining :) You can add in some math vocabulary such as more, greater, less, fewer and they will have concrete examples right in front of them.

Then, patterns! Your kiddos may choose to make a pattern, or, if not ready for that, to continue one laid out for them - red, white, red, white ... what comes next? Ours asked for pipe cleaners to thread buttons on - in patterns! Simple patterns can evolve into more complex - instead of red,white red, white (ABABAB), they may try ABBABB or ABCABC patterns, using more colors or sizes.

Sorting mats have proven to be LOTS of fun for my kiddos - and a great focusing tool. Simply take large paper, draw a grid and laminate them to hold up through multiple uses.

My kiddos have pulled them out to examine all sorts of things ... shells, coins, rocks ....

They even took the plastic animals and sorted them by habitat - ocean, farm, polar, etc. Have them choose an attribute to sort by - color, size, shape, shiny, flat, bumpy, etc. -  and then figure out what goes where. They may have to make subgroups and it could generate great discussion :)


Attention to detail is something my friends are really getting involved in - they want to examine with a magnifying glass and do some sketching to really try to be scientists :) We talk all the time about how scientists observe, sketch and write about what they see ... collections are a great way to put this into play!

Have fun!

Monday, January 30, 2017

We Are Scientists: Ice and Snow!

In the winter months up north, we can sometimes see a lot of ice and snow! When it keeps us from going outside to play, we bring it inside - to play and experiment!

There are so many ways to explore:

Bring in a big bin of snow to play with! Put on some mittens and make some mini snow people, using buttons and small sticks for decoration. Your kiddos will have great ideas for what to add for even more fun! Observe how the snow changes over time and talk about the volume of the snow - it fills a container but then, when it turns into water, does it take up as much space?


Try some ice dissolving - get some ice chunks and have small cups of salt and spray bottles of warm water available - and see what your little ones decide to do with them. Sprinkling or spraying may produce cracks and fissures - drop a tiny bit of food coloring in to see it spread out through the ice cracks!


Float an "ice cap" in some cold water! Take a container and freeze some water into an ice shape and set it to float. Notice how big it is and check the container for a good visual. Have some small polar animal figures available to float and balance, and observe over time ... as it shrinks! The kiddos will have some fun keeping their animals afloat and will make some great observations :)


See what other ideas your little ones come up with - exploring, asking questions, and trying out experiments will give them practice with the scientific process!

Give them pencils, paper, and crayons to record what they see - scientists aways keep notes!

Have fun!


Wednesday, March 9, 2016

We Are Scientists: Out for a Walk!

Sometimes you just have to pack your stuff and get outdoors! As Spring approaches, look for new ways to explore the backyard, playground, or sidewalk. Grab a basket or tote and throw in whatever "science" tools you have around ... Magnets, magnifiers, measuring tools, a sieve or colander, transparent colored or clear lids or containers. Grab a block and a car for even more fun! Somehow, making a Kit makes it more official - and fun!

Let your little ones take the lead - see what they're drawn to and slow down the pace to "notice" everything about it. It might be bugs or spiders, it might be plants or trees - lessons are all around you! If they need a little nudge, model your own observing style ... they'll want to know ... "What are you looking at?"

Prompt them to explore with "I wonder..." statements, and then let them go with it!


  • Take some little cars out to the playground or backyard and see which ones go faster down the slide. Build your own slide with a long piece of wood and change the angle to make the car go faster or slower.
  • Use your magnifier to get a close up look at all the different colors and parts of a bug (the non-stinging variety!) Your kiddos will be amazed at the details they see. Help them take a picture with your phone and enlarge it for viewing. Bring a sketch book with crayons or colored pencils, so your child can record like a scientist :)
  • Measure everything you see - with a ruler or against something familiar - sneakers or fingers make a great non-standard unit of measure. How many fingers tall is that flower? How many sneakers long is that bench?
  • Do a magnetic or non-magnetic study! Have your child see you try a magnet with something magnetic - it's magical! Then, something non-magnetic ... they will want to join in and find out for themselves!
  • Take samples of dirt from different areas and check them for differences ... are they the same color? Texture? Wet or dry? Sift some sand and see what different sizes those grains of sand really are - are there stones left behind?

Let your little ones play in the dirt and the mud - it will open their mind to scientific thinking and making conclusions.

Have fun!