Showing posts with label remote learning. Show all posts

Friday, February 12, 2021

Photos as a Teaching Tool

With some students remote and some present in school, educators are scurrying to find engaging ways to interact with both groups and “up” the interest factor in their lessons. 

Using photographs as tools in the classroom is not a new technique, but maybe one to revisit in this day of COVID teaching. The strategy of popping a photo up without direction and leaving feedback open-ended makes the photo a “mystery” to be solved and encourages students to “lean in” by piquing their curiosity.  

There are so many ways to do this in very different areas ...


Use photos as Story Starters, giving students an opportunity to write a sentence or story about what they see. Embed lessons about sentence structure, word choice, etc. in a back door kind of way.  


Photos can be great language builders - descriptive words are a natural ... size, color, shape, etc. Try a word web on a topic using a photo as a launch point. 


 Science topics are a terrific fit for photo use! There is nothing like a visual prompt to get everyone involved in something like space, earth science, growing things ... any topic you want. 

KWL charts can be enhanced by using a few photos to boost the interest and grab your visual learners, prompting them to participate. 


An area where real life photos is underutilized is Math! Photos of block arrangements, groups of scattered manipulatives, or partially-filled containers with a “What do you notice?” will get your students thinking, looking for groups, similarities and differences, shapes or whatever else they come up with. They will begin to view math as a part of the everyday world. Great discussions and lessons can ensue! 


The BEST part is that, using technology, ALL of your students can see these photos at the same time and can feel that engagement of learning and exploring something new. A puzzle or mystery to be solved is sure to grab their attention.


Use photos as transition tools or do it just for fun, but toss a little learning in along the way ... What words can you make with these letters?

What do you see on these picture cards? Matches? Sizes? Lots of math concepts here ...


Have fun!

Sunday, December 6, 2020

Learning Tools: Recycled Bottlecaps

Looking for ways to do more hands-on learning? Running short on supplies with remote and hybrid learning situations? 

Make your own learning manipulatives to use at home or at school! 

Recycled plastic bottle caps are easy to gather in a short time and come in a variety of colors and sizes. They are perfect for so many different uses - in literacy, math, and even art. 

As you work on letter recognition, you and your kiddos can put together a set of upper and lowercase letters for practice. Play a matching game with them, placing the uppers over the lowers and checking them together. You can also supply a name strip with the alphabet for self-checking :) 

Write sight words on larger caps and use them to manipulate into sentences - even “silly sentences” can be lots of fun and get your little friends interested in reading and writing :) Then, have them copy the sentences down for some writing practice - good fine-motor work!

At math time, use different colored bottle caps to make patterns - ABAB, AABAAB, ABCABC. Repurpose your collection to act as counters when making up or solving addition and subtraction number stories, or practicing basic math facts. See what other uses your budding mathematicians will come up with! Maybe sorting by attributes - size, color, ...?

Finding art applications is easy, too! Some friends may use them as “tiles” in a mosaic or to arrange into pictures. Others may use them as stamps or tracers with pencils to incorporate shapes into designs. They can also be glued into 3D forms as parts of sculptures, possibly using other recyclables. 

The opportunities are endless - see what your kiddos come up with! 

Have fun!


Tuesday, November 10, 2020

Start with a Craft!

Looking for a way to get your school days off to a good start? Want to do some fun crafts but your materials are limited due to remote/hybrid learning situations?

Consider beginning your day with a simple craft to push those fine-motor skills and get some conversation going for social-emotional growth between classmates, wherever they are learning :) 

Follow your class' interests, or the seasonal calendar, to determine what craft themes to explore... Halloween has just passed, and Thanksgiving is looming. Leaves are what's happening in nature, so just look around for inspiration. 

Keep supplies to a minimum, especially in these days of hybrid and remote teaching, and try to repurpose everyday recyclables or handy items. Have kiddos save cereal boxes and magazines at home, and prep families with a note to start a bin for cardboard and paper scraps, as well as safety scissors and glue sticks. (Be ready to supplement if these items are not easily accessible at home.) 

Then, try these tasks:


Stencils: 

  • Have children draw a shape on the flip side (inside) of a cardboard food box - cereal, fruit snacks, pasta - and cut it out. Try this with simple leaf shapes for starters :) They can get shape making practice and cutting practice with this - both great fine-motor activities!
  • Save the stencils for another day and use them to trace with pencils or colored pencils. The kiddos can color them in and draw in details of the leaves for a pretty picture.
  • Then, use magazines to find fall colors in ads and pictures, and use the same stencils to trace and cut out leaves to glue on another paper, making a collage.
  • Trace leaves on sturdy paper or even more cardboard, cut out, and use paint or markers to color. Then, find some yarn or string to make a leaf hanging or mobile.
Paper tearing:

  • Make a large shape on paper - circular like a pumpkin or an apple. Find orange or red paper to tear into small pieces - tearing is another great fine-motor exercise! Glue on to cover the whole shape. Trim paper around to complete and hang :) 
  • Make a series of large feather shapes on paper and cut them out. Trace a shoe on brown paper, or white paper and color brown. Tear other colors to cover feathers and assemble a turkey. Use markers or crayons to add details.
  • Cut fall colored paper (either construction paper or magazine paper) in strips and tear into pieces. Draw a tree trunk with brown or black crayons and use the pieces to create a picture of a fall tree.
  • Think about things in nature and Thanksgiving foods - torn paper can be used to make everything from acorns to corn on the cob :) Use the same processes to trace, cut and assemble - giving your students lots of practice!
Use your imagination to come up with other projects, remembering that some kiddos may not have access to lots of art supplies at home :)

Have fun!

Thursday, October 8, 2020

Remote Learning: Reading Aloud Tips

In a remote learning model, as in any type of teaching, you have to make choices about best practices for teaching reading. 

Live read alouds can be a wonderful way to connect with your students, modeling reading fluency and how a good reader thinks ... as long as all are engaged :) 

Take the time when doing live read alouds to set norms, just as you would in a face to face classroom. Make sure all of your little ones are ready to settle in :) 

Try these tips to set up ...

  • Start with a simple but calming movement activity before settling in -  a few yoga poses or a shake-it-out settling activity 
  • Have a “cuddle toy” that each child has on stand-by next to their workspace for keeping their hands occupied during reading time. (Might cause a stir at first but will become a commonplace tool)
  • Express “Get comfy” directions and give a short wait time before launching into your story 
  • Consider having reading time as “tummy time” depending on how flexible your students’ tech is - this can help with focus for some and for developing core strength 
  • Use frequent question or recap breaks to stay on task - just like you would in person :) 
  • Try to engage each child by using names when talking and mentioning things in the story. Avoid putting them on the spot but rather invite them to share when appropriate :)

If live reading isn’t feasible, consider using Zoom, YouTube, or another program to save your stories to be listened to independently, but build in the suggestions above. Building in short breaks for thinking about questions keeps your students engaged and encourages them to think about what the story is all about, aiding in their comprehension. 

By recording, you also give the children the ability to revisit a story several times, which promotes deeper thinking and allows them to become more familiar with story elements - win, win! 

Have fun! 


Friday, October 2, 2020

Remote Learning: Building Community

While your class may not be in-person, or only partially in-person, it’s still made up of people - little people :) 

One of the biggest concerns with remote learning is that students are feeling disconnected and aren't getting the benefits of being in a group. This is where consciously using Social-Emotional Learning (SEL) can help to make the kiddos feel part of things by building bridges between on-line, hybrid and in- person learners. Aside from targeting these feelings with good literature choices and class discussions, what else can you do?

Think about ways to build community amongst your students, in order to promote togetherness and belonging!

Use photos!

  • Distribute class pics to be kept at home or in school (or both)! Have students send in a photo and put them together grid style (with permissions, of course) to be kept on display for reference during lessons, or anytime. 
  • Make class graphs a part of your day! Use those same pictures, individually mounted on index cards or magnets (business card magnets are the best!!) to build bar graphs that tie in with a daily question, or that relate to whatever lessons you are engaged in. This "polling" method gives everyone a voice from time to time and allows them talking points based on commonalities - or even differences!

Consider pen pals within your class!

  • Have your class send artwork/pictures/letters between class members to strengthen bonds. You might even want to switch partners every so often, to mix it up!     
  • A roving paper class pet or something like Flat Stanley can be fun - each member of the class would take a turn having a visit and writing/drawing about it, and forward to the next, if it's doable :)      

Socializing is important for cohesiveness! 

  • Try to make a point of holding a Social Zoom on a regular basis, including all in the class. No lessons - just a fun activity to have them interact. Maybe show and tell or a game to play - or just taking turns telling something that's going on :)
  • Have a silly theme day from time to time - crazy hair, hat, socks, PJs - make it attainable for all :) Teachers - for those who forget on crazy hat day - keep a roll of aluminum foil handy - turn it into a Hershey’s kiss hat! 

Keep the class bonding, learning and belonging - it's so important!

Have fun!!


Saturday, August 29, 2020

Remote Learning: Movement Breaks

Hey teachers! :) Don’t give up your movement breaks when remote learning is the model you’re working in! We KNOW how important breaks are for keeping attention focused and there are so many options that are easy to use  ... redeploy strategies you’ve used in the classroom and just tweak them a little bit! 

Establish routines that include movement for starters, transitions, and wake-up, shake-up times. :) 

Starting out your day, instead of roll call, have Make Your Move - when they hear their name, they make their signature move - get some wiggles out before sitting down at the screen. Or try a rhyme game ... “If your name rhymes with _____ , do a dance!” This is a fun way to get everyone interested and on task, and sneak in a little rhyming lesson.

For transitions in the virtual classroom, when you want to switch subject matter or get new supplies out, use a YouTube or a class song to get everyone moving and set a time limit. Try “We Can Count to 100” on YouTube to count up, clean up and regroup (while also getting LOTS of practice counting all the way up to 100.) You could use this for “bio-breaks” also, while remote learning, so everyone isn’t hopping off at odd times.   

When you see that attention is waning or bodies are getting twitchy, have a cupcake or muffin tin ready with movements taped in the bottom and a big pompom. Make a show of tossing the pompom high so it lands in one of the cups, and have your students do whatever comes up, counting to 10. Once you do one or two, slide back into your lesson. 

For an alternative, try a game of Follow my Move, where students take turns choosing a stretch, exercise or dance move and everyone follows, while counting to 5 or 10. ( More counting practice!) Spacing this out throughout your screen time, using popsicle sticks with kiddos names, will keep them wondering who’s next ....

Using popsicle sticks of your own to draw or label a movement, stretch, activity is also a great way to keep them organized and make sure you have LOTS of options during your on-air time. There are even sets you can find on teacher supply websites if you want to go that route. 

For littles, a good old fashioned ABC March around individual spaces gets a little percussive movement in to get the wiggles out. Really get silly with how hard you march and lift those knees! Acting out simple finger plays with the whole body is effective for getting the blood flowing and minds on task, while highlighting rhyming or counting :) Think 5 Little Monkeys or The Itsy-Bitsy Spider with LARGE hand and arm movements ...

Transitions could also include a little Teacher I Spy! incorporating shapes and colors, or a more movement - oriented “Find Me ...” where the student has to bring an object back to the screen that is a particular shape, color, or whatever. If you’re learning about numbers, make it “Find me 8 of something small ...” These brief movement breaks will incorporate learning, but allow movement - win, win! 

Have fun! 


Saturday, May 9, 2020

Remote Learning: Growing Things (With What You Have at Home!)


Want to grow something and show your children at home the process?

No seeds? No problem!!

Don't despair if the sunflower project you always do in the Spring isn't able to work with Remote Learning! Look around at what you (and your students!) already have at home - you'll be surprised what you (and they) can do when you start thinking outside the box :)


Soon after we realized we weren't going back to the classroom anytime soon, I looked around at what I had - in my fridge, my pantry, on my block ...

The first thing I tried was rerooting romaine lettuce. I had a package of lettuce with the stalk part still attached and I had seen a YouTube video showing how to regrow the lettuce. I can't believe how simple this was! Just cut the lettuce about 1 1/2 inches from the end and take the stem piece and set in water in a small container. Overnight, I could see the regrowth. Change the water daily and within a week or two, you'll see roots start to appear. Plant in dirt and watch it grow!


Seeds from an apple were next, after eating it, of course. I put the seeds into a sealed plastic bag in the sunlight, with a small, damp paper towel and waited to see what would happen. This took longer, but after about 7-8 days, roots and a stem started to appear. A few days later, it was transplanted into dirt and continues to grow :)


Look around your environment, too, not just in the house! These "helicopters" fall from a tree near me every year, so into a bag they went, and .... after two weeks (patience!), a small root system was kicking in!


Carrot greens can be grown from the tips of carrots - good for seasoning and garnishing :)


To grow potatoes, I cut a section of a potato that had some growth at the eye, and put that in a plastic bag, too. I left it in a sunny window, and forgot about it ... until this root system caught my eye :)


No seeds, no problem! You can teach and they can learn - using things that are already around in the home!

Have fun!


Wednesday, April 22, 2020

Remote Learning: Look for Sight Words All Around!

Part of learning to read is to quickly recognize some words - the words we call "sight words." Each grade level has an expected list, and each class does things a little differently, but there are lots of small, simple words your child will begin to recognize, especially with fun ways to practice them :)

One resource that is available to you at home is the use of what we call "environmental print." It's the print that you see on packaging, newspapers, magazines, signs, etc. Before you throw away your recyclables, I have a fun "game" for you to play at home :)

Show your child the box or paper, and see if they can find any words that stand out, either alone or as part of (a chunk of) another word .... let's call it a WORD HUNT! Once you've found something, cut it out! I found all these words on my Raisin Bran Crunch box this morning, before I recycled the rest  :)


For another step, you could tape or glue these words onto index cards, or cut up cardboard (use the flip side of the box!) and you have brand new sight word cards! If you find matching pairs, you could do WORD MATCH! I found all of these - I know there are some matching words in this pile!


SILLY SENTENCES is the next game ... arrange the words in sentence lines to try to make sentences. Sometimes they make sense, sometimes they are just silly!! You might have to make some additional people, place or thing (noun) cards or action (verb) cards to form some complete sentences. Let your child draw pictures and help them sound out the corresponding words, so then they can use these when they have sentences to write for assignments.


Most of all, they will get used to looking for these words in the environment, tuning into literacy all around, and having fun with it!


Tuesday, April 21, 2020

Remote Learning: Math - Use What You Have!

Sometimes Math concepts are hard for our little guys and we have to look through their eyes to find ways to make it all make sense. Making it fun is always best, as is applauding small successes as steps along the way :)

In these times of being home during learning times, we have to be even more flexible in how we approach "lessons" :) Look around with fresh eyes for available tools already in your home :) Use things that you find to make math lessons more concrete. For starters, if your child benefits from using tactile methods of teaching, pull out a deck of cards and rustle up some old game pieces.

Get out your playing cards for a simple game, that will explore counting, ordering, and more and less.


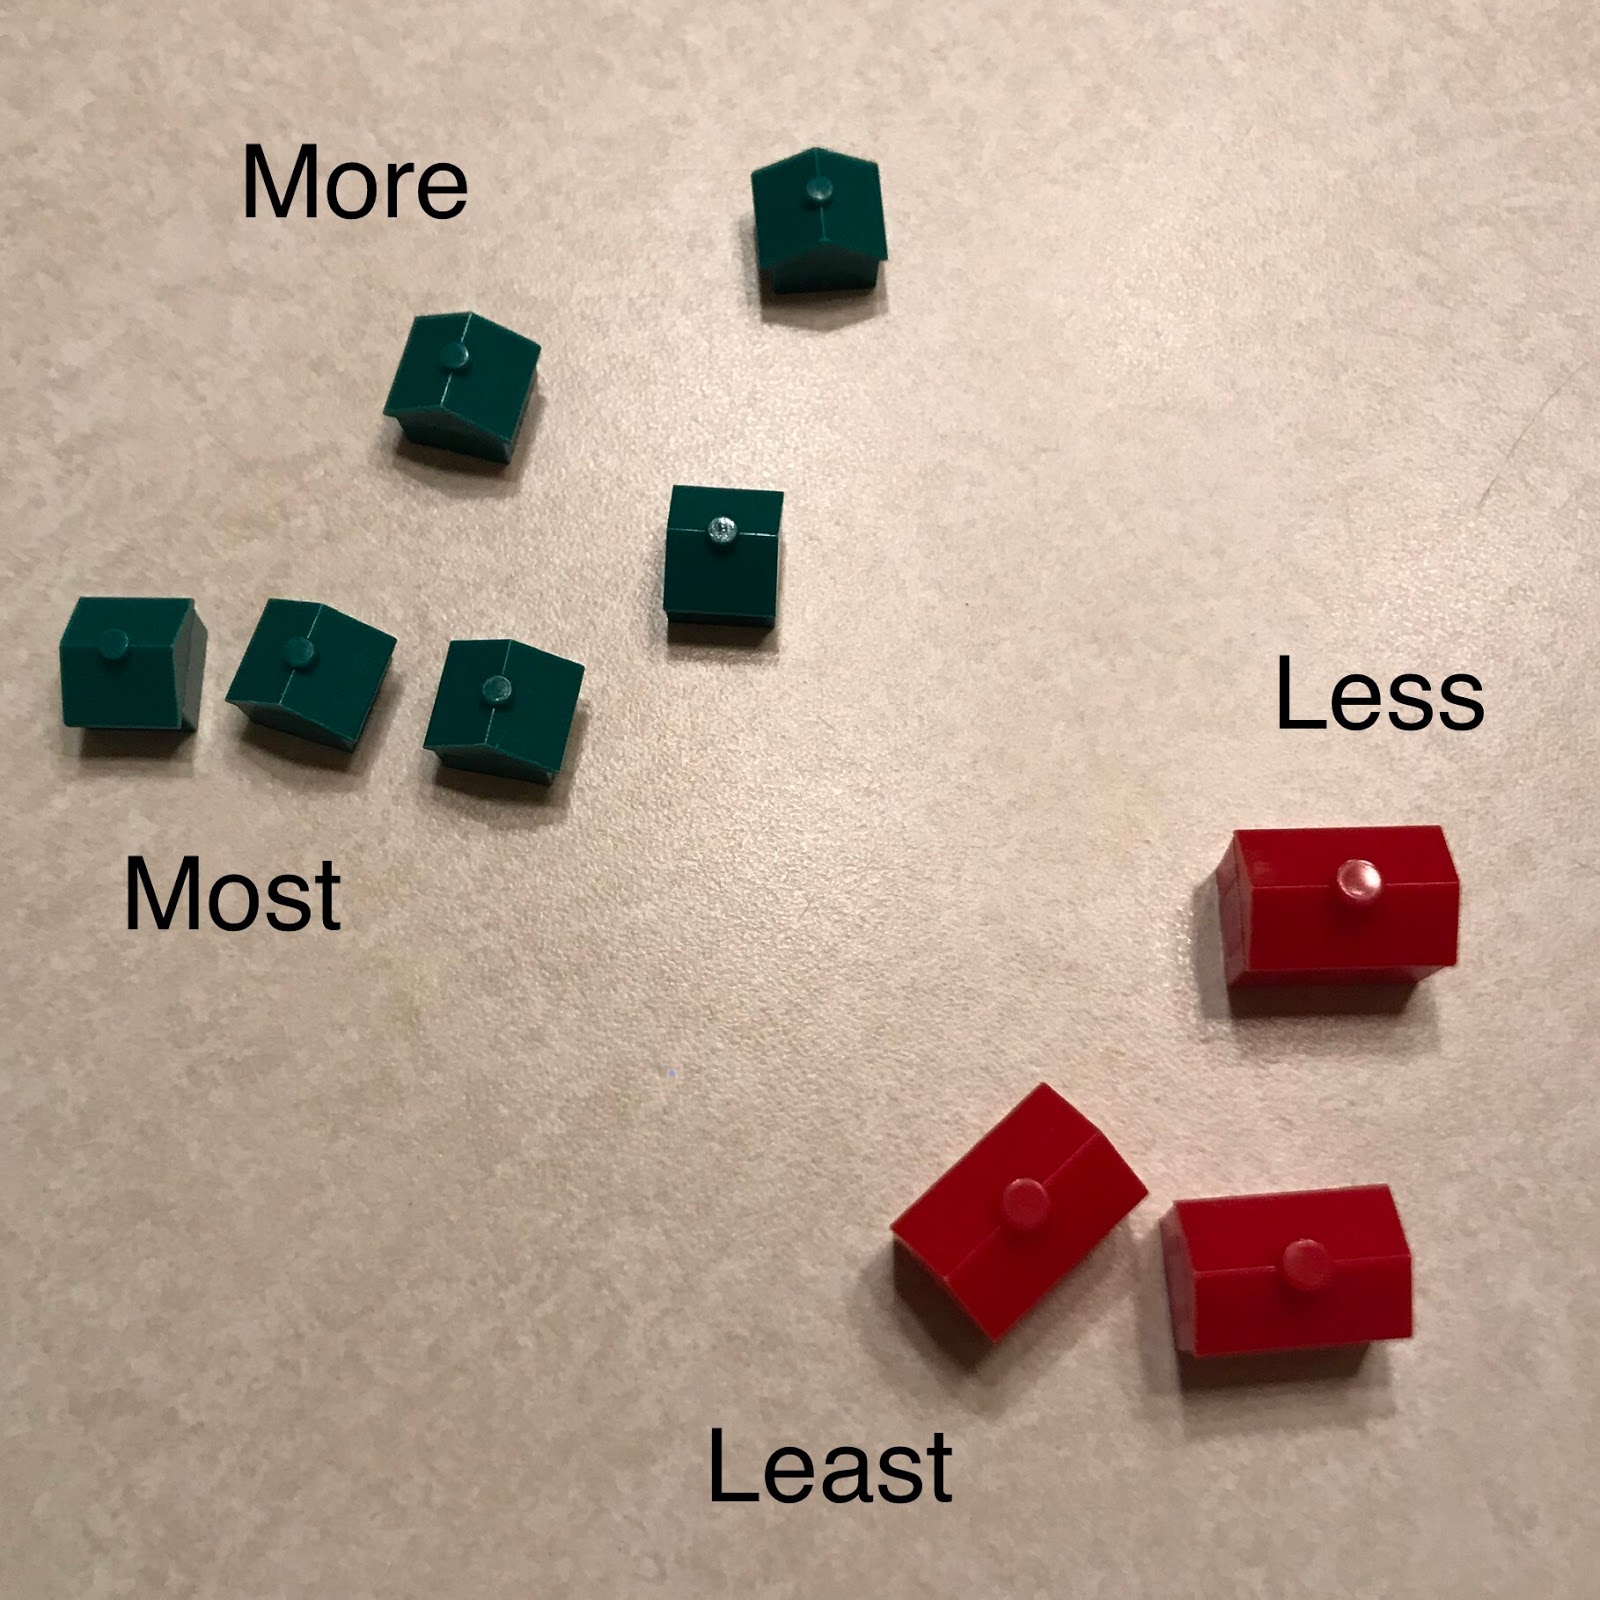
Each player gets a stack of cards and turns over one at a time (like the old War game). Each player takes a turn to count the objects (diamonds, hearts, spades or clovers) on their card and touches the numeral in the corner of the card, saying the number. Then, use math language like "most," "more," "less'" and "least." e.g. "I have 9 and you have 5. I have more than you."

Another form would be to lay out three or four cards, count them each up and order them, naming them as "most" and "least." If your child guesses correctly, they get the cards. Getting these concepts down with smaller, one-digit numbers will be to your child's benefit, before moving on to larger numbers. Down the road, you can make higher number cards from index cards, and play with them.

Find an old Monopoly game, or another game with multiple pieces, to use them as your own "math manipulatives." Grabbing amounts of green houses and red hotels, sorting them and finding the totals, will help your child with those skills. Then, add in the math language of "most" and "least" to bring those concepts home :) You might have other toys or games around that can be repurposed for these lessons. Any time you can engage your child in moving, finding, collecting - this will help them learn.

In our house, buttons were always a fun manipulative, as were popsicle sticks. As a teacher and crafter, popsicle sticks were easy to store, and fun to explore with. In our Kindergarten classroom, we used them to count the days of the year, making "bundles" when we reached a group of ten.

Trying this at home may solidify the concepts of higher numbers for tactile learners ... 5 "bundles" (or tens) and 2 "extra" or "all by themselves" (or ones) would be 52. To compare higher numbers to find out "most" and "least," making bundles and extras and touch each one as you count. Your child may understand these bigger numbers better when they can see quantities with their eyes and touch them with their fingers.

By playing with the numbers using games and game pieces, and writing down/matching with corresponding numerals, math becomes more concrete!

And, more fun!


Thursday, March 26, 2020

Remote Learning: At-Home Literacy (Fun!) Challenge

Looking for ways to help your child branch out in their literacy skills, while they're home?

Try putting the kids in charge :) This is a multi-step, fun project that could be broken down over several days :) They will learn about characters, setting, adding details, writing down information, making choices about writing, and compiling notes into a "report." All while having fun ....... :)


Step1:

Get out some art materials and design a character (animal or person) to write about. (They may be able to do this alone, or need help with outlines or models, depending on their age and/or ability. Sometimes just drawing a simple outline with shapes will help them get started...)

I picked a mouse for my character (and he has a lizard friend!) ... maybe you will choose a bear, a person, a snake, or something else. Look at books to get ideas, if you need to. Use colors and add details to make your character super cool! Definitely come up with a name for your character! When you're done, cut your figure out.

Step 2:

Design your character's "house." Find a small box or envelope (bigger than your character) and draw on the outside, making it into the type of place that your character would live in. Add pictures of accessories and cut them out to tuck them in, if needed/wanted.

Step 3:

Find some writing paper - computer paper, paper from a notebook, whatever you decide on will be great! Fold it or cut it into smaller pieces - either quarters or strips. I cut mine into strips so I could write across and then fold it up later to fit in my "house."

Step 4:

Decide on a list of questions that you want to answer about your character. Think about what your character looks like, what their house looks like, what his/her family is like, what their favorite color is, what they like to eat, play with, etc. If you need help, ask a bigger person to write them down. 

Step 5: 

Take one question at a time and write about your character. When all questions are answered, ask some more questions and write some more answers :) It could be as simple as "Snakey has no feet and is green," or much more detail, if you're older. Small friends can do this with a big friend. 

Step 6: 

Write an introduction, as if you were introducing your character to a friend. Line up all your writing pieces and decide which piece of information should go first, next, last. Put it all together into a book about your character. Staple or tape together, or rewrite if needed.

Step 7:

Make a cover and have an author's reading with the family - sit in a special chair and read aloud. Consider recording it on audio or video and sharing :)

So, you have your character forever now ...
maybe they'll take some adventures next ... !

Have fun!

Thursday, March 19, 2020

More free resources (Part 2)

Everyone is getting very creative but just in case you’re looking ....
More resources ....

On FacebookLive - check out PhillyZoo at 2 each day.

Audible books for all ages - https://stories.audible.com/start-listen

Aquarium live cams - https://www.montereybayaquarium.org/animals/live-cams

San Diego Zoo also has live visits with animals on Facebook and FacebookLive.

Children’s Museum of Indianapolis is offering fun videos and activities for kids https://www.childrensmuseum.org/museum-at-home

Children’s Museum of Pittsburgh has maker projects on its Museum at Homepage https://pittsburghkids.org/museumathome

Have fun!

Tuesday, March 17, 2020

Free in-home learning resources: during Coronavirus 2020

While we are all adjusting to our new schedules, and learning how to adapt to doing things differently, so many resources are being made available to families to facilitate in-home learning. Check these links (subject to date/time restrictions) to find ways to extend your child’s learning :)


For extensions in Literacy, take a look at:

Storyline Online.  https://www.storylineonline.net/about-us/

Seussville  https://www.seussville.com

Oliver Jeffers ("The Day the Crayons Quit") is doing daily Instagram read-alouds, and Peter H. Reynolds ("The Dot") will be on FacebookLive. Check for your favorite authors on social media - more and more are stepping up.

PenguinKids is doing a daily read-aloud at 10am ET on InstagramLive, so check them out, too :)

YouTube has an amazing assortment of books read aloud by teachers and others, if you're looking for a particular favorite. Many local libraries are also operating online, even if they are closed to the public.

For Math, there are Math games and lots more ... at https://www.education.com/

Interested in Science? Mystery Science (mysteryscience.com) is opening up for free for all different ages, and Scholastic.com has a great library of videos to view on many different topics.

Don't miss a daily visit on FaceBook Live with the Cincinnati Zoo :) 3PM
https://www.facebook.com/cincinnatizoo/

Looking for Dance and Exercise fun? Try these ...

Ballet:  https://www.clevelandinnercityballet.org/single-post/2020/03/14/Cleveland-Inner-City-Ballet-to-launch-Virtual-Online-Ballet-Instruction-Program

Yoga: https://www.youtube.com/user/CosmicKidsYoga

All the budding artists can join Mo Willems for his Lunchtime Doodles at 12N ET:
https://www.youtube.com/watch?v=RmzjCPQv3y8

Many museums and performance art establishments are working on getting their content out to the public. Check as the days go on to find even more things to do :) I saw this compilation of at home things to do/view, but always preview before having kids jump in :)

https://www.cnn.com/style/article/what-to-do-at-home-streaming-art-museums-concerts-coronavirus-trnd/index.html

Have fun with your exploring time!


Note: all info subject to changes

Wednesday, March 9, 2011

Remote Learning: Make Treasure From Trash!

Ready for more no-cost teaching tools? Right in your own home, there are many opportunities to create learning from things you come across every day. Everyday items like cardboard tubes, yogurt and baby food containers, ends of wrapping paper - all have secondary uses for craft projects. It just takes a little imagination to find the next great recycling use!

So, before you fill up your recycling container, check for second uses for some of those objects -

Water bottles:
Make a set of measurement bottles! Using a measuring cup and some water, find the level for several different amounts (half a cup, one cup, two cups, etc,) and use a permanent marker to mark the outsides of a few different bottles. Then mix up a batch of colored water by adding a few drops of food coloring and let your child measure and pour to their heart's content. They will be learning about more and less, quantities and measurement, all kinds of great things!

Use a water bottle to make an "I Spy" toy that's great for all kinds of learning skills - as well as quiet play if you're going to be out somewhere :) Use an empty water bottle that is completely dried out - fill it with confetti (shredded paper) and add items to search for- either small objects or pictures on heavy paper (glossy magazine or card stock). When complete, fasten top on with a small bit of craft glue or use a glue gun (adults only please!). When your child shakes it up, differerent objects will "appear."  I've seen these done for different letters (ABC bottles) or concepts (a beach bottle, a bug bottle, etc.).  Have fun with it!

Egg Cartons:
Sort out beads in egg carton cups to get ready for pattern making - keychains, bracelets, or just string on a chenille stick - an egg carton will help you sort them out as well as keep them from rolling away!

"Creature" making - Bugs, worms, caterpillars - use some washable markers and attach some googly eyes and some pipe cleaner legs - and, presto! Use your creative skills and see what you come up with!

Use part of an egg carton as a disposable paint organizer! Are you painting with three colors? Four? Put just the amount you want to use in a strip of egg cups and when you're done - no clean up necessary!

Cereal boxes:
Heavier cardboard boxes are just right for cutting into stencils for tracing! Cut into shapes, different stencils for different seasons - hearts in February, shamrocks in March, bunnies in April - and it won't cost you a thing! Your children will have hours of fun and improve their pencil grips and small motor control at the same time!

Paper Towel Rolls:
Every child loves a telescope! Decorate your paper towel roll with paper, tape, stickers, etc. to make a great "focusing" device ...then play "I Spy" for all things that begin with certain letters, have specific shapes or colors - whatever strikes your fancy! Adaptations that are fun to try: “Nature-scopes” to look for bugs and natural observation, "Leprechaun-scopes" for St. Patrick's Day for seaching out little elves, "Santascopes" for you-know-who with a little tag attached:  "On Christmas Eve night, look up in the sky, Santa's reindeer may fly by!"  Use your imagination!

Plastic Containers:
Use tops for individual paint trays and bottoms for water containers for watercolor painting. Use containers and baby food packages for stashing small craft items like beads, stickers, buttons, etc.

Wrapping Paper Scraps:
You get to the end of the paper roll and there's not enough left for another package ... save these scraps for collages and shape projects. Multicolored papers make great flower petals for cut and glue practice. Cut some into shapes and use them as picture starters - an oval piece might be a person's body - add head, arms and legs and keep going! Holiday paper can be cut into little cards for little hands to use at holiday time!

Have fun!