Showing posts with label crafts. Show all posts

Wednesday, December 9, 2020

Winter Fun Kit - Snow Daze

If the holidays are overwhelming with toys, emotions, schedules ... try something new :) 

To take the stress away, especially when things are upside-down due to COVID, gift an “experience” to be enjoyed in the after-holiday blah time. January can be such a let-down, and with socializing restrictions in place, at-home activities are the way to go!

There are so many subscriptions and kits out there that look super interesting but just a little different from what I was picturing ... so I made my own. And, you can too! 

I ordered a few craft items from my favorite craft supplier, to make some painted craft stick snowflakes, which will be fun to paint and assemble, and not require too much help from already-stressed adults :) On my list was also some felt, buttons, pompoms, and wiggly eyes to make a tabletop put-together, take-apart snowman decorating kit for hours of fun. 

Playing indoor games together will put some smiles on your kiddos’ faces AND get them some much needed non-screen time :) Oriental Trading had a snowball bowling game and a snowman building spinner game that fit the bill, but it would be easy to put one together yourself for very little cost. :) A few giant white pompoms and some upside-down paper cups and voila! 

A recipe for a snowman treat to make, with ingredients included, will fill out the “make it” selections - so simple with wafers, frosting and candy eyes! I am including some fruit roll ups to cut up for scarves ⛄️ 

Of course, I included a few Snow-themed books, aged appropriately for the recipients of my particular box. Adding to book collections is one of my favorite things! 

Everyone LOVES to get mail, so I will give a certificate at the holidays and mail the box after the New Year! 

Someone will be having fun! ⛄️⛄️⛄️⛄️⛄️


Sunday, December 6, 2020

Learning Tools: Recycled Bottlecaps

Looking for ways to do more hands-on learning? Running short on supplies with remote and hybrid learning situations? 

Make your own learning manipulatives to use at home or at school! 

Recycled plastic bottle caps are easy to gather in a short time and come in a variety of colors and sizes. They are perfect for so many different uses - in literacy, math, and even art. 

As you work on letter recognition, you and your kiddos can put together a set of upper and lowercase letters for practice. Play a matching game with them, placing the uppers over the lowers and checking them together. You can also supply a name strip with the alphabet for self-checking :) 

Write sight words on larger caps and use them to manipulate into sentences - even “silly sentences” can be lots of fun and get your little friends interested in reading and writing :) Then, have them copy the sentences down for some writing practice - good fine-motor work!

At math time, use different colored bottle caps to make patterns - ABAB, AABAAB, ABCABC. Repurpose your collection to act as counters when making up or solving addition and subtraction number stories, or practicing basic math facts. See what other uses your budding mathematicians will come up with! Maybe sorting by attributes - size, color, ...?

Finding art applications is easy, too! Some friends may use them as “tiles” in a mosaic or to arrange into pictures. Others may use them as stamps or tracers with pencils to incorporate shapes into designs. They can also be glued into 3D forms as parts of sculptures, possibly using other recyclables. 

The opportunities are endless - see what your kiddos come up with! 

Have fun!


Tuesday, November 10, 2020

Start with a Craft!

Looking for a way to get your school days off to a good start? Want to do some fun crafts but your materials are limited due to remote/hybrid learning situations?

Consider beginning your day with a simple craft to push those fine-motor skills and get some conversation going for social-emotional growth between classmates, wherever they are learning :) 

Follow your class' interests, or the seasonal calendar, to determine what craft themes to explore... Halloween has just passed, and Thanksgiving is looming. Leaves are what's happening in nature, so just look around for inspiration. 

Keep supplies to a minimum, especially in these days of hybrid and remote teaching, and try to repurpose everyday recyclables or handy items. Have kiddos save cereal boxes and magazines at home, and prep families with a note to start a bin for cardboard and paper scraps, as well as safety scissors and glue sticks. (Be ready to supplement if these items are not easily accessible at home.) 

Then, try these tasks:


Stencils: 

  • Have children draw a shape on the flip side (inside) of a cardboard food box - cereal, fruit snacks, pasta - and cut it out. Try this with simple leaf shapes for starters :) They can get shape making practice and cutting practice with this - both great fine-motor activities!
  • Save the stencils for another day and use them to trace with pencils or colored pencils. The kiddos can color them in and draw in details of the leaves for a pretty picture.
  • Then, use magazines to find fall colors in ads and pictures, and use the same stencils to trace and cut out leaves to glue on another paper, making a collage.
  • Trace leaves on sturdy paper or even more cardboard, cut out, and use paint or markers to color. Then, find some yarn or string to make a leaf hanging or mobile.
Paper tearing:

  • Make a large shape on paper - circular like a pumpkin or an apple. Find orange or red paper to tear into small pieces - tearing is another great fine-motor exercise! Glue on to cover the whole shape. Trim paper around to complete and hang :) 
  • Make a series of large feather shapes on paper and cut them out. Trace a shoe on brown paper, or white paper and color brown. Tear other colors to cover feathers and assemble a turkey. Use markers or crayons to add details.
  • Cut fall colored paper (either construction paper or magazine paper) in strips and tear into pieces. Draw a tree trunk with brown or black crayons and use the pieces to create a picture of a fall tree.
  • Think about things in nature and Thanksgiving foods - torn paper can be used to make everything from acorns to corn on the cob :) Use the same processes to trace, cut and assemble - giving your students lots of practice!
Use your imagination to come up with other projects, remembering that some kiddos may not have access to lots of art supplies at home :)

Have fun!

Thursday, September 10, 2020

Playing Store: Consumers and Producers

Playing store can be a great play experience for your kiddos, but why not really make it meaningful?

With a little help, your children can participate in PBL (project based learning) by creating their own products, "pricing" them, and "selling" them.  It sounds complicated, but it truly is not :) 

As an example, one small crew made bead bracelets and duct tape bookmarks, as part of an open-ended craft activity. (Great fine motor work, BTW!) Some were very elaborate, therefore more "expensive." The artists and artisans were the "producers." When they had a bunch of “products” finished, they laid them out and examined them, counted up the sale items, and came up with a pricing system. They kept it simple with $1, $2, and $3 items, but this could be adjusted if you wanted to make change or work with harder numbers.

All items were then priced and the kiddos turned our dramatic play area into a store display area. They arranged their goods, and some friends made signs to show "consumers" where to shop. They all discussed how much each item should cost, and tagged items with sticky notes.


For the consumer side, children then took turns being shopkeepers and customers. This required a little adult intervention, to model being the paymaster, and to sort out roles. Shopkeepers could earn "Kid Cash" while working and then save it up to go shopping with later on. A few customers were given some cash on loan, to get the process started. Customers with no cash yet had to window shop, plan, and wait until they made some money to spend. All roles revolved, so all students got a chance to be producers, shopkeepers, and customers.

When it was time to be a customer (or consumer), each child had to budget their teacher-issued “Kid Cash” in order to purchase what they wanted. Decisions had to be made about items that were too pricey, or not within the budget, and the dollars had to be stretched to stay within budgets. 

On the sales side, adjustments were made to prices if items weren’t moving well and small groups of students spontaneously got together to make those judgements. It was awesome to watch them start to take ownership of the store :)

Throughout the process, lessons were learned, the children could tell about the process that we “studied” :) 

AND we had so much fun!

* This lesson was done pre-COVID-19. Adaptations could include quarantining supplies for a few days in between segments and setting up a store play center using precautions seen in actual stores (such as clear partitions and hand sanitizer stations), “normalizing” these scenes for students. This would allow for some play interchange, while maintaining distance and safety precautions. 

Saturday, July 18, 2020

Q-Camp: Plans for Tired Parents :)

This 2020 is an unusual year! You may be running out of ideas to keep your kiddos busy and engaged, which BTW is always ok - because children do their best work when it is born out of a quest for SOMETHING TO DO!!

But still, it's already been a long spr-ummer already, right?!? So, kids being kids ... they (and you!)  are still looking for stuff to do :)

I've tried to group some old posts together to make it easier to do a week's worth of fun and interesting activities with, hopefully, the kiddos doing most of the "work"! 

Day 1: Click here for some tips on fun Outdoor Play - using what you have to build and play on an obstacle course will get your child's creative juices working and have them think about everyday objects in new ways ... and it's great exercise! They can redo it again and again, practicing good social skills (if they have a partner) and design skills. Of course, some supervision is needed to ensure safety :) Don't pass up everyday opportunities for sidewalk curb balancing and hill rolling :)


Day 2: Let your kiddos experience Math concepts in a whole new way - Math with Water Play - great for a warm, dry day :) Let your kiddos collect an assortment of "tools" from around the house and see what happens. Maybe with a little starter exercise, they will take the play in new directions :)


Day 3: A little reading goes a long way, depending on your book choice. Reading to cool off is great for any day - rain or shine! You can cozy up for some great illustrations, and fun, silly words, but be ready to have your kiddos act out the shakey-shakey part :) Acting out and retelling stories are a great tool for comprehension, so play away!


Day 4: Mail Call! Use those rainy or too-hot days to craft some mail for relatives. Great way to reach out in these isolated times :) and children of all ages an abilities can participate! Younger friends can draw a picture and olders can write as best as they are able. These cards and letters are sure to be treasured and - maybe, just maybe, they'll write back!!


Day 5: Ocean Animals are always fun! Check out these simple craft ideas and great reading options - you can usually find titles on YouTube if you don't have access otherwise :) Pairing crafts with stories extends the literature and helps to solidify the story for young readers :)


Have fun!! 


Tuesday, July 21, 2015

Open-Ended Recycled Art

One of the coolest ways to spend a summer day (or any day!) is to do some art with recycled materials :) If you're like me, these days your recycling bucket fills faster than your actual trash ... So try a little trash to treasure creativity! Some of those items sitting right now in your recyclable bucket will inspire your child's imagination. Make sure to start off with absolutely no plan in mind ... just bring out some materials that could be interesting and let your children explore.

If you need a launching point, try examining an egg carton together and do some verbal brainstorming with your little ones. "What could we make with this? What animals have bumps like this?" Maybe they will want to paint and personalize the outside and use it to collect cool stuff on a nature walk. Then, see what other ideas they have! Egg cartons can become so many things -  bugs, caterpillars, finger puppets ... there is no limit to what your children might think of. (If you do a search online for egg carton crafts, you will find all sorts of ideas.) Your child might be inspired to make a whole collection of insects or other animals by dividing the carton up (adult help needed for cutting) and using markers, googly eyes, and pipe cleaners.


Boxes are another source of unlimited creativity. Use empty cereal or cracker boxes to make a whole town, farm, or big city to play with. Cover boxes with craft or construction paper and your child can personalize with details, such as doors, windows, and even signs for businesses. Lay it down. add wheels, and it becomes a vehicle.
The important thing is to let your children take ownership of the activity, with limited prompting and assistance from you!

Cardboard tubes are cool - there is always something to make with them! Paper towel rolls can be telescopes for pirates or adventurers. Smaller tubes can become binoculars with a little imagination, string, and some markers. Your children may want to connect some tubes and make tunnels to send some bouncy balls or tiny cars through.

Don't overlook your junk mail, either. Your little guys can use recyclable newspapers and magazines to practice cutting things on lines, and then gluing those cutouts or papers into collages of favorite things or mosaic designs. Toy store fliers and catalogs are particular favorites for little ones :)

Have fun!

Sunday, June 14, 2015

Father's Day Fun Gift

For Father's Day this year, I am borrowing this idea from a past Mother's Day post, and changing it up just a bit!

Everyone loves a gift that they can actually use ... here you go! And, it's so easy!!

Have your child make a handprint on a nice, sturdy piece of paper - preferably in a color that Dad would like to have displayed on his desk! We're using some leftover card stock in a nice, medium blue. Make sure the color paint you choose is a nice contrast to the color of the paper.

When it's dry, cut around it in a round shape (use a plastic lid or china saucer as an outline), leaving enough space to also get a name and date on the paper, near the handprint. If your child is able to cut already, then trace the line for them and let them cut away!

Use markers to finish with your child's name and the year, written by them if they are able or by you, if they are too small yet. When all is complete, you can have it laminated at a local copy store, if you have this service available to you, or use clear contact paper to finish it off.

Add a little poem - feel free to grab mine and adapt.  You'll melt their hearts:

Mug mats or coasters make a great gift for dads or grand pops - usable, personal, and easy to keep clean! Slip them inside a handmade card and you'll be all set for Father's Day!

Have fun!

Wednesday, January 22, 2014

Snowy Days!

Snow and January go together here in the Northeast U.S. - and the kids love to get out and play in it, making snowmen, snow angels, snow forts, etc. 

If it's too cold, then it's time for some inside snow play! Grab a basin of clean snow from outside to play in and make sure to get the mittens on … let your little ones mold the snow into mini versions of the snowmen they wish they were making outside! Be quick - it won't last long :) 

When you're done with the cold stuff, make a paper snowman! First, cut three different sized circles from cardboard (a discarded cereal box works great!) and then let your children use them as stencils to trace around and cut circles from white construction paper. This is great for some small-motor exercise, as well as sizing lessons (small, medium, large). 

Make a snow scene, with your snowman as the centerpiece and use cotton swabs dipped in white paint to create your own storm! (I had some snowmen cutouts available, so we took a shortcut!) Decorate your snowman with markers, scraps of fabric, buttons, whatever you want …
Have fun with it, and stay warm!


Tuesday, December 3, 2013

Christmas Time: Gift Giving

This holiday season, let your children experience the joy of giving. You can try to teach them … or you can step back and let them learn!

Spark some interest in some of the great organizations that are gathering gifts for the less fortunate. Let your children know that they can help make the holiday special for someone else … elves come in all shapes and sizes! Let them know that they can be "helpers" to spread the Holiday Spirit.

Then, find or work together to make a container that will become a focal point for gathering loose change (and good thoughts!) during the next few weeks. You might take a holiday tin or a special basket or decorate a gift bag … whatever you decide to do will be great!

Next, have your children check around for change in pockets, junk drawers, cars, and the sofa cushions :) It will be amazing how the change adds up! When you go to the store or come home from a day's outings, help your little ones to "find" the change and put it in the container. When you're ready, take that change to the bank or grocery store change counter. If you're not near one of these, or just looking for practice counting coins, you can separate and roll them up yourselves!

You will have enough saved up to go shopping, big or small, for someone who might not have much for the holiday. My little ones always like to pick something for someone their own age, but take your child's lead! Remember to reflect on the giving :)

While you're waiting for the coins to pile up, create some one-of-a-kind sparkling ornaments to share along with your gifts. You'll need some chenille sticks or florist wire, some jingle bells or small buttons or charms, and beads of any and all colors and shapes.


At one end of the wire/pipe cleaner, attach an anchor of some sort - we had some jingle bells, so we used them. Then, let your child create a masterpiece, adding things until its about one-third full. Twist the remainder into a loop for hanging and you have a beautiful ornament/door hanger to give away! (Make another for a great gift for grandparents or someone special!)

Have fun!!

Saturday, November 30, 2013

Christmas Time: Trim a Tree

When it's time to get in the spirit of Christmas, little ones like to make some fun themselves!! Let them experiment with these cute trees, making ornaments, magnets for the fridge, or even gifts ... handmade gifts are always well-received :)

To get started, you'll need some tree shapes cut from fun foam - you can pre-cut your own or pick up a pack at fabric/craft stores. Have on hand some plastic beads, shiny stickers or sequins, sticky foam pieces or cute colored buttons. Teach your child, using a white glue squeeze bottle, how to make small "baby" dots of glue and then have them pick a few places where they want to place a "decoration." Keep adding until each tree is just the way your little one wants it! When complete, they should be left to dry on a flat surface.

While you're waiting for them to dry, get in some counting practice - count up the ornaments on each tiny tree. Use leftover beads or buttons to play a pattern game … lay out a two or three part pattern and see if your child can continue it with "what comes next?" Then, if you're making your tree a gift, design a gift tag or a card to put it in. Gift giving teaches lessons about sharing and thoughtfulness that are wonderful to pass along to your children. Spending time with them and sharing experiences is the best gift of all!

When the trees are dry, decide whether you want to punch holes or glue on ribbon loops to hang your trees up as an ornaments or holiday decorations, or attach magnets to the back to hang on your fridge. Either way, you have some cute new crafts made by your fabulous kiddo artist!

Have fun!

Sunday, November 3, 2013

Thankfulness: A Thanksgiving Project!

Saying thank you is a wonderful way to build social skills with your child. Whether your child received a gift or had a wonderful visit with someone, a homemade thank you card is the way to go!

Fold some paper in half - construction or computer paper is fine … or look for cool card stock papers, available at your local craft store. Show your child how cards typically open, book-style, and show them how words go in a left-to-right progression.

Then, go on a letter search - use all those catalogs that are coming in the mail! Help your child find all the letters to make the words "Thank You!" and get some cutting practice in … so good for small motor practice! Your child can arrange the letters on the card, practicing that left-to-right progression again, an early reading skill :) When thats done, help brainstorm what to say.

Thanksgiving time is also a great time to practice these skills! Get your child in the habit of looking for things to be thankful for - it can be a lifelong thing! And … so many other skills come into play with a project like this!

First, you and your child will use language and planning skills to come up with a list of things to search for that your child is thankful for. Then, hone small motor and visual discrimination skills while searching for pictures and words that fit your list. Get out your scissors and cut, practicing small motor skills. Now, make a placemat of things that your child is thankful for. It could be laminated for use at the table on Thanksgiving - and beyond!


Your child will delight in finding photos and words that represent things he or she is thankful for! (And get lots of practice at so many things!) You could even make it a counting project … add a new thankful thing each day :)

Have fun!

Sunday, May 19, 2013

We Are Scientists: "Discover" Symmetry

Have some fun with symmetry in nature ... It's perfect for Spring!

First, find some beautiful non-fiction books that show full-winged pictures of a variety of butterflies and bugs. Have your children inspect some close-up pictures to "discover" all on their own ... lessons stick better that way! Direct their attention to specifics in the photos and have them do the "noticing."

There are also many children's book authors who use beautiful artwork displaying symmetry in fiction stories depicting animals or insects. The books might tell about the seasons, life cycles, or natural occurances such as camouflage - you might have some on hand that are already favorites of your children. Eric Carle's book, "The Grouchy Ladybug," shows symmetry in the collage work he does, even though it has other themes. Use resources you have on hand to draw attention to something new!

Then, get out there and explore! Make sure you have a "kit" to inspire your little ones to get into the activity. Our kit consisted of some plastic tweezers, magnifying glasses of different sizes, some index cards (for lifting delicate specimens), and a small container with holes to temporarily house what we found. It all fit in an old lunch box ... a small sand bucket would do nicely, too! Your child will be delighted to find all sorts of examples in the critters you uncover! Make sure they are using their words to describe what they see - and you could even bring along a sketch book and some crayons to do critter portraits :)

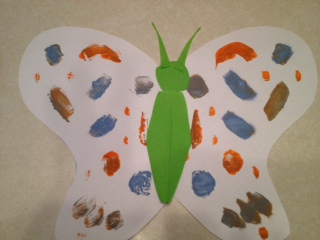
For some fun artwork, when you're back from your travels, fold a large sheet of construction or other heavy paper in half. Draw the shape of a butterfly's wing (or another bug's) on one half with the center of the body at the fold. Cut through both pieces of paper so when you unfold, you have a butterfly shape. Have your child make a design on only one of the wings with some acrylic paint and then fold and press gently to transfer the design to the other wing. You should end up with a mirror image - symmetry!


You can finish up by adding a body, head and antennae with some paper scraps, pompoms, or whatever you have on hand!

Have fun!

Tuesday, April 2, 2013

Mix Up Some Colors!

Make learning about colors fun!

Learning about primary colors - blue, red and yellow - and the colors they make when blended together - is so much fun for little ones! Get some washable paints and some large paper and get ready to mix and make!

There are some wonderful books that illustrate for children just how to do some color mixing! Mouse Paint, by Ellen Stoll Walsh, is an adorable tale about white mice who jump into different paint colors and end up mixing them up on paper, thereby creating new colors through blending. Your child will love the cute little mice and the patterns they make - it is a perfect way to explain how blending certain colors results in new colors.


Let your little "mice" replicate the story by mixing up some paint colors of their own. Playing with paint and paper is fun, messy and will have your little ones exploring - and learning! You can use fingers, brushes, sponges or even fabric scraps as your tools ... try each primary color first and then see what happens when a dot of something else enters the picture! Let your child direct the learning and be ready for some terrific artwork! Have extra paper on hand for when "experiments" turn everything brown or gray and your child wants to try again :)

Another book on the same theme is Color Dance by Ann Jonas. Children will be fascinated by the swirls and twirls of the colored scarves in this lovely picture book! Make sure to linger over each illustration and have your child retell the story to you to reinforce the learning. Explore some fun with movement by trying out some scarves of your own ... then, look for colorful fabric scraps or bits of ribbon to make a color collage!

Have fun!

Sunday, December 16, 2012

Welcome the Season!

Welcome the holiday season with a decorated door ornament! Use craft sticks (we used six long ones and two short ones) and some glue to design and form your door. Children can paint them or use them in their natural color. Practice some counting and small motor skills while you create!

Choose your hardware - a bright button may be a doorknob or perhaps some fun foam or a "jewel." Attach with a bit of glue and then choose how you want to decorate your door. We used a bit of "tree" formed into a circle with a snip of chenille stick. Perhaps you have some scrapbooking bits or a tiny holiday charm ... make it special!

When you're all done, attach a hanger of wire or ribbon to hang it on a tree or door knob - beautiful!

This could make an adorable gift for someone special - or a keepsake for years to come! Enjoy!


Sunday, November 25, 2012

Searching for Santa!

As it gets closer and closer to Christmas, you may be hearing more and more about SANTA! That means that it's time to make plans to search for Santa in the night sky!

Take a cardboard tube and help your child wrap it in a festive color of construction paper. Glue or tape in place. Then, your child can get creative with how to decorate this hand-made telescope - with some festive touches! Set out paper pieces, foam decorations, glitter or stickers of their choice to personalize it - it's now a Santascope!

Attach a little printed note like this:

"On Christmas Eve when Santa
Goes flying through the night,
Look for his sleigh and reindeer -
What a wonderful sight!"

Your child can search the sky for the Jolly Old Elf right before bedtime .... maybe they'll catch a glimpse!

*******************************************************************************

Make a Rudolph ornament while waiting for Christmas to get here!

You'll need some craft sticks and sheets of foam (tan and white), two googly eyes and a red nose made from a pompom or another piece of foam, red this time. First, glue two craft sticks in a V pattern and then use another to go stright across, about a half-inch below the tops of the other sticks. To complete the antlers, add two more craft sticks in a wider V.  Finally, add the foam pieces: a large piece of tan for the face, small piece of white for the forehead, two tiny ears - then add the nose and eyes.
Add a little string or ribbon and Rudolph is ready to hang around and help you decorate!

Have fun!


Monday, October 22, 2012

Pumpkin Fun!

Pumpkin season is a fun time for art projects! You can make sponge print pumpkins, paper scrap pumpkins, even paint some paper bag 3-D pumpkins. Your little ones love to make projects using crayons, markers, etc.

Here's something else to try - a felt play kit!!


You will need a shoebox, some felt pieces, scissors and glue ... and your imagination! Line the inside of the shoe box lid with a rectangle of colored felt. This will be the background for any scenes your child puts together. For a "Five Little Pumpkins" scene, cut some long, skinny pieces and some shorter pieces out of a dark colored felt to form a fence. Then perch your little orange pumpkins all along the fence and take them off one-at-a-time to the tune of:

Five little pumpkins sitting on a gate
The first one said, "Oh my, it's getting late!"
The second one said, "There are witches in the air!"
The third one said "But I don't care!"
The fourth one said, "Let's run, run, run!"
The fifth one said, "Let's have some fun!"
Then .... whoosh went the wind and OUT went the light,
And five little pumpkins rolled out of sight!

Your child will love the flexibility of the fabric and how the felt  pieces cling to the background ... and you can play with it over and over! Keep your kit around long after pumpkin season and fill it with different shapes - you and your child can come up with many uses for this play set! Use it for story telling, language development, patterns, etc.

Have fun!

Monday, July 23, 2012

Summer Olympics Fun!


There are so many fun ideas to play with that are Olympics-related and that will inspire excitement in your children!!

Start with checking out all the internet action already going on to get them aquainted with what sports and athletes they might be interested in. Check out the live feed from www.nbcolympics.com or get lots of info at www.olympic.org ! Google "Olympics" for more sites ...

Then ... do some training and competition! It is so important for children to have lots of exercise and physical movement - get out there and make it happen! It's easy to put together a simple program of activities using items you may already have around the house or classroom.

See what you can come up with ... when we did the Winter Olympics, we set up a card for each  "competitor," with different stations for "events" like sock skating and olympic ring toss (hula hoops and bean bags!). If you do a few games or exercises each day, you can stretch it out over a few days or a week - culminating in a Closing Ceremony of your choice!

Crafts can be simple:

For olympic rings, you'll need paper, paint (representing each of the five colors) and small paper cups! Hold the cups upside down, dip in paint and print circles galore!


For a related art project, make Olympic torches! Trace children's hands on flame-colored tissue paper - red, orange, yellow - one set of each if you can! Wrap a paper roll with black paper or have them paint them black and then attach the hands to the top - now you have Olympic torches!


Make some hand-made medals together, going over the five colors of the rings - every country participating, at the time the logo was developed, had at least one of these colors in its flag! The five rings represent the five continents (North and South America were considered together at the time, Europe, Africa, Asia and "Oceania") of the world - and the fact that they are all joined together for "unity" - kids understand that concept!


I like to finish off with individual photos of my Olympic athletes, standing in front of a flag, wearing their hard-earned medals - and huge smiles! They make a great keepsake - and, who knows, maybe it will be part of their own Olympic profile someday! :)

(Parts of this post are adapted from previous posts on the Olympics - I wanted to get it all together :)

Have fun!!

Sunday, May 13, 2012

Paint Play!

Playing with paint can be so much fun - and filled with self-discovery!!! Sometimes little ones will have a hard time with art projects because their hands can't quite make what they want them to YET, so projects like this are perfect!!


Fill a pie plate or aluminum baking pan with just enough paint to cover the bottom. Have on hand a variety of materials that will either wash clean or are disposable. Lay out some big sheets of paper or a giant roll and let your kids explore! Let them know that there is no right or wrong way to CREATE - just dig in!!


They might have fun with some kitchen implements ... try a potato masher or a slotted spoon. Fly swatters make great prints, as do twists of fabric scraps. One of my personal favorites is bubble wrap!! The point is to let your kids explore and come up with new ways to use the materials.

Bubble Wrap Printing

You will be surprised at how cool the prints will be! Use multiple colors for layering and don't be afraid to let your little ones get messy - hands can make prints with palms, fingers or the outer edge of their fists ... Let them figure it out! If you're looking for a particular outcome, like a flower or a shape for a collage, to use in a card or illustration, you can cut it out after the paint dries. Have fun!

Monday, November 14, 2011

We Like Leaves!

Got leaves?? Try these activities!!

1. Leaf rubbings: This is magical! Children LOVE to see what will come through the paper and they want to do it again and again. You need an assortment of leaves, lightweight paper (copy paper works well!) and crayons with the paper peeled off. Put a leaf under the paper or in a piece of folded paper and use the side of the crayon (not the point) to rub firmly back and forth - and watch the magical process begin!


2. Leaf prints: Use your leaves as beautiful printing tools ... paint lightly and carefully all over a real leaf and then press in a folded piece of construction paper - it will make a work of art! Trim away the extra paper and frame or attach a hanger to it!


3. Suncatchers: Pick out your favorite leaf (it's hard!) and put it under a heavy book or object to flatten it out a bit. Then use a piece of clear contact paper to stick it to and another piece to cover it. Once it is all pressed out with no bubbles, trim around it, making a circular shape or following the edges and attach a bit of coordinating ribbon or yarn to hang it up with. The sun will shine right through it!


4. Patterns: Cut out some paper leaves to make patterns with - try different colors and different shapes - easy patterns and more complex ones. Let your children come up with as many patterns as they can think of!
Make a magnetic set by laminating or using clear contact paper and attaching magnets to the back. All you need is a magnetic surface (fridge?) and you're all set!


5. Sequencing strips: use your paper leaves to make sequences on long strips of paper. Math skill alert - leave room at the end to finish the sequence!

6. Tracing: Put a whole pile of leaf patterns cut from cardboard or cereal boxes with some paper and colored pencils and watch some cool art emerge! Children will begin with tracing (great for small motor practice) and then begin experimenting with overlapping and coloring in!


Have fun!

Sunday, November 6, 2011

The Mitten: Compare and Contrast

I am a huge fan of Jan Brett - her illustrations are amazing - their attention to detail and all the background research she does to make her designs authentic make her books unique and captivating! Jan leads her readers through her books with side panel illustrations that show what happened on the page before and what is coming next! Each page is extraordinary!

I have used many copies of her book, "The Mitten," over the years with all ages of children - from little ones in Preschool all the way to older students in primary grades.  There are so many lessons that can be planned and shared around this timeless story... you can focus on the parts of the story, beginning, middle and end, as well as on the use of descriptive, interesting language. Examining stories and discussing them helps children learn what makes a great story so that they can use these strategies down the road when they begin writing.

"The Mitten" is actually a retelling of an old Ukranian folk tale - I have another version by Alvin Tresselt that I like to use with my children to compare the different versions of the story. We chart how they are the same and how they are different, which animals appear in each story and in which order. They take so much interest in the story and get so involved in checking out all the details!

You can find lots of resources on the internet to use in retelling each of these stories - coloring cards and outlines to make all sorts of mitten projects. There are great black-line illustrations for the Jan Brett version at http://janbrett.com/put_the_animals_in_the_mitten.htm. I couldn't find one for the other version but it would be fun to make!

Have your children work on a way of retelling each story and ordering the sequences of events - it helps them with comprehension! You could do a comparative sequencing with character cards or a Venn diagram to sort it all out - all have met with great success with my kids!

Have fun!