Showing posts with label math. Show all posts

Sunday, April 25, 2021

Learning Outdoors

"Why not have class outside?" Easy for them to say .... ;) But ... with some prep, it can be fun and productive!

In these continuing pandemic days (or really anytime!), as the weather gets nicer in the northern hemisphere, we can look to the outdoors to supplement our classroom space, but only if our needs can be met there for safety and security :) 

First, think about safety. Is the surrounding area conducive to having class outside? Are there too many distractions from heavy traffic or loud noises? Is it too sunny/shady? The physical position of the teacher (and other adults) and students is also important, as you want to make sure no one is out of sight or close to hazards (like streets or steep slopes).

Next, this plan takes some prep work for the teacher, instead of a spur-of-the-moment decision. Try a rolling cart or carry basket pre-loaded with all the supplies you might need. (A small white board, markers, some chalk, sticky notes, etc.) Students could have pre-made "seats,"such as folded beach towels or small pillows tied inside plastic shopping bags for avoiding dampness. Clipboards are always a great addition, making things "official" :)

Then, choose what part of your daily lesson would work best outdoors. Some topics really work in outdoor settings, such as: 

  • measurement or making patterns in math - Take your measurement tools outdoors and use objects found there to extend your lesson. Or, find natural objects outdoors to arrange and extend patterns on the sidewalk or in a grassy area.
  • growing things or force and motion in science - Take these topics outdoors and plant in the dirt or in raised containers or offer wood planks and blocks to encourage experimentation with force and motion ideas. Add a few balls or toy cars and see what theories your friends can prove.
  • poetry or descriptive writing or really any type of creative writing - Any age students would enjoy laying outdoors on a beach towel and writing/drawing about what they see/feel/hear.
  • reading aloud with discussion - This would be great, even as a last-minute idea, and can break your day up, allowing for stretching and movement, as well.
  • independent reading/paired reading (more room to spread out)/small groups - Experiment with different set-ups for reading time and spread your class out a little. Have something in mind to hold them accountable for what they are reading during this time. You may choose to pull a small group, as long as you can still monitor safety for the others.
  • art with watercolor paints, chalk, recycled sculptures, nature sculptures - There are so many art projects that can be enhanced by being outdoors, and help your children connect art and nature.
Have Fun!


Friday, February 12, 2021

Photos as a Teaching Tool

With some students remote and some present in school, educators are scurrying to find engaging ways to interact with both groups and “up” the interest factor in their lessons. 

Using photographs as tools in the classroom is not a new technique, but maybe one to revisit in this day of COVID teaching. The strategy of popping a photo up without direction and leaving feedback open-ended makes the photo a “mystery” to be solved and encourages students to “lean in” by piquing their curiosity.  

There are so many ways to do this in very different areas ...


Use photos as Story Starters, giving students an opportunity to write a sentence or story about what they see. Embed lessons about sentence structure, word choice, etc. in a back door kind of way.  


Photos can be great language builders - descriptive words are a natural ... size, color, shape, etc. Try a word web on a topic using a photo as a launch point. 


 Science topics are a terrific fit for photo use! There is nothing like a visual prompt to get everyone involved in something like space, earth science, growing things ... any topic you want. 

KWL charts can be enhanced by using a few photos to boost the interest and grab your visual learners, prompting them to participate. 


An area where real life photos is underutilized is Math! Photos of block arrangements, groups of scattered manipulatives, or partially-filled containers with a “What do you notice?” will get your students thinking, looking for groups, similarities and differences, shapes or whatever else they come up with. They will begin to view math as a part of the everyday world. Great discussions and lessons can ensue! 


The BEST part is that, using technology, ALL of your students can see these photos at the same time and can feel that engagement of learning and exploring something new. A puzzle or mystery to be solved is sure to grab their attention.


Use photos as transition tools or do it just for fun, but toss a little learning in along the way ... What words can you make with these letters?

What do you see on these picture cards? Matches? Sizes? Lots of math concepts here ...


Have fun!

Saturday, December 12, 2020

COVID Creativity: Mini-Boxes for the Win!


Whether you’re in the classroom or remote, one of your biggest challenges is what to do when you have early finishers or mini-breaks. With the health and safety rules in place due to COVID, it's not advised to share resources between students, so it's time to get creative. 

If you are in school, make up mini-boxes of interesting, curriculum-related or fine motor building materials. Have students choose one each week to be their in-school “busy box” or go-to downtime activity. At the end of the week, students will place the mini-boxes on a table and "quarantine" them.

If you are remote or have remote students, give choices and picture models for them to make up one of their own each week to keep handy at home :) Encourage use of everyday items, such as buttons, spoons, or natural or recycled materials. This is a no-cost to low-cost solution. 

"Design" your boxes to go with science exploratory units, math lessons, or word-building and letter practice. Using materials already on-hand should keep you from spending more time out of your already-stressed schedule and once they are established, they'll be in a rotation and just require occasional tweaking :)

Some examples might be: 

1 - Grab a handful of letter tiles (Scrabble?), paper and pencil and write as many words as you can from the letters. Try alphabetical order, too :) 

2 - Make a basket of bears to put in order, make patterns, count, etc. 

3 - Program bottle tops with letters - pick one at a time and write on a dry-erase board for letter practice.

4 - Supply dice and counting bears - roll, count and write down the number for practice. 

Science kits would be fun, too! Make a box of sticks. leaves and pine cones to examine, build with, sketch, etc. I threw in stripped crayons for leaf rubbings, too.

A small magnet and some metal/non-metallic items would be a great exploratory box. Add in a bunch of large paper clips for extended chains.

If you have access to craft sticks (colored ones are even more fun!) and Velcro dots, you can make a set of attachable sticks to form shapes and letters. Just put velcro on opposite sides of opposite ends and stash them in a plastic bin - fun and learning!

Pipe cleaners and beads for beading and patterning could be another box, using things you may already have access to in the classroom. Great fine-motor work!

You could try some force and motion cars and blocks, some Playdoh for many purposes ... use what you have around to make up as many mini-boxes as you want.

Legos make a great mini-box! Grab a bunch from a larger bin and make up some minis - for fun and fine-motor play.

So many choices - you can make multiple boxes of the same items, to avoid sad faces when their favorite is taken. Make the choices extend your curriculum and keep your learners engaged, while finding time to assist all learners in completion of work. 

Everyone needs a break and some creative time, even you!

Have fun!


Sunday, December 6, 2020

Learning Tools: Recycled Bottlecaps

Looking for ways to do more hands-on learning? Running short on supplies with remote and hybrid learning situations? 

Make your own learning manipulatives to use at home or at school! 

Recycled plastic bottle caps are easy to gather in a short time and come in a variety of colors and sizes. They are perfect for so many different uses - in literacy, math, and even art. 

As you work on letter recognition, you and your kiddos can put together a set of upper and lowercase letters for practice. Play a matching game with them, placing the uppers over the lowers and checking them together. You can also supply a name strip with the alphabet for self-checking :) 

Write sight words on larger caps and use them to manipulate into sentences - even “silly sentences” can be lots of fun and get your little friends interested in reading and writing :) Then, have them copy the sentences down for some writing practice - good fine-motor work!

At math time, use different colored bottle caps to make patterns - ABAB, AABAAB, ABCABC. Repurpose your collection to act as counters when making up or solving addition and subtraction number stories, or practicing basic math facts. See what other uses your budding mathematicians will come up with! Maybe sorting by attributes - size, color, ...?

Finding art applications is easy, too! Some friends may use them as “tiles” in a mosaic or to arrange into pictures. Others may use them as stamps or tracers with pencils to incorporate shapes into designs. They can also be glued into 3D forms as parts of sculptures, possibly using other recyclables. 

The opportunities are endless - see what your kiddos come up with! 

Have fun!


Sunday, October 25, 2020

“Creepy Math” with Crawly Manipulatives


Math is magical when you do it with fun, touchable objects in the classroom or at home. Seasonal things like plastic spiders and pumpkin erasers are fun, but so are simple things like bottlecaps or buttons. It’s all about the sensory element and interest factor πŸ•·

“Hide” the objects in a wrapped tissue box to make them extra special ~ there’s something about reaching in and grabbing that makes it spine-tingly fun! 

You can teach how to use tally marks for counting by pulling each item out and simply tallying first, one by one, showing how to cross at 5. Then switch to grabbing handfuls, tallying and comparing. So many early math skills here ... practice forming the numbers while you’re at it! πŸ•Έ


Making tens and counting can be done with seasonal ten-frames, seasonal objects - or both! These were found out there on the internet but they would be easy enough to make on your own. Giving kiddos the visual of ten in the ten-frame allows for simple counting and “how many more to ten?” It also begins to set up fact families, as your friends can count to see which numbers go together to make 10. 

Empower your math learners to make up their own spider stories (number stories or word problems) by verbally providing an example or two. “There were three spiders in the web, two more came ... how many altogether?” Let them take it from there and bring back the tally marks to pull it all together :)


Have fun! πŸ•·πŸ•ΈπŸ•·πŸ•ΈπŸ•·


Thursday, October 22, 2020

We Are Scientists: Learning with Leaves 🍁

Nature is a great equalizer - all students can be a part of a shared activity when the subject is something that they can all access, like leaves. 

Go on a nature hunt or ask students to bring in interesting leaves, pine cones, twigs, etc. Build a collection in a series of small tubs to allow for social distancing, but shared experiences. 

Sort and Match

For matching and sorting, look for a set of leaf ID cards on the internet, or have students help make a set :) Look for simple pictures that display size, shape and color. 

Sorting Mats with boxes (large construction paper, draw on boxes and maybe laminate) offer a focal point for slowing down observation to really look at samples, and a way to divide up leaves by similarities and differences. Seeing up close that all leaves are not the same may lead to closer inspection of the trees they come from :)

Scientific Observation

Encourage students to look carefully at the parts of leaf, and to try to draw what they see. Magnifying glasses are a great tool to introduce here. When they get close up “like a real scientist” and take a look, they may notice the veins and stems - don’t forget to look for nibble spots where insects and small animals may have feasted. 

Make Patterns

Use clear contact paper or packing tape to cover leaves, in order to make a group of leaves for forming patterns. Model a few simple patterns and see where they take it! 

Tracing and cutting leaf shapes from card stock or construction paper would work, too :) 


Remote Learners

If you have remote learners, encourage them to fill their own basket at home with natural finds. As an alternative, have a basket of samples bagged to take home outside your classroom. If available, send small magnifiers and sorting sheets to complete the experience.


Leaf Art

There are so many ways to explore leaves through art. For a list of Art applications see this post : We Like Leaves!


Have fun! πŸπŸ‚

Friday, October 16, 2020

We are Scientists: Pumpkin Exploration

There is nothing like hands-on experience for really learning and remembering about a topic. Pumpkins are a great subject for diving into and learning about in a multi-disciplinary way! 

Measuring is a fun way to start out .... try it with non-standard units of measure that you can compare to other objects. You can use something flexible like a rope or length of yarn to see how much it takes to go all the way around the pumpkin. You can also see how tall the pumpkin is this way, or use blocks or connecting cubes to get your answer. Hands on measuring and comparing are great math activities :) 

Talk about how your pumpkin grew and where it came from. Show photos of the stages of growth - from a seed to a sprout and changing colors - there are great non- fiction (and fiction) books that highlight this. You can find videos of pumpkins growing and even virtual pumpkin patch visits! 

Cut into your pumpkin for some slimy, hands-on fun next! I like to make a cut in the top and also cut out a “window” in the side, to make it easier to see in and reach in - the hole on the top offers more light.   


Lots of kiddos love to reach in and pull out all the pulp and seeds. Use as many of your five senses as possible - to see, smell, touch and maybe even taste seeds or pumpkin products. Run a hand around the outside and count up the ribs - or try guessing and counting as a fun predictive activity. For those with sensory differences, try for a little exposure at a time to the pulp in order to get them more comfortable with the squishy feeling. 


In-class learners can go back again and again to see and explore ...  remote learners may benefit from leaving a basket of baggies with pulp and seeds outside for them to pick up after school hours. Planning ahead can have all students on the same page with this activity. (If you’re up for it, watching it rot over a few days is also interesting.) 

Playing with sealed bags of “pumpkin guts” can be a fun counting activity - make sure there is pulp and seeds and have students mush around and count the numbers of seeds inside. 

Using a variety of gourds and small and large pumpkins can also be a fun sink or float activity. Introduce some other classroom items - maybe a pumpkin eraser, or some plastic scoops - and guess whether things will sink or float. Then, take turns testing out your theories. Your little scientists will love it! 

Have fun! 


Thursday, September 10, 2020

Playing Store: Consumers and Producers

Playing store can be a great play experience for your kiddos, but why not really make it meaningful?

With a little help, your children can participate in PBL (project based learning) by creating their own products, "pricing" them, and "selling" them.  It sounds complicated, but it truly is not :) 

As an example, one small crew made bead bracelets and duct tape bookmarks, as part of an open-ended craft activity. (Great fine motor work, BTW!) Some were very elaborate, therefore more "expensive." The artists and artisans were the "producers." When they had a bunch of “products” finished, they laid them out and examined them, counted up the sale items, and came up with a pricing system. They kept it simple with $1, $2, and $3 items, but this could be adjusted if you wanted to make change or work with harder numbers.

All items were then priced and the kiddos turned our dramatic play area into a store display area. They arranged their goods, and some friends made signs to show "consumers" where to shop. They all discussed how much each item should cost, and tagged items with sticky notes.


For the consumer side, children then took turns being shopkeepers and customers. This required a little adult intervention, to model being the paymaster, and to sort out roles. Shopkeepers could earn "Kid Cash" while working and then save it up to go shopping with later on. A few customers were given some cash on loan, to get the process started. Customers with no cash yet had to window shop, plan, and wait until they made some money to spend. All roles revolved, so all students got a chance to be producers, shopkeepers, and customers.

When it was time to be a customer (or consumer), each child had to budget their teacher-issued “Kid Cash” in order to purchase what they wanted. Decisions had to be made about items that were too pricey, or not within the budget, and the dollars had to be stretched to stay within budgets. 

On the sales side, adjustments were made to prices if items weren’t moving well and small groups of students spontaneously got together to make those judgements. It was awesome to watch them start to take ownership of the store :)

Throughout the process, lessons were learned, the children could tell about the process that we “studied” :) 

AND we had so much fun!

* This lesson was done pre-COVID-19. Adaptations could include quarantining supplies for a few days in between segments and setting up a store play center using precautions seen in actual stores (such as clear partitions and hand sanitizer stations), “normalizing” these scenes for students. This would allow for some play interchange, while maintaining distance and safety precautions. 

Saturday, July 18, 2020

Q-Camp: Plans for Tired Parents :)

This 2020 is an unusual year! You may be running out of ideas to keep your kiddos busy and engaged, which BTW is always ok - because children do their best work when it is born out of a quest for SOMETHING TO DO!!

But still, it's already been a long spr-ummer already, right?!? So, kids being kids ... they (and you!)  are still looking for stuff to do :)

I've tried to group some old posts together to make it easier to do a week's worth of fun and interesting activities with, hopefully, the kiddos doing most of the "work"! 

Day 1: Click here for some tips on fun Outdoor Play - using what you have to build and play on an obstacle course will get your child's creative juices working and have them think about everyday objects in new ways ... and it's great exercise! They can redo it again and again, practicing good social skills (if they have a partner) and design skills. Of course, some supervision is needed to ensure safety :) Don't pass up everyday opportunities for sidewalk curb balancing and hill rolling :)


Day 2: Let your kiddos experience Math concepts in a whole new way - Math with Water Play - great for a warm, dry day :) Let your kiddos collect an assortment of "tools" from around the house and see what happens. Maybe with a little starter exercise, they will take the play in new directions :)


Day 3: A little reading goes a long way, depending on your book choice. Reading to cool off is great for any day - rain or shine! You can cozy up for some great illustrations, and fun, silly words, but be ready to have your kiddos act out the shakey-shakey part :) Acting out and retelling stories are a great tool for comprehension, so play away!


Day 4: Mail Call! Use those rainy or too-hot days to craft some mail for relatives. Great way to reach out in these isolated times :) and children of all ages an abilities can participate! Younger friends can draw a picture and olders can write as best as they are able. These cards and letters are sure to be treasured and - maybe, just maybe, they'll write back!!


Day 5: Ocean Animals are always fun! Check out these simple craft ideas and great reading options - you can usually find titles on YouTube if you don't have access otherwise :) Pairing crafts with stories extends the literature and helps to solidify the story for young readers :)


Have fun!! 


Tuesday, April 21, 2020

Remote Learning: Math - Use What You Have!

Sometimes Math concepts are hard for our little guys and we have to look through their eyes to find ways to make it all make sense. Making it fun is always best, as is applauding small successes as steps along the way :)

In these times of being home during learning times, we have to be even more flexible in how we approach "lessons" :) Look around with fresh eyes for available tools already in your home :) Use things that you find to make math lessons more concrete. For starters, if your child benefits from using tactile methods of teaching, pull out a deck of cards and rustle up some old game pieces.

Get out your playing cards for a simple game, that will explore counting, ordering, and more and less.


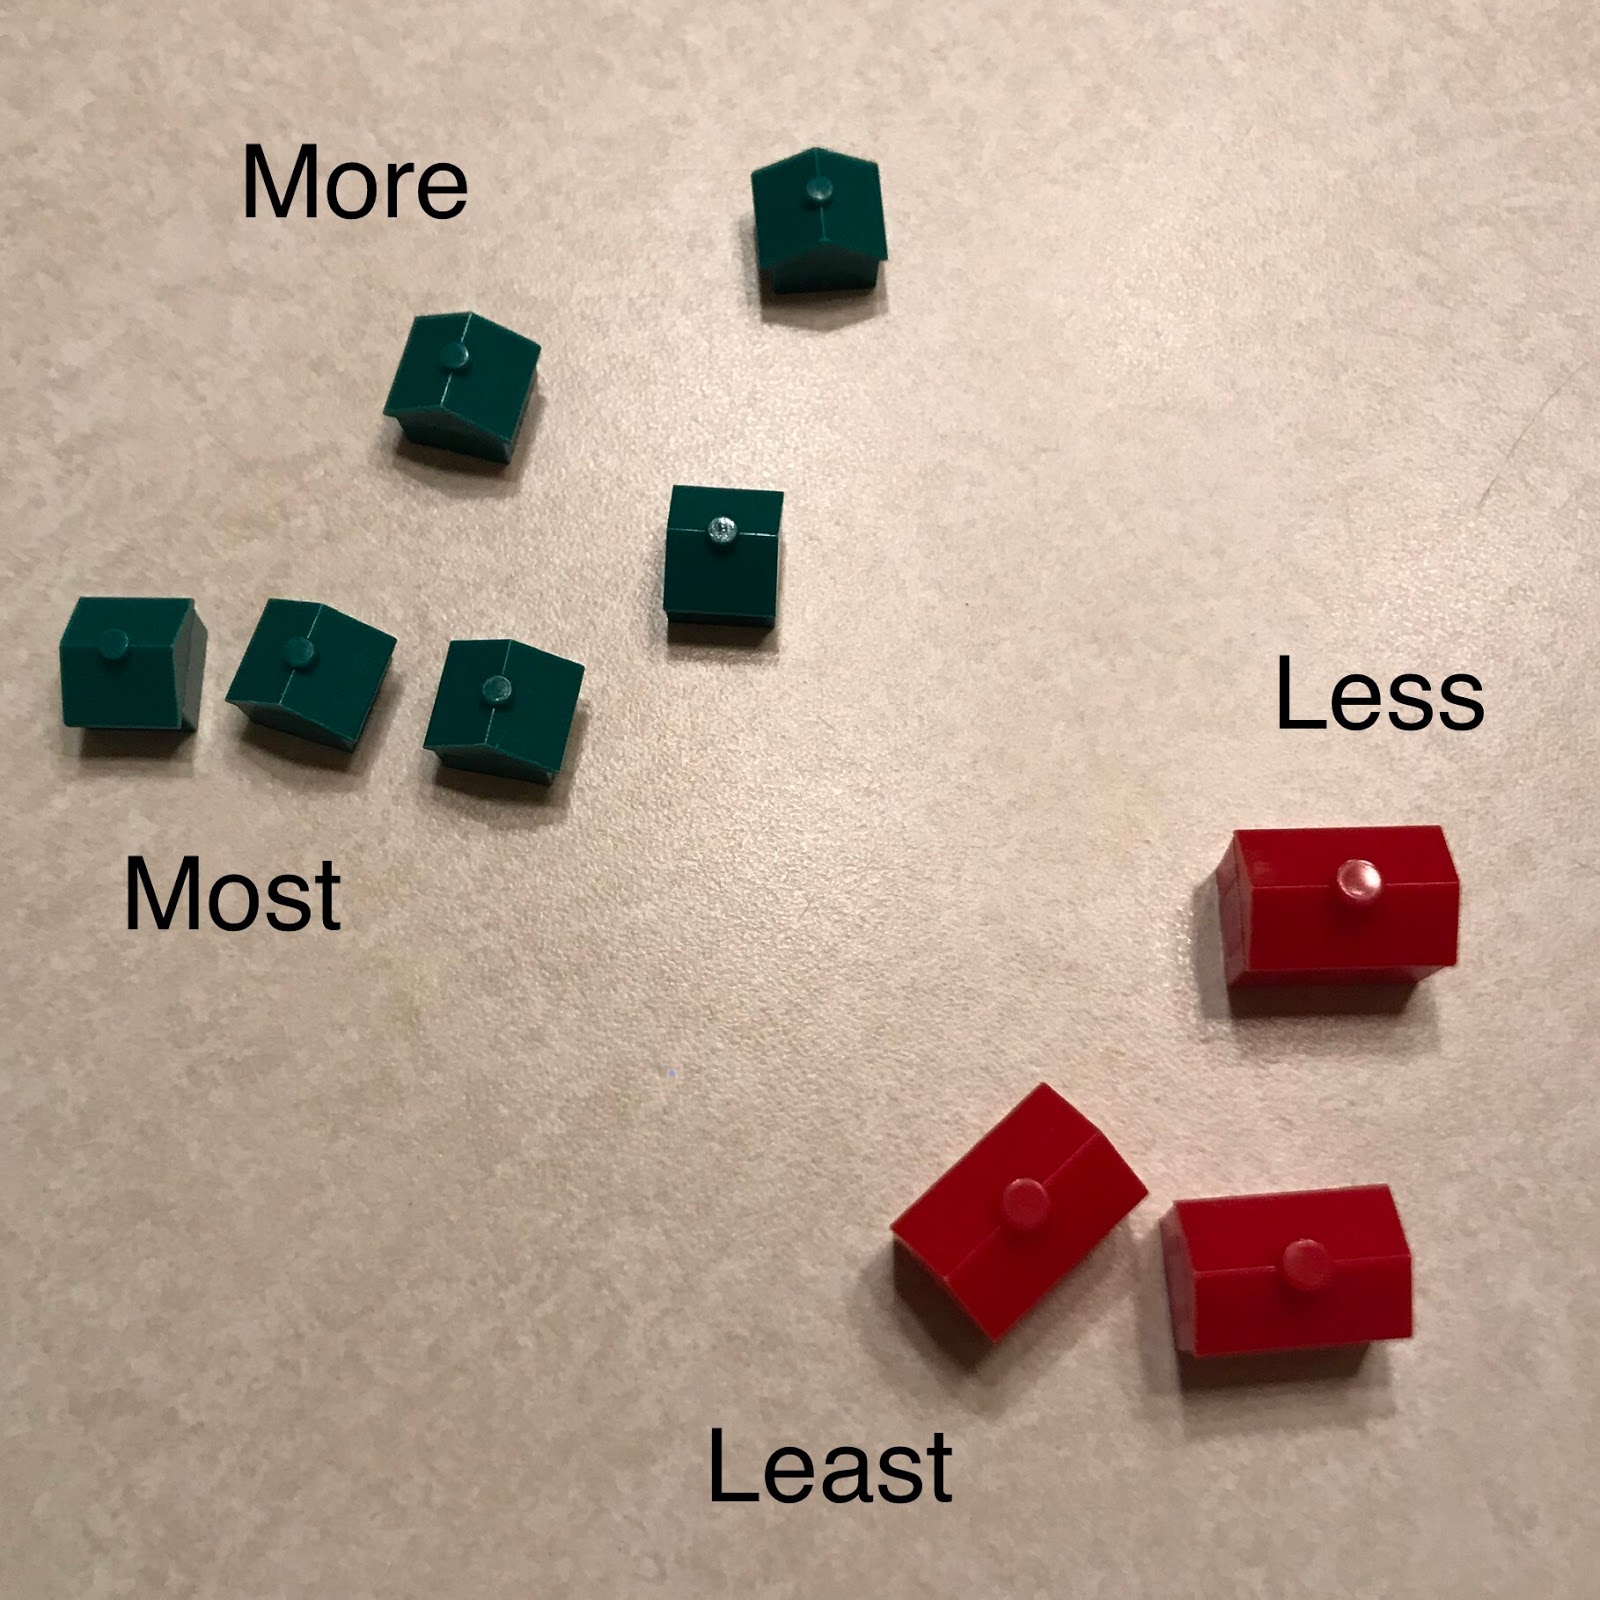
Each player gets a stack of cards and turns over one at a time (like the old War game). Each player takes a turn to count the objects (diamonds, hearts, spades or clovers) on their card and touches the numeral in the corner of the card, saying the number. Then, use math language like "most," "more," "less'" and "least." e.g. "I have 9 and you have 5. I have more than you."

Another form would be to lay out three or four cards, count them each up and order them, naming them as "most" and "least." If your child guesses correctly, they get the cards. Getting these concepts down with smaller, one-digit numbers will be to your child's benefit, before moving on to larger numbers. Down the road, you can make higher number cards from index cards, and play with them.

Find an old Monopoly game, or another game with multiple pieces, to use them as your own "math manipulatives." Grabbing amounts of green houses and red hotels, sorting them and finding the totals, will help your child with those skills. Then, add in the math language of "most" and "least" to bring those concepts home :) You might have other toys or games around that can be repurposed for these lessons. Any time you can engage your child in moving, finding, collecting - this will help them learn.

In our house, buttons were always a fun manipulative, as were popsicle sticks. As a teacher and crafter, popsicle sticks were easy to store, and fun to explore with. In our Kindergarten classroom, we used them to count the days of the year, making "bundles" when we reached a group of ten.

Trying this at home may solidify the concepts of higher numbers for tactile learners ... 5 "bundles" (or tens) and 2 "extra" or "all by themselves" (or ones) would be 52. To compare higher numbers to find out "most" and "least," making bundles and extras and touch each one as you count. Your child may understand these bigger numbers better when they can see quantities with their eyes and touch them with their fingers.

By playing with the numbers using games and game pieces, and writing down/matching with corresponding numerals, math becomes more concrete!

And, more fun!


Sunday, July 22, 2018

Photo Magnets: Graphs and Surveys

Have some fun with photos! You can do this in a classroom, or use with family members at home!

Take a great photo of each child's (or family member's) face and attach it to a magnet. I find that the business card adhesive magnets are a great size for this, as well as for many other jobs :)

You can laminate the photos for longer life, or copy them onto sturdy paper stock.

Then, have your kiddos generate some questions that they would like to take a poll on ...

Do you like apples? Yes or No questions work great for simple surveys

OR

Decide on some categories for graphing. What color apples do you like? Red/Green/Pink/Yellow

They will LOVE coming up with categories and questions ... the possibilities are endless!

What's your favorite ice cream? Sport? Book? Use your imaginations!

I like to use "Getting to Know You" questions for the beginning of the school year:

How many people are in your family?
Do you have any pets?
How many kids in your family? Brothers? Sisters?

This gets our new friends talking and sharing, and we get to learn more about them. We use the photo magnets to build graphs, starting at the bottom or left side of a magnet easel or board, and building up or over. As each child answers the question, they come up and place their magnet in the appropriate place on the graph. We can count, and label each "tower" (or line) with numbers when complete.

These magnets can teach sorting, ordering, counting ... you can even work patterns in - boy/girl, ages, etc.! As each child takes their turn, there is discussion and interest, and children making connections with each other, bringing cohesiveness to the group. The magnets are reusable and great for so many other activities, too - dividing into groups, taking turns, etc.

Have fun with them!


Sunday, January 14, 2018

Loose Parts: Junk Drawer Bounty!

There are so many cool things that you can do with Loose Parts - all the little things that end up in your junk drawer or around the house. With only a discerning eye and some old odds and ends, you can put together a basket or box of small things to tempt your child's imagination! Playing with collections can enhance math and science skills, stimulate language development, encourage creativity, and give small motor skills a workout. And, it's fun!

First, check your junk drawers for old keys, buttons, and other little pieces that might make interesting additions to your collections box. Coins can also be cool for sorting, patterning, and making designs with. Nuts, bolts, screws, etc. might make the list - anything small hands can tinker with, while staying safe. We also found some old monopoly houses, dice, bottle caps, and ping pong balls, which were all of immediate interest to our small friends.

Next, set them out and watch the magic happen! All of these small objects can be examined,  sorted by many different attributes - size, color, shapes, etc. Piles, patterns, lines and arrays may happen. Counting and comparing will be a natural next step. Encourage one to one correspondence counting by touch-counting objects yourself. Some of our friends even made creative pictures with different small pieces, shaping flowers, people, houses ... watch out, imaginations may be sparked! Side by side play on the part of the adult is a great way to spur exploration, without direct instruction or direction.

When our friends discovered our classroom collections, buttons and keys were examined and sorted - conversations about where they came from and what they would do with them came next. Sorting mats were pulled out and magnifying glasses employed. Every child discovered their inner scientist :) Patterns were made, and attributes discussed, using comparative language! The balls were bounced and rolled and then raced on flat surfaces - and then  other small pieces were used to make an obstacle course - lots of basic physics tests followed. Different objects were even put together to make non-permanent art - very cool pictures and collages!

See what's in your junk drawer - and get started!

Have fun!

Sunday, February 12, 2017

Learning with Collections!

There are so many things your children can do with a collection of objects! It could be coins, shells, rocks, buttons! I can remember, as a child, being fascinated with a jar of multi-colored buttons that sat on a shelf at my grandmother's house. We would pick some, or pour some out, and  play with them, making up all sorts of games.


There are many simple things your children may choose to do ... many of them math and science related! Let them play with collections, and make decisions about what to do with them. Their ideas might surprise you! They may first choose to just examine up close and begin to notice differences between groups - colors, sizes, shapes ...  noticing is the first step to classifying and sorting!

Counting collections is another great next step, while they are doing some examining :) You can add in some math vocabulary such as more, greater, less, fewer and they will have concrete examples right in front of them.

Then, patterns! Your kiddos may choose to make a pattern, or, if not ready for that, to continue one laid out for them - red, white, red, white ... what comes next? Ours asked for pipe cleaners to thread buttons on - in patterns! Simple patterns can evolve into more complex - instead of red,white red, white (ABABAB), they may try ABBABB or ABCABC patterns, using more colors or sizes.

Sorting mats have proven to be LOTS of fun for my kiddos - and a great focusing tool. Simply take large paper, draw a grid and laminate them to hold up through multiple uses.

My kiddos have pulled them out to examine all sorts of things ... shells, coins, rocks ....

They even took the plastic animals and sorted them by habitat - ocean, farm, polar, etc. Have them choose an attribute to sort by - color, size, shape, shiny, flat, bumpy, etc. -  and then figure out what goes where. They may have to make subgroups and it could generate great discussion :)


Attention to detail is something my friends are really getting involved in - they want to examine with a magnifying glass and do some sketching to really try to be scientists :) We talk all the time about how scientists observe, sketch and write about what they see ... collections are a great way to put this into play!

Have fun!

Thursday, July 14, 2016

Math with water!

One of the BEST things about summer is that you can get wet and messy ... and, then just clean up outside!

Playing with water as an open-ended activity can present your child with many different learning opportunities - and lots of fun! The math lessons and practice with language concepts will take place organically :) while fulfilling so many of the core learning concepts that we want kiddos to explore.

I like to have an inflatable baby pool on hand, but any kind of tub or container that holds water will do!


First, make sure you have different sized containers available for pouring and measuring. Model how to pour from one to another, or just let your kiddos figure it out. They will soon see that some containers can handle more water and some less ... and what happens when you pour from larger to smaller and vice versa. There is no better teacher for this type of measurement than hands on experience!

Next, play with a variety of objects to establish a sink and float lab. Provide some interesting household objects - plastic dishes, spoons, corks, colanders and funnels, etc. - and show how some will sink and some will float. Let your little ones try different things and put them in categories ... another math skill!

Float a few rubber duckies (or whatever small floaty toys you have handy!) in the water and count them out as you go. Matching objects with the numbers that represent them is an early skill to hone, and you can sing as well ...
"One little, two little, three little duckies ..."

Then, start to play a game that uses positional words - over, under, next to, etc. - and let your child take the lead, coming up with new ways to display the ducks (or balls, or boats, or whatever). This practice with verbalizing the positional concepts will help your child become more familiar with the words for each.

Let them come up with new ways to play - filling up and draining the containers, splashing and pouring, floating different toys - all will teach new lessons, and make for hours of fun! Don't forget to provide some clean paintbrushes to paint on hot sidewalks or decking, making shapes, lines, and even beginning to practice letters and numbers :)

A tub of water + lots of fun = tons of authentic math learning!

Have fun! 

Sunday, April 10, 2016

Math Games with Ladybug Wings!

Make a cute ladybug game to practice math with your little ones -  you can play it over and over! You'll be getting in lots of small motor work during the creation of the game, and then, math skill practice with such concepts as one-to-one correspondence counting, matching numerals and the objects they represent, odd and even, etc.


First get some black construction paper to make the body. Use something round, like a cereal bowl, as a stencil to trace around. Model holding the bowl and tracing around, then hand off for kiddo practice :) When that's done, add a small semi-circle at the top for the ladybug's head! Make sure your little guys add some eyes and antennae - whatever materials you all choose! (We did googly eyes and some mini pipe cleaner pieces!)

When you're all finished with the body, help your kiddos use the "stencil" again to cut a big round red circle for the ladybug wings. After tracing and cutting it out, help your little one fold or draw a line down the middle to cut it apart into two wings. Glue them on, overlapping a little bit, so they stick out a little - like real wings do!

Now, comes the game part! Cut out some round black dots to place on the wings. Roll one or two dice and count out how many dots are rolled.

Then, try to put them all on the wings, one on the left wing, one on the right, etc. ... but remember, ladybugs have the same number of dots on each wing! Does the number you rolled work out, or do you have a "leftover"?

Take the dots off and roll again. Each time, practice matching numbers to objects, for counting practice. For a change, use dice with numerals, or cards with numerals instead, to reinforce matching the number with objects that represent it.

Try to remember which numbers work and which don't ... when your kiddos are ready, introduce even and odd ("the odd one out"), as concepts to explain how sometimes it works and sometimes it doesn't, in math!

Laminate your ladybug, or put it in a plastic sleeve, to use a Dry-Erase Marker for dotting - for replaying ease! Remove the eyes and antennae while you're laminating, or look for alternative decorations that will lie flat :)

Have fun!

Thursday, March 3, 2016

Word Problems and Graphing with Goldfish!

Learning math through playful word problems can be super fun - with the right props! Use whatever you want for counting ... reading books about fish inspired us to use pretzel goldfish ... which happened to be in the kitchen cabinet!

To get started, grab a pair of dice, some paper fishbowls, and some yummy goldfish and get ready to play! It doesn't matter which flavor you use - player's choice :)


Players take turns rolling a die and counting out the number of fish into their own bowls. Then, they each take a second turn as you state the problem - "Tommy has 4 fish and he gets 3 more. How many does he have all together now?" This use of typical word problem language, while your child can directly visualize the scene, eases your child into making those connections.

When you have played a few rounds this way and the kiddos are understanding, take it to a new level .... make some fish vanish! Roll again, but this time, it is to take away or subtract! "Sarah had 5 fish, but she ate 2 - how many are left?" Players can keep rolling until all their fish are gone :) Decide on your rules beforehand - ending on an exact roll was one of ours!

If you have rainbow goldfish, you can also practice some math skills by setting up some columns and sorting out the four different colors - then graphing them and using "most" and '" fewest" to describe the amounts. Proper math terms are good to know :)

All of these math skills are goals for any early childhood curriculum - but always, always make it fun - yum!


Tuesday, February 23, 2016

Playdough for the Win!

There are SO many things you can use playdough for - make all of them super fun!!

Small Motor Play
  • Roll it out and cut out shapes with cookie cutters
  • Pinch and pull to strengthen muscles
  • Cut thin ropes with scissors for resistance
Literacy Practice
  • Roll out "snakes" to make letters, numbers and shapes
  • Get letter or number stampers and make impressions in the play dough
  • Use as base for thematic play with sticks, blocks, yarn to recreate a story 
Science
  • Mix up some playdough with your kiddos - make predictions, measure, add, see the ingredients come together
  • Take shells or other natural materials and make imprints like fossils
  • Use small figures of animals, dinosaurs, etc. to make tracks


Sensory Play 
  • Add dry jello to scent it 
  • Add salt to make it gritty
  • Add glitter to make it sparkly
  • Add all to make it super fun!
  • Introduce beads, buttons, or fake jewels to up the interest factor

Math
  • Take a muffin tin, add tape with different numerals written on it to each cup and roll small balls to make the amount in each cup.
  • Make playdough pancakes and serve them up on different plates to give equal portions - one for you, one for me, etc.

Ask your little ones what THEY would like to do with the playdough - they will come up with even more ideas :)

Have fun!!