Friday, April 22, 2011

Start Spring with Eric Carle books!

To get started, gather some books written and/or illustrated by Eric Carle - there is a great list on his website: www.eric-carle.com . Check out similarities, artwork, colors ... go on a few picture walks. Choose a few books to read and show your children that some of the books have specially-cut pages and need to be treated, as all books do, with special care!
I like to tell the little ones that someone named Eric wrote these books for them – and other children! I tell them his whole name and describe how he is sitting somewhere in a workshop/office planning even more stories – right now! I describe the process in simple terms for them and then we get started looking at some of the books – it helps them connect in a special way. (I also tell them that they, too, can be story-tellers or authors!)
“The Very Hungry Caterpillar” is a well-known book that is fun for all ages! (counting and days of the week are part of the book!) 

When you're done reading, make one of these:  (1) Egg carton caterpillars from half of an egg carton – paint and attach eyes and chenille stick antennae.

(2) Thumbprint caterpillars - use as many colors and make it as long as you want! 

(3) Super-simple paper-cup print caterpillars! Use the top edge of a small cup to dip in paint and make your caterpillar -  go over circle shapes, too! 

(4) If you’re really ambitious – here's a multi-part project: Have children paint clothespins to look like a caterpillar. Separately, make coffee filters into butterfly wings by coloring with markers (try for symmetry) and dripping drops of water to make them bleed. Let dry and set aside. Paint paper rolls brown to make cocoons. Make a big deal about putting the caterpillars into the cocoons and waiting – maybe a week or so - but it's hard to wait(!) When the kiddies aren’t around, clip your wings onto the clothespins to make butterflies and roll back up into the cocoons – when you are ready, the butterflies can emerge for the cocoons.
Another favorite,“The Very Lonely Firefly,” is a book with a great message and one kids love – and get! Fireflies are fun to make – paint craft sticks with glow-in-the-dark paint, attach eyes and pretty tissue paper wings – when they are all dry, you can turn the lights off and have your fireflies find their friends!
“The Grouchy Ladybug” is also fun to do with kids – they pick right up on the repeating lines and LOVE to join in -with attitude - on the ladybug’s lines. It combines time of day (the o’clocks) and size (increasing animal sizes) with lots of animal names – fun! List the animals to practice recall - a great literacy extension. Make a ladybug and go over symmetry in nature as a science extension – use a paper plate or card stock and attach wings with a fastener – make sure your dots are equal on each wing!
Check my previous post "I Love Eric Carle!" for more ideas!  Have fun!

Wednesday, April 20, 2011

Kids in the Kitchen: Family Pizza Night!

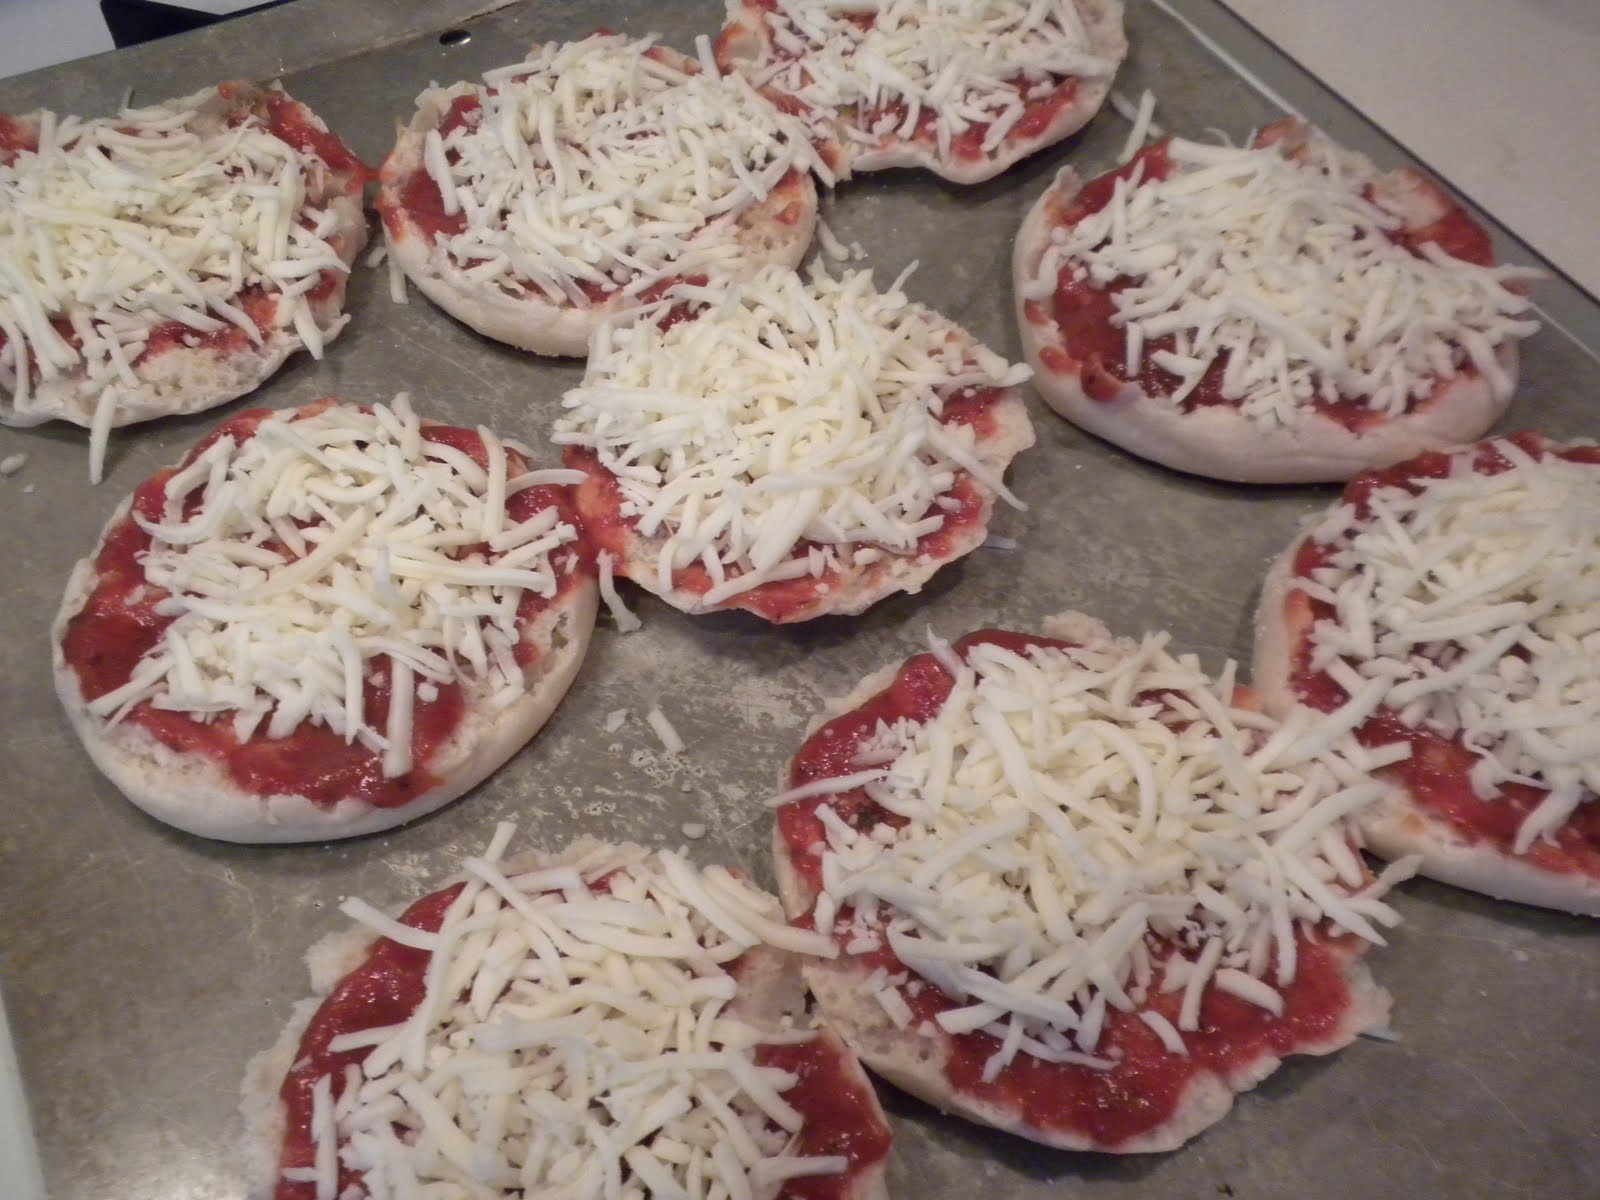
Every once in a while, when the week has been particularly hectic (!), it's fun to have a family cooking night! Try this with some super-simple English Muffin Pizzas!

This is something that you can get your child involved in and they can do just about everything themselves :)


Ingredients are very easy to find:

English Muffins or your choice of "crust"
Pizza or Tomato Sauce
Shredded mozzarella cheese
Toppings (if desired)
Olive oil (optional)

Help your child to split the muffins and place on a cookie sheet, open face up. Have your "chef" spoon a few tablespoons of sauce onto muffins and spread with the back of the spoon. Work in counting and measuring skills as you go! If you want to add any spices - basil, oregano, ... - do this now.
Then sprinkle on a few teaspoons of cheese to cover the top and, if desired, add toppings. Drizzle with a little olive oil and bake in a hot oven (350 degrees) for 10 minutes or until the cheese is melted. (Some chefs like to put under the broiler for a few minutes instead - whatever works for you!) Cool a bit and serve.

Kids have fun doing the basic recipe and even more fun making silly faces with the cheese and toppings - might be a great way to get some veggies in, although pepperoni was always a favorite in my house! Even better is the opportunity to spend time with your child, conversing and laughing - and eating!!

You can extend your meal by making look-alike desserts from dessert shells, whipped topping and berries - complete with more silly faces! :)

There's lots of lessons here: math (shapes, counting, measuring), science (changes from heat) and cooperative working together - but, most of all, language development, social skills and family fun!!

Monday, April 18, 2011

Fiction or Non-Fiction?

While you’re choosing books and reading to your children, you can add discussions of literacy elements as extensions of your stories. 
Talk about the title, the author and the illustrator. Use those words so the child becomes familiar with them. Little eyes light up when you tell them, “A man named Eric wrote this book – for you! His whole name is Eric Carle – can you say that? He has an office where he makes pictures and writes words for children just like you to read! Writing books is called being an author.”
Don’t be afraid to introduce big words – four and five-year-olds are able to distinguish between "fiction" and "non-fiction" books and like to play the fiction/non-fiction game. At the end of a story, ask them about the characters and the setting – “Do bunnies wear clothes?” or “Do teddy bears really talk?” - to prompt discussion of real and non-real, fiction and non-fiction.  Let them figure out which category the book falls into!
Sometimes the illustration style, drawings versus photographs, etc. will give clues about the story, as well.  Discuss the choices made in illustrating the book with your child – they might want to try their own illustration! Extending the story in this way also makes it more memorableJ
Have children play with fiction to make it non-fiction and vice versa. Generating conversation with your child is great for vocabulary building, speech sounds, and verbal expression. Ask them questions like,  “What would the story be like if Corduroy couldn’t get around in the store? Would a book about real snakes be better if they lived in a house and watched TV?”
Pair up fiction and non-fiction books with similar topics and share with your child. Spring is a great time for this – there are lots of baby animal stories and books that lend themselves to spring reading! You could pair up “Hopper’s Easter Surprise” by Kathrin Siegenthaler and Marcus Pfister (dreamy illustrations by Marcus Pfister!) with a non-fiction book about bunnies, complete with real photographs. You and your child could compare all sorts of things between the two and learn lots of science information while you’re reading. Any of Eric Carle’s books about animals – “The Mixed-Up Chameleon” or “The Very Hungry Caterpillar” – would be easy to find companions for in the non-fiction section of your library.
  So, get out there and get reading!  J

Friday, April 15, 2011

Fun Easter Reading!

A sure hit with the preschool set are any of the "There Was An Old Lady ..." books - they are fun to read and so entertaining to look at!

The "easter version" -Lucille Colandro's "There Was An Old Lady Who Swallowed A Chick!" - will be a favorite from the first time you read it with your child!

Preview the book first, noticing the really cool illustrations by Jared Lee. There is lots of detail to these pictures! Have a color hunt through the pages, seeing how many colors your child can pick out :)

Read with your child all the way through the story, enjoying the unfolding of events and the surprise ending!

Later, read again, noting rhyming words and the sequence of the items swallowed - there are lessons built right into this story that are fun to explore!

As you read, encourage your child to recall and join in on recounting the repeating list of "she swallowed the ..."  Hesitate and have them "jump in" to complete a sentence that they may remember. As with any book, let them pick out words or letters that look familiar.

Play with the story -
... try to remember the sequence without looking
... draw an egg, candy, a basket, etc. with your child on index cards and make a game to play, sequencing them in order
... assemble props from your own Easter stuff and act out the story (use a bag or container for the "old lady")
... check YouTube for a story reading
... check the internet for printables to play with

.... and have fun!

Wednesday, April 13, 2011

Make a Texture Bunny!

Make your Easter Bunny a texture project Here’s what you need:
BUMPY-edged paper plates for the body, face and ears (The base of the bunny is two small paper plates, one for his body and the other cut to make his face and ears J)
 SOFT cotton balls for the body
 HARD plastic googly eyes
 ROUGH sandpaper for his paws 
 SMOOTH plastic for his nose (I cut mine from a plastic container top – make it an upside-down heart)
 WRINKLY paper strings for his whiskers (paper Easter grass!)


Put it all together with some glue and maybe a staple under the nose to hold the whiskers on.


As your child assembles this project with you, use any texture words that apply to introduce or reinforce vocabulary! Have your child say the words as he/she touches the different textures to encourage learning!
Have fun with it! Happy Easter!

Tuesday, April 12, 2011

More "Keepers" for Mom!

Frame a Journal Entry
If your child is old enough to draw and “journal,” save a selection and frame it – there are often entries about family or special times - and the pressure of making something perfect will be gone! Look through journals or portfolios and have them select one that they like - either an illustration or handwriting sample, or both! In years to come, it will be so much fun to look back at drawing and writing from years gone by! They can complete the gift with a heartfelt card :)  Happy Mother's Day!


Laminated Handprint
For younger children, my personal favorite (which I still have and use many years later!!) is a laminated handprint coaster. Pick a bright colored paper – construction or card stock – and, using white paint, have your child make a handprint. When the paint is dry, your child can write his/her name (or if too young, an adult can help!) Cut out around in the shape of a circle and laminate to make a perfect mug-mat! You may want to cut it before writing the name, leaving room, if your child’s handwriting tends to wander or GROW!  Then, have the child make a card to tape it in – with the following message:
“In years to come, you’ll use this to rest your mug or glass
And think of how I made it in my little preschool class.
I wish you Happy Mother’s Day and hope you’ll use this well
And know that I do love you more than I can tell!”

It's a KEEPER!

Monday, April 11, 2011

Keepers for Mother's Day

From the time your children start school until they go to middle school or high school, you are presented with cards, gifts, art, crafts … for every occasion. I used to save everything – in plastic tubs, large mailing envelopes, shoe boxes, etc. Eventually, I was feeling overwhelmed by the pile that was developing in the attic – AND, I never looked at the stuff again!
I noticed, as my own children got older, that simple handwriting samples from years gone by, small keepsakes and sweet handmade cards are easy to store away and peek at from time to time – and that those were the things that my own mother had kept - for a LONG time!
 When you know that a child spent time, talent and energy putting a little bit of themselves into a project, you value it more than a pre-cut, purchased craft or something that was primarily done by an adult helper  - so, keep that in mind when choosing your Mother’s Day projects!
Think of a few past projects that ended up being “keepers”! Teach your children about giving – simple gifts are lovely– and don’t forget about yourself!  Trade children with a friend or have another loved one work with your child to make a gift for you – it’s important that they learn about showing love and appreciation J
Mother's Day Bookmarks
Use card stock and a nice font on your computer to make the beginning of a bookmark – “I love my mommy because …” and have the child dictate an ending, in their own words. Then, flip it over and have them write their name, make thumbprints or personalize in some way. Laminate it, punch a hole at one end and have them help you loop a pretty ribbon through it!


Mother’s Day Portrait
Draw, paint, collage – a “Portrait of my mom”: Use whatever materials you want to make a whole-person drawing or a face, adding details like eye color and hair style, and see where it goes! It will no doubt be adorable! Add dictated information, such as a fill-in-the-blanks information sheet:
My mom is pretty when she ___________________.
I love it when my mom ____________________________.
My mom always says, “_______________________________”.

You can attach it to a decorated frame or bind it all into a card format, folding over a large piece of construction paper! Some of the answers are hilarious … some adorable! Have fun with it!

Stay tuned for part two: more gifts to come ...