Pages

Sunday, December 11, 2011

Holiday Snowglobes!

I saw these adorable snowglobes hanging up in school the other day outside my friend Kelly's room, and they were so cute I had to try them out!


So easy ... have your children make pictures of something to do with the holiday - mine shows a Christmas tree, complete with gifts! Then, have them color it all in with crayons or colored pencils to resemble the color of water - light to medium blue - or try some silver snowflakes in the "air"! When the picture is complete, find something round to trace around it and cut out a perfect circle. Use a scrap of black construction paper to make your stand and glue it all on contrasting paper. The result is so cute!

Use it for a festive decoration or as a writing prompt to encourage a story about the holiday ahead! Wishing and hoping are part of the seasonal fun - maybe your little ones will draw their wishes inside the globe :)

Have fun!

Saturday, November 26, 2011

Get Ready with a Holiday Countdown!

It's so hard for the little ones to wait for the holidays, especially once it gets to be December! Help them out with a "Count-down Chain"!

Take construction paper in holiday colors and draw some lines for cutting - make them about two inches wide. No construction paper? - no problem! Find some nice, glossy magazine pages and turn it into a recyclables craft :) You will need 25 strips if you're counting until Christmas, starting at the beginning of the month, or one strip for each day left - the 15th is a great day to start for Christmas with only 10 days left! 

Depending on which holiday(s) you’re celebrating and how many days you want to play, you can make your own rules! Have your children cut on the lines, giving them excellent cutting practice! Turn each strip into a loop with tape or staples, alternating colors, and add new strips by threading through the loop and fastening into another link.

When you are finished, hang your chain up and each morning or evening, take off a link and count “how many days left?!" Lots of counting practice for your little ones!


While you're waiting for the holiday to get here, try this - pattern math with decorative bows! Fill a basket with colored bows and show how to start a pattern. 

Side by side play works best for this ... or direct modeling :) You could even make some poster strips with color patterns. Your children can match the strips, see "what comes next" for sequencing practice and form their own patterns with these festive bows!

Have fun!

Wednesday, November 23, 2011

Turkey Time!

Happy Thanksgiving!

Here's a short list of things to do with your kids:

1. Give them jobs to do to help prepare for the holiday: teach responsibility through small chores and jobs. Setting the table, counting out silverware, greeting guests and taking coats are all small tasks that will help your child feel included in the festivities.

2. Make a centerpiece! Take some natural items that your child can scavenge from the great outdoors - pine cones, berries, small rocks - and add to a large vase or glass container. Set in a large pillar candle or some votives, making sure that nothing is near the flame. Your child will be thrilled to help!

3. Design some placecards! Grab some card stock or heavy paper and some art materials and have your children practice writing names! Give them a list of who will be gathering and let them design some stand-up cards to place around the table. Stickers or stamps and ink pads would be cool, too!

4. Play some old-fashioned games when the feasting is over! Simple games were played even by the Pilgrims - rolling hoops, tic-tac-toe, checkers - spend some time on something that's not plugged in and have a great conversation with your child!

5. Go for a walk! After your fantastic feast, while you're "making room" for dessert, get out and go for a walk around the block or down the street!  Get some exercise for the whole family :)

Have fun!

Monday, November 14, 2011

We Like Leaves!

Got leaves?? Try these activities!!

1. Leaf rubbings: This is magical! Children LOVE to see what will come through the paper and they want to do it again and again. You need an assortment of leaves, lightweight paper (copy paper works well!) and crayons with the paper peeled off. Put a leaf under the paper or in a piece of folded paper and use the side of the crayon (not the point) to rub firmly back and forth - and watch the magical process begin!


2. Leaf prints: Use your leaves as beautiful printing tools ... paint lightly and carefully all over a real leaf and then press in a folded piece of construction paper - it will make a work of art! Trim away the extra paper and frame or attach a hanger to it!


3. Suncatchers: Pick out your favorite leaf (it's hard!) and put it under a heavy book or object to flatten it out a bit. Then use a piece of clear contact paper to stick it to and another piece to cover it. Once it is all pressed out with no bubbles, trim around it, making a circular shape or following the edges and attach a bit of coordinating ribbon or yarn to hang it up with. The sun will shine right through it!


4. Patterns: Cut out some paper leaves to make patterns with - try different colors and different shapes - easy patterns and more complex ones. Let your children come up with as many patterns as they can think of!
Make a magnetic set by laminating or using clear contact paper and attaching magnets to the back. All you need is a magnetic surface (fridge?) and you're all set!


5. Sequencing strips: use your paper leaves to make sequences on long strips of paper. Math skill alert - leave room at the end to finish the sequence!

6. Tracing: Put a whole pile of leaf patterns cut from cardboard or cereal boxes with some paper and colored pencils and watch some cool art emerge! Children will begin with tracing (great for small motor practice) and then begin experimenting with overlapping and coloring in!


Have fun!

Sunday, November 6, 2011

The Mitten: Compare and Contrast

I am a huge fan of Jan Brett - her illustrations are amazing - their attention to detail and all the background research she does to make her designs authentic make her books unique and captivating! Jan leads her readers through her books with side panel illustrations that show what happened on the page before and what is coming next! Each page is extraordinary!

I have used many copies of her book, "The Mitten," over the years with all ages of children - from little ones in Preschool all the way to older students in primary grades.  There are so many lessons that can be planned and shared around this timeless story... you can focus on the parts of the story, beginning, middle and end, as well as on the use of descriptive, interesting language. Examining stories and discussing them helps children learn what makes a great story so that they can use these strategies down the road when they begin writing.

"The Mitten" is actually a retelling of an old Ukranian folk tale - I have another version by Alvin Tresselt that I like to use with my children to compare the different versions of the story. We chart how they are the same and how they are different, which animals appear in each story and in which order. They take so much interest in the story and get so involved in checking out all the details!

You can find lots of resources on the internet to use in retelling each of these stories - coloring cards and outlines to make all sorts of mitten projects. There are great black-line illustrations for the Jan Brett version at http://janbrett.com/put_the_animals_in_the_mitten.htm. I couldn't find one for the other version but it would be fun to make!

Have your children work on a way of retelling each story and ordering the sequences of events - it helps them with comprehension! You could do a comparative sequencing with character cards or a Venn diagram to sort it all out - all have met with great success with my kids!

Have fun!

Monday, October 24, 2011

Halloween BINGO!

If you're looking for some not-so-scary fun for a Halloween party, try this idea! Make a BINGO game with Halloween symbols to play - great for matching, visual discrimination, and following directions.


Begin with a blank document and set up a five by five grid to form the outline of a BINGO board. Then, download at least 12 images of Halloween-related clip art to fill in your grid - I used each one twice! (For little ones, you could make it even simpler with a 3 by 3 grid.)  Make one board and then move the images around to make alternate boards, saving each time you have a new one set up. Make multiple copies of each - it doesn't really matter if two children get the same board! Copy the images into another document and enlarge to make cards for the BINGO leader to pick and call out.

Have your children use markers, coins or any small objects to play - maybe candy corn would be fun!! Multiple sheets and crayons would work, also - have the children "x" out the pictures as they're called.

While you are playing, you will be working on taking turns, focusing on the speaker and developing new vocabulary! Since there are no words on the cards, you could also have even the smallest students call the cards! They will LOVE it!

Have fun!

Wednesday, October 12, 2011

Make A House to Teach Addresses and Phone Numbers

While you are going over Fire Safety this month, be sure to check for knowledge of addresses and phone numbers. It's a safety lesson that is sure to come in handy sometime!

Try this: take a small paper lunch bag, fold the top(where it opens) into a triangle and secure with a staple or glue. Fold the bottom up so it now resembles a house shape and draw a roof line.


Have children decorate with doors, windows, etc. - they can get very imaginative with some markers! Flowers, trees and all kinds of decorative features can be added - they might even want to draw themselves in the windows!

Then, on the inside of the fold, attach an index card programmed with their home address and phone number. Use this for a little memory game - check the information, close the flap, have your child try to recall ... practice the number of the house, the phone number, the street name ... until your child can repeat it back to you.

Then, if they should ever have to give an address or tell their phone number for safety reasons, they will be prepared :)

Be safe - and have fun!

Monday, September 12, 2011

"All About Me" booklets

The first few days of school can be overwhelming - for everyone! To get to know your students, have a multi-day project ready to work on where you can pull students one-on-one and have them dictate words to go with some fun pictures!


Make an "All About Me" booklet, using half sheets of paper with specific prompts, one a day, such as ...

My name is ________________.

The people in my family are ____________________.

I am ______ years old!

I like to eat ________________ and __________________.
My favorite story is ________________________.

The toy I like to play with is __________________________.

... and leave space on each page to have them draw a picture to correspond with what they tell you :)  Make some copies of a cover and let them do the design work to individualize it!

When the days you have allotted are up, you will have new knowledge about each of your students, as well as some great information about their speech sounds, small motor development, attention span, verbal ability, etc. ...   and they will have a BOOK!

Win, win! Have fun!

Saturday, September 10, 2011

Name Games

At the beginning of each school year, getting to know your students is always fun ...  now add some digital photos to help them get to know each other!

Even before your younger learners can read names, they can begin to recognize photos and start associating them with the letters of the names connected to them!

Start your new school year off with a quick close-up of each student (get permission from parents!) and use it to label various things in your classroom. A check-in board is a likely first place ... and a helper chart! Attach a photo to placecards before laminating and you'll have your students sorted out in no time! Friends will be excited about identifying each others' names and helping them find their seats :)

Later on, set up a box of letter tiles (available at office/teacher stores or use old Scrabble tiles) and namecards with photos. Children will enjoy figuring out which letters make up each others' names. Use this to launch a center which later can graduate to include basic sight words and vocabulary, also using photos or illustrations - it will be a big hit!

You will find lots of other uses for these photos through the school year - have fun with it!

At the end of the year, take another photo and pair them in a project to show how much growing has taken place!

Thursday, August 25, 2011

Back To School!

September means back to school at our house - some areas are back already - so it's time to put away the summer lifestyle and get ready for school days! Here are some things you can do to help your child get ready:

1. Start adjusting bedtimes/wake-up times if they've changed a lot in the summer holidays. Small shifts over time work better than ... WAKE UP!! out of the blue 😉

2. Think about the volume of communication that will be coming home shortly and come up with a way to handle it quickly and efficiently ... a binder, basket, magnet clips ... whatever you think will keep things organized and at your fingertips. Try to return papers as they come home to avoid build-up and stress!

3. Check your school's website for calendars, supply lists, reading lists - many schools are going paperless and there may be useful information posted already! Any information you have ahead of time will make the transition into school easier.

4. Work out a morning routine, complete with a schedule and expectations, and get your child involved in setting it up - the best way to avoid those early morning melt-downs is to have a clear picture of what needs to happen and then, to follow through - start the year out as you want it to continue.

5. Come up with a short list of lunches/snacks that will work for your child and try to keep options stocked and available as your fall-back when you're not feeling creative and you don't have a plan - keep it simple!

6. If you haven't seen school friends all summer, set up a lunch or play date with a friend or two to ease the way back into school - comfortable children always do better in school :)

7. If you've slacked off reading and writing during the summer, begin reintroducing short periods when your child can spend some time engaging in these activities and reconnecting with the elements of literacy.

8. Chances are that your children will be asked to draw and/or write about their summer when they start school - generate some ideas through discussion, so they can feel confident about their first assignments. Have them reflect on photos or play "remember when..." to get them started.

9. Stamina can be an issue after a long, lazy summer - get moving and walk, bike, run with your child to increase their (and your!) stamina for those longer periods of time when they will need to focus.
* This would be a great time to cut back on the screen time :)

10. Positive statements about school, friends, teachers, experiences will help your child look forward to the days ahead - focus on the positive instead of dwelling on the end of vacation and you will be happy when your child is happy, too!

Enjoy! Have fun!

Wednesday, August 3, 2011

Books to Love: "The Little House" by Virginia Lee Burton

Virginia Lee Burton's "The Little House" is one of those books that has been around forever but still captivates new readers every year! It was first published in 1942, but seems timeless - even as it lays the groundwork for some cool history lessons! I loved it as a little girl (a long time ago!) and I love it now!


Make sure to preview or review the illustrations in this book - they are charming and such a large part of the story as a whole! I swear that the house looks like it has a face - and, in fact, the house IS the main character in the book. The theme of curiosity, on the part of the house, leads the readers into the developing story, and their own curious natures will be looking ahead for "what-happens-next!"

Children will be fascinated by the changes in the same old scene, as the days, nights, seasons and years pass. They will see for themselves how the old saying, "The grass is always greener ..." is proven false, as the city encroaches on the little house in the country. Depending on their age and experience, great discussions about the balance between progress and protecting our environment could take place - "progress" is another theme of the story.

There are so many different lessons contained in the text and pictures - changes in clothing, transportation and types of neighborhoods, cycles of day and night, seasons and years - every time you pick it up you can focus on something new!

For an extension activity, use a cutout of a "little house" as a picture-starter. Make available different colors of construction paper in smaller pieces to be cut into shapes for doors, windows and shutters. Use larger paper for mounting the house on and have LOTS of art materials to create the scene of each child's perfect "little house." Have them include things that they think would make it perfect ... after brainstorming and listing! Maybe they would like a pool or a swing, as in the story, or something else!! Have them dictate or write the response to "My Little House would have ..."

For a seasons lesson, divide large paper into four, with four little houses, and have the children decorate accordingly ...leaves sprouting, sun shining, leaves changing, snow falling, ...

If your reader has a great imagination, have them take on the "personality" of one of the big buildings toward the end of the story and tell a story from the building's point of view! Stretch those story-telling brains!! Make sure to illustrate it, as well :)

Have fun!

Monday, August 1, 2011

Character Book Bags

Plush toys that represent characters from books that kids love are so much fun! Curious George, Clifford, Franklin, Madeline, Babar and Mouse (from the Mouse and the Cookie books) are all currently in my collection, to name just a few! Children love to hold them as we read books - it makes reading personal and gives them a tactile connection to the story!


Here's a fun idea that I've done in the past - maybe your kids would like to try it, too! Choose a character that is a favorite with your children and gather up some of the stories that go with that character. Begin a notebook that records the character's adventures while he is "visiting" your house - it might say "Curious George came for a visit today and we decided to make it a beach day! We packed up all of our beach toys and headed off - George made sure to buckle his seatbelt in the car ...." (Have the story dictated by your child  and make sure to read some books that go along with your character, for background.)

Then, when your visit is done, pack it all up - character, notebook and books - in some kind of bag, suitcase or backpack and pass them along to a friend. Have your character spend a night or two with a few different friends, following the same process, and eventually come back to see you again - you'll have fun reading all about his adventures!


Some friends might like to include photos of his adventures - my "Curious George" visited zoos, stores, beaches, the firehouse ... he was strapped into carseats, strollers and tucked in at night ... the opportunities are endless for traveling about! Use your imaginations!

Other friends might like to draw a picture and illustrate the "adventures" of whatever character you choose to travel around. Get some cutting and gluing practice in if you're adding something to the travel notebook and you might attempt a few letters or words of your own story, if you're able! You and your friends will be the authors of a fascinating travel book when you're all done - then, do it again!

Have fun!

Tuesday, July 19, 2011

Simple Travel Games

If you have a car trip ahead of you this summer (or any time!), check out these simple travel game ideas!

To get started you will need:

Plastic Sheet Protectors (I Love These!!)
A clipboard (kids love clipboards!)
Dry-Erase Markers


To play the Traffic Sign Find Game, find Clip-Art of different traffic signs that you might see on your travels - make them up into a page and make as many copies as you want. Insert in a plastic sheet, attach to a clipboard and, as each new sign is sighted, the player will check it off with a big X!! It keeps them busy and helps with visual discrimination. You can sneak in a little math by counting how many signs found? how many left to find? and by discussing shapes and colors! When you've found them all, just erase with a swipe of napkin or tissue and start again!


Use the same format for the Letter Find Game!! Make up a sheet of letters - you can make them all upper-case for beginners or change up the cases and fonts if your children are a little older - and follow the same procedure! Check road signs, store signs, even signs on trucks, etc. ... some letters are REALLY hard to find!!


A blank piece of white copy paper inside a sheet protector can also serve as a write and wipe board for practice of letters, numbers, names - or for drawing on!! Your children will come up with all kinds of uses!!

Have fun!

Wednesday, July 13, 2011

Summer Camp: Pirate Play!

Playing Pirates is always a BIG hit - with boys and girls! Gather some props to make a pretend pirate ship - a large box to decorate would be great, but just arranging some chairs together and tying on some black streamers or fabric to connect them will give your children a place to gather! Add a paper-plate ship's wheel  and they will be set to go!

Get in a bit of geography by having a globe on hand and spinning it to choose where you are setting sail for. Have the children find "home" on the globe as well! If there's no globe available, a large map will do :)

Every pirate needs a spyglass, so each child should start out with a paper towel tube and decorate accordingly - use markers or stickers to make them really cool! There are lots of clip-art pieces on Google images to try out - pick a few and assemble!

If you have any eyepatches lying around, or other pirate regalia, put them out in a dress-up bin - try some all-purpose vests turned inside out and some old shirts cut with ragged edges to make pirate gear! A sash cut from red and white striped fabric or an old scarf pulls the whole look together!


For more crafts, supply a key with simple mapping symbols and paper and markers for the children to make some maps - don't forget a big X to mark the spot where the treasure is!  If you're looking for more fine motor practice, you can find free pirate coloring sheets at several sites on the internet, as well!

Before all the fun begins, come up with a "treasure" to be split between the pirates - beaded necklaces from the party store and "gold" coins work well - and hide it all in a special container somewhere. Then, devise some clues that will guide the group from place to place, each time to find the next clue until the end of the hunt! Here are some to get you started:


Treasure Hunt!
Cut these clues apart and hide them as directed – or make up your own!


Under the fence where the squirrels run                        (have this ready to start the action!)
Look for clue #1!


Find a toy that’s the color blue – that’s                                   (hide this under a fence!)
Where you’ll find clue #2


Look around the base of the big tree                                       (hide this under or near a blue toy!)
If you’re looking for clue #3


Beside a window or a door,                                                  (hide at the base of a tree!)
You will find Clue #4


Look under a rock or two                                                     (hide beside a window or door)
To find the fifth and final clue!


This clue will send you around the lot                                         (hide under a rock)
Until you find where X marks the spot!

 (attach a rolled up REAL treasure map to the last clue -  ready to point out where you’ve hidden your “treasure"!)
 

If your treasure includes some gold coins, get in a little fun "arrrr"ithmetic - counting and adding up sums!

For snacks, try some "treasure" goldfish crackers in silver cupcake papers or some pretzel logs and fruit roll-ups cut up to form into a pirate ship - fun!

Books to read with your little pirates:
"Shiver Me Letters: A Pirate ABC" by June Sobel
"How I Became A Pirate" by Melinda Long
"The Night Pirates" by Peter Harris
"Tough Boris" by Mem Fox
"Grandma and the Pirates" by Phoebe Gilman
"What's Inside a Pirate Ship"

Have a great time!

Monday, July 11, 2011

Summer Camp: Knights and Ladies of the Castle!

Get ready for this week's camp idea by assembling a few arts and crafts supplies: some cardboard, markers or paint, some craft foam and writing materials.

Set up some props to center your activity, either outdoors or indoors. Mark this area by hanging some sheer fabric or paper streamers or use my idea - take a 10' by 10' outdoor tent canopy (borrow one if you can) and only raise it up to half-height. This makes a perfect castle area for pretend play, after you hang a few decorative flags and some streamers! You might want to designate one or two special chairs as thrones and have some space for craft assembly and "fine dining."

Of course, dressing up is always fun - see what you have in the way of royal garb and add fabric or towel cloaks, if needed. Jewels, such as party-store rings and beads of all colors go over well, also :)

For crafts, start with a crown or tiara for your young royals. Every prince or princess, knight or lady likes a crown! Use light cardboard or craft foam to prepare some crown shapes beforehand (or order from a catalog supply) and then make available some glittery baubles and colored foam pieces to make them sparkle. It's always interesting to see who will make theirs a repeating pattern and who will go for "more is more!"


Making a shield with your personal crest is next on the fun craft list! Cut some small shields out of cardboard with long rectangular strips to be mounted on the  back for holding. Decorate as you wish with your favorite things - symbols, initials, cut-outs, stickers, whatever you want! Stripes of different colors or contrasting colored tapes could also be fun! When you have it just the way you want, turn it over and attach your handle - now you're ready for anything!


When you're ready for another activity, story-telling is an old favorite "at court." If you want to use props, you could use paper cut-outs, or copies from your favorite stories (mount them on a craft sticks for puppets) or maybe you have a set of finger puppets lying around - I've had these for a long time (IKEA has great little finger puppets!).

Lastly, write your own fairy tale!  Draw or copy some pictures and have your children dictate a beginning, middle and end of a story - make sure there's some action (maybe a witch or a dragon!) and a happy ending ... and dress it all up with a special cover - it will become a new favorite!

When it's time for snacks, serve your royals on a silver platter - maybe some fancy cheese and crackers and a bowl of fruit - with lovely napkins and a special cold drink! Have fun!

Thursday, July 7, 2011

Summer Camp: Pretend Camping!

When the summer starts to get "old" for your kids, here's a do-it-yourself fun idea: hold your own summer camp days, right at home!

All you need is a little pre-planning and some imagination - start now, while the fun is still fresh and plan ahead for later in the summer!

In the past, I've held camp during August (basically crafts, games, stories and snacks!) - parents and children were looking for things to do by that time of the summer! Plan a morning full of activities - you could even switch off with another parent or two to free up some me-time!! It's always more fun with a few:)

I'll start you off  with ideas for a theme that worked well for me - and follow up with more themes in more posts - so, check back!

Camp-In Day

Set up a small tent outdoors (or indoors!) and gather up some quilts and cushions. Make sure you have the fixings for a pretend camp-fire - I found a little aluminum baking pan that we adorned with yellow, orange and red tissue paper flames - some rocks or wooden blocks placed in a circle with some sticks in the middle would do nicely, too!


Meet around the "campfire" to get started - talk about camping and outdoor fun - then go on a little "hike" through your yard, neighborhood or a near-by park. Have a small plastic container along for a sensory tub to be filled with rocks, pinecones, leaves, small sticks, etc.

When you are finished, have a basket of books related to camping available :)  There is a Berenstain Bears book - "Go To Camp" and a great Kevin Henkes story "Bailey Goes Camping" to get you started! While some are checking out books, have the other children rotate through different activities, just like in school, so each child gets to try everything!

For crafts, have available some TP rolls to make into binoculars for viewing nature. Use paint or markers to color or have stickers available to decorate. At another spot, have some sturdy paper and glue to turn your nature finds into a cool art collage! Get a little letter/sound practice in by trying to label the found items! For pretend play, gather some plastic plates and picnic items and they will do the rest!

For a snack, try some trail mix (cereal mixed with raisins and nuts, if permitted) OR assemble your own kid-s'mores, using graham crackers with layers of chocolate cake frosting and marshmallow cream spread on top! Have water or juice available to stay hydrated!

Knowing how kids love "souvenirs," you could also find some tiny compasses and bandannas at a party store or on-line catalog! When you're ready, you can close the "camp" by singing some favorite songs around the fire! Have fun!

Friday, July 1, 2011

Summer Fun!

Surfing around the "blogosphere" is a great way to come up with some new ideas - and some motivation! When the summertime first begins, it's easy to forget about deadlines and timetables and just kick back ... but then, sometime down the road into summer, I always regret the time and opportunities missed for some learning fun!

This year, I decided to start a running list of fun things to do that would keep a child's skills active ... here's what I have so far: (and I "borrowed" extensively from other blogs, but didn't keep track :( - if one of these ideas is mentioned in your blog, or you have an idea to add, please add a link in comments with your URL! Thanks!)

1. Write the story of yourself ... with illustrations! Staple together some computer paper and make a cover - then fill in the pages with your OWN biography ... start with you as a baby and add in some of your big milestones - use photos or drawings and some labels or sentences (written or dictated!) - it will be a KEEPER!

2. Make some mail and send it - a card for a far-away cousin or someone having a special birthday! Draw, cut, glue - make it interesting! In fact, you could get some cards done now for future birthdays and set them aside for mailing later :)

3. Design a new project or toy - save your recycling for a few days and brainstorm what sort of art project you want to do - maybe you will use different objects to print-paint or use some craft glue to assemble something really awesome!

4. Make a summer dessert - ask a grown-up to help you measure, cut and mix things to make something tasty to eat! Dividing up some graham crackers and chocolate bars for S'mores could be math practice!! Work in some counting and some planning skills!

5. Read a book - with a friend! Find a buddy and get two copies of a book - try the library or trade with a neighbor - then read and get together to discuss. You could ask each other questions or just share your favorite part!

6. Make a map of your neighborhood - use some markers and pictures or magazine cut-outs and plan out the roads and buildings in your area ... use symbols, shapes, lines, etc. to make it cool!

7. Take a container and find all the loose change in your house - put it all together and then COUNT it all up - divide it into different coin piles, make patterns with the coins, towers of coins - and then figure out what to do with it all!

8. Make a collage of all things you LOVE - take some magazines and look through for foods, toys, colors, activites, etc. and take time cutting and gluing them all on a piece of paper or cardboard!

9. Read a book about something NEW - go to the library or bookstore and look for something you haven't read about - nature stories, space, people from sports or history or maybe a different culture - fiction or non-fiction!

10. Make your OWN list of fun things to do - check your newspaper and local websites - use your imagination and HAVE FUN!

Saturday, June 25, 2011

Eric Carle's Birthday Bash!


All kinds of fun from my friends at "An Amazing Child" - they have set up a link to gather ALL these great ideas - check them out!

Thursday, June 16, 2011

Calendar Play: What Day Is It?

Learning with the calendar is a great way to focus your children's attention at the start of a lesson or as part of your daily routine. Many of the topics covered in the early years are naturally related to times of the year, seasons and holidays, so it makes sense to put them in context. There are so many things that the calendar can help you get started on ... and, your kids will take it from there! Mine have often been found "playing school" with the calendar as the center of activity.


Along with a Daily Schedule, it gives them a framework for expectations (two more days until our trip, three school days until the weekend, X's birthday is coming up, etc.) and allows them to begin ordering things, beginning on the road to organizational techniques. Giving them jobs that relate to the calendar - numbering the days, choosing a pattern, using a pointer to read the numbers and days of the week - all promote good learning and literacy practices!

Daily, go over:
Days of the Week - follow left to right progression, just like reading!
Months of the Year - beginning sounds get a work-out here!
Seasons - work in proper dressing, weather!
Related Holidays - share knowledge about each others' holidays!
Counting Up - practice any time you can! At the end of each week, practice moving down to the next line, just like reading :)

Play "How many more until... (fill in the blank!)" or "What day starts with /m/?" to get in some math or beginning sounds work, which will be seamless and organic to the activity. Use this time to introduce different forms of Patterns (AB, ABC, ABB etc.) - and have the children predict and participate in "what comes next?"

For more math practice, work in "Counting Down" to just about anything - the weekend, a special activity, a holiday - and "Counting by twos, fives and tens" as they are able. (I use different colors to denote the breaks when we are headed this way!)

As you work with your calendar, you will find many more uses and ways to build on the experience - and your kids will, too!

Have fun!

Tuesday, June 14, 2011

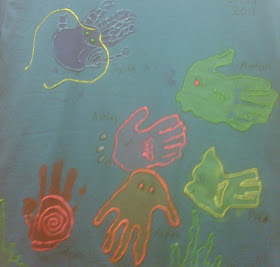
Under the Sea Handprints


Love, love, LOVE this end-of-the-year project! This is a close-up of a t-shirt that has a lot of person-ality in its design! My friend, Mary Ann, and her wonderful helpers, Tammy and Jean, were looking for a fun end-of-year keepsake, so this is what they did in their preschool class. Each little person in the class made a special handprint with paint on each little shirt. Then, with a little imagination and some fabric paint, they were all  transformed (Tammy's the artist-in-residence!) into a variety of sea creatures - one shirt for each child :).  I see a snail, a stingray, a jellyfish ... as well as some beautiful, colorful fish and seaweed!

This concept would transfer well to a cloth bag for a sweet gift, or even to paper for a fun craft project. Use it as part of an Under the Sea unit or for a party craft - have fun with it! Ask your children to interpret what they see in different handprints or shapes and add some touches to make them unforgettable!


There are so many great books to use for an Under the Sea unit! One of my favorite authors - Marcus Pfister - has a series of "Rainbow Fish" books that are fabulous for their lessons - themes of friendship, sharing, inclusion - and for their beautiful artwork! These are anytime books, but especially fun to read as it get closer to summer - have fun!

Monday, June 13, 2011

Pretend Play: Dinosaur Lab

I love a great Pretend Play Center - change your kitchen/housekeeping area up every so often to keep the fun fresh and to stimulate more verbal interaction between the children! I've seen/done Kitchen, Hospital, Doctor's Office, Vet's Office, Pizza Parlor, Bakery ... but here's one I just saw a few weeks ago:

Pretend Center: Archaeologist/Paleontologist's Lab

I stopped by my friends' classroom - Mimi and Merrie - and they had this fabulous center up and running - it was a great favorite with the kiddies!
Here's what I observed: A table covered in craft paper with textured stencils taped down to do dino-rubbings; Bones (dog chews) and paintbrushes in sand for finding and preparing for "study"; Fossils made from plaster-of-paris (could be play-doh or other modeling clay) for examining, and more modeling clay and small dinosaurs for creating "fossils".

There were many dinosaurs on display and props to get in the mood: "Lab Coats" made from old adult-sized white shirts, with labels; Magnifying glasses and plastic lab/safety glasses; Charts and dioramas identifying all different dinosaurs, with pictures and labels.
Books in the library were also theme-driven! Include some great dino-books in yours - there is an Usborne Book of Dinosuars and a few younger non-fiction books by the Berenstains "The Day of the Dinosaur" and "The Biggest Dinosaurs" in my collection - and of course, some wonderful fiction books, like Jane Yolen's "How Do Dinosaurs Say Good Night?"

In this dino-center, there was much exploration going on - lots of questions asked and answered, lots of engaging pretend play! And, as always, along with the play ... tactile exercise, verbal exchanges, matching, sorting ... all sorts of learning was taking place! Thanks for the inspiration, teachers!

Wednesday, June 8, 2011

Learning With Leo Lionni

There are MANY great books by author Leo Lionni which continue to be a valued part of many teachers' libraries, even though they are not new books - the books below were first published between 1960-1975! Wonderful, beautiful picture books (some Caldecott winners!), they also deliver powerful messages - some may be favorites you remember from your own childhood!

 If you're looking for books that have lessons about friendship, bullying, sharing, etc. - this author is one to look for! Read each on their own or as part of an author study group! Here is a short sampling of some of his books:

'"Swimmy": Swimmy gets a group of fish to swim as one to scare off the big fish that has been scaring them.

"Fish is Fish": A fish wishes he could go on land like his friend and see all the wonders of the world, but, when he tries, he sees that his own world was actually the most beautiful to him.

"Frederick": Frederick shows his friends the value of words, thoughts and poetry when they need some inspiration.

"A Color of His Own":
A chameleon finds out that having a friend to share with is better than having his own color.

"Inch by Inch": The inchworm outsmarts his enemies by talking and using his ability, measuring, to get away from threats.

With each book, take time to explore the pictures, which are full of color and texture - Eric Carle counts Leo Lionni as one of his great influences!

Read and re-read - explore the messages that are presented, as Leo Lionni gives each animal character human situations or dilemmas to work through - talk about these "problems" and "solutions" with your children - use them as jumping off points for discussions about events in their own lives. Make your reading time a time for sharing, also!

When you are ready to do some crafts to extend these stories, check these out:

"Swimmy"
Make a large fish out of posterboard or craft paper. Have children use a stencil or sponge (or any way you want!) to make many fish within the big fish - or have a whole class each stamp a fish and supply one dark-colored one for an eye! All will work together to make one!


"Fish is Fish"
Supply fish cut-outs to children and have them glue on larger paper and design their own fish-kids! Add arms, legs, clothing, hats - use your imagination!!

"Frederick"
Write a poem together on large paper - dream up a list of descriptive words and phrases and try to re-create a favorite place or feeling!


"A Color Of His Own"
Have your children draw an outdoor scene. Make a cut-out of the chameleon from the story from posterboard and have the children trace him into their picture when they are finished. He will be a perfect "hidden" chameleon! Add a dictated or written sentence about the child's chameleon! If you're doing with a whole class, you just might have a new favorite class book :)

"Inch by Inch"
Make a six-inch worm to use as a unit of measure. We used a large-sized craft stick (just about 6-inches!), pompoms and googly eyes - see what you have on hand! Then measure away!! (This paper is two-worms long! This table is six-worms wide!)


Have fun!